大家好,又见面了,我是你们的朋友全栈君。
使用软件:Halcon18.05(默认安装好任一版halcon)
使用设备:Intel Realsense 435+AUBO机械臂
完成功能:相机标定、eye-in-hand手眼标定
1.准备标定板
1.1如果没有标定板:
1.1.1窗口–打开算子窗口–gen_caltab
设置XNum,YNum—圆点个数,X和Y方向圆点个数
圆点直径=MarkDist × DiameterRatio
间距为MarkDist(单位为米)
caltab.descr是标定板描述文件
caltab.ps为标定板生成文件,没有ps用Adobe PDF打开就能看到如下图1-2所示的标定板,可以直接打印。
如果买了标定板直接用标定板的数据就行,但还是需要用这个生成一个标定板的描述文件,也就是caltab.descr
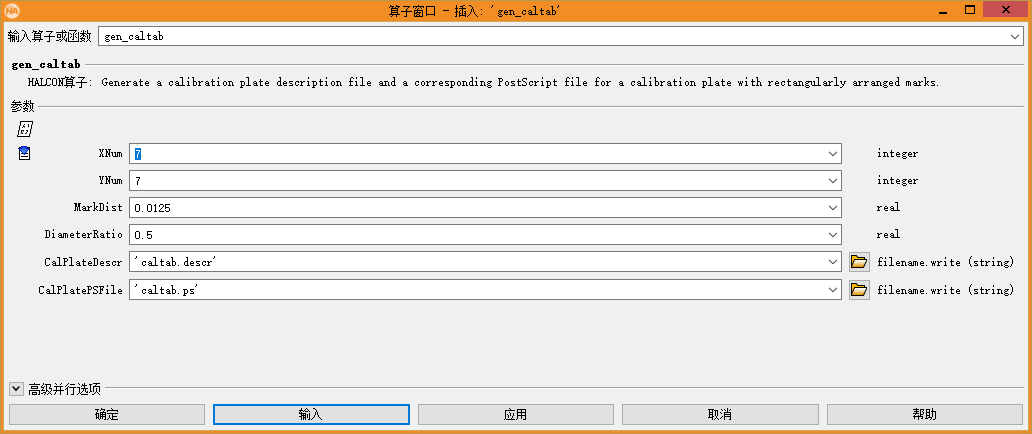

点filename.write可以看到保存路径
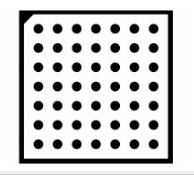 图1-2
图1-2
1.1.2.点插入,运行,在刚刚的保存路径下找到生成的caltab.descr
1.2有标定板
按照已有标定板尺寸生成caltab.descr——标定板描述文件,之后操作与1.1.2相同
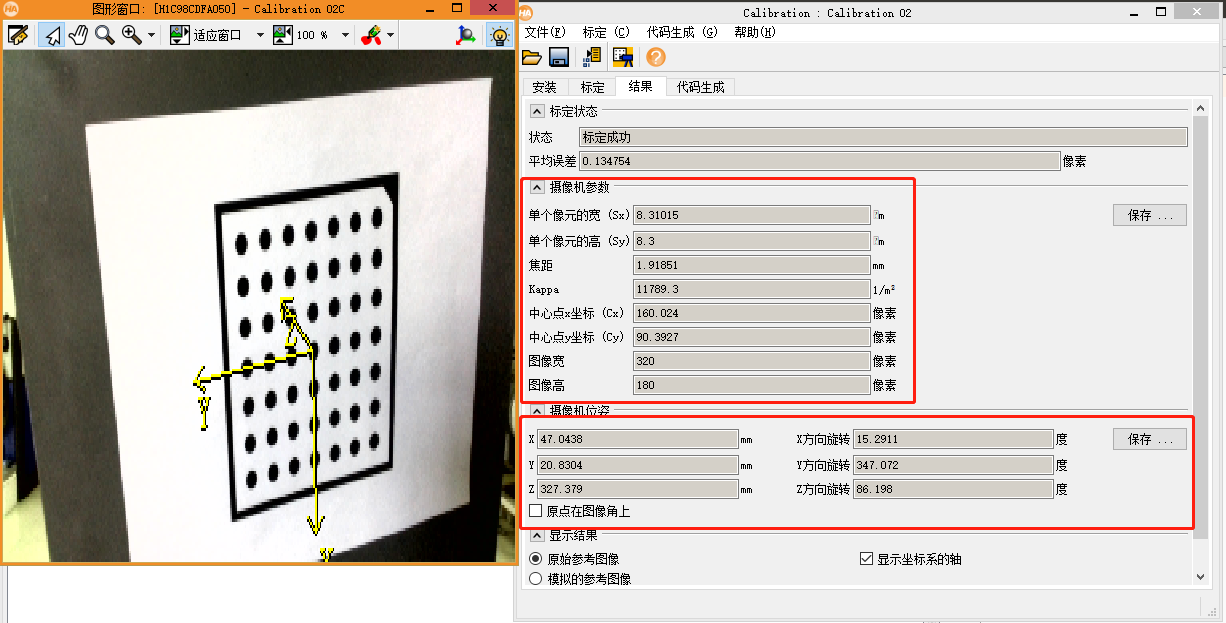
2.相机标定
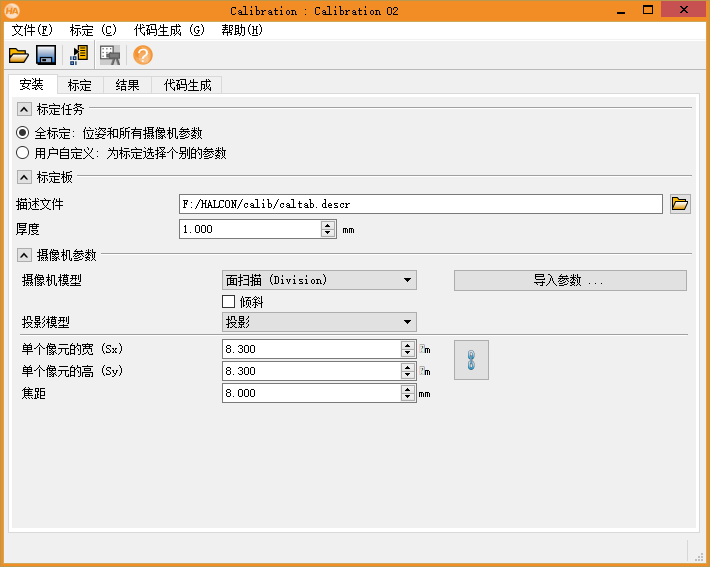
助手–打开新的Calibration
在描述文件地方插入刚刚生成的caltab.descr
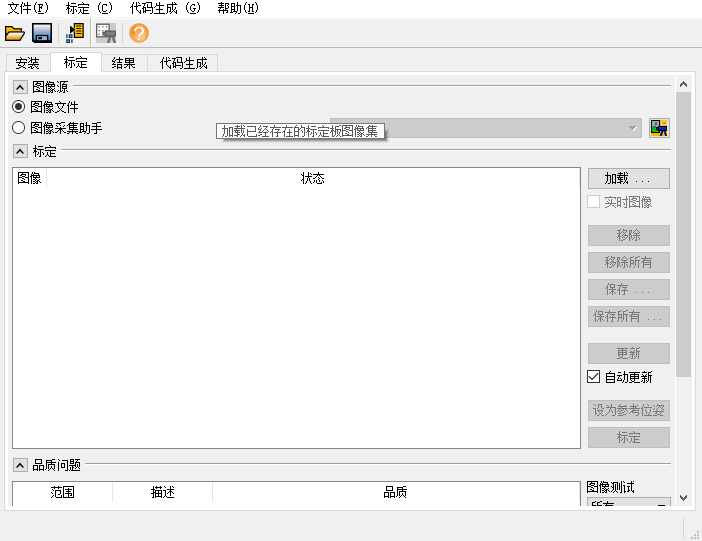
点击标定,如下图所示,如果有图片直接在这里点击加载调用已拍摄完成的图片,移除掉识别错误的图片
没有图片就先连接相机,之后先点击图像采集助手,再采集图片,实时采集能看到识别出点的图片时再点采集按钮。
在结果中摄像机参数需要记录下来,之后会用到,摄像机位姿需要点击“保存”保存成 .dat 格式的文件
3.手眼标定
标定板不动,移动机械臂,拍摄15+张图片,覆盖多个位姿,并记录每张图片拍摄时机械臂的位姿(包括X,Y,Z,RX,RY,RZ六个)
生成机械臂位姿dat文件,打开默认路径下的movingcam_robot_pose_xx.dat,直接修改
我的路径:
C:\Users\Public\Documents\MVTec\HALCON-18.05-Progress\examples\solution_guide\3d_vision\hand_eye
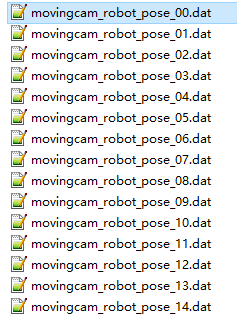
movingcam_robot_pose_xx.dat内容如下:
对照自己记录的机械臂位姿进行修改,一定要一一对应
# Used representation type:
f 2

# Rotation angles [deg] or Rodriguez-vector:
r 180.0 0.0 75.0

# Translational vector (x y z [m]):
t 0.569269 -0.152535 -0.160
修改ImageNameStart(图片存储位置)和CalTabFile(标定板描述文件位置)的位置
ImageNameStart := '3d_machine_vision/923-0/0000'
改成自己的标定板描述文件位置
CalTabFile := 'C:/Users/alw/Desktop/caltab.descr'
附上全部代码
*
* This example explains how to use the hand eye calibration for the case where
* the camera is attached to the robot tool and the calibration object
* is stationary with respect to the robot. The robot positions the
* camera with respect to the calibration plate.
* In this case, the goal of the hand eye calibration is to determine two unknown poses:
* - the pose of the robot base in the coordinate system
*   of the calibration object (CalObjInBasePose).
* - the pose of the camera in the coordinate system of the
*   tool center point (ToolInCamPose).
* Theoretically, as input the method needs at least 3 poses of the
* calibration object in the camera coordinate system.
* However, it is recommended to use at least 10 Poses.
* The corresponding poses of the robot tool in the robot base coordinate system
* (ToolInBasePose) changes for each calibration image,
* because it describes the pose of the robot moving the camera.
* The poses of the calibration object are obtained from images of the
* calibration object recorded with the camera attached to the robot.
* To obtain good calibration results, it its essential to position
* the camera with respect to the calibration object so that the object appears
* tilted in the image.
* After the hand eye calibration, the computed transformations are
* extracted and used to compute the pose of the calibration object in the
* camera coordinate system.
dev_update_off ()
* Directories with calibration images and data files
ImageNameStart := '3d_machine_vision/923-0/0000'
DataNameStart := 'hand_eye/movingcam_'
NumImages := 14
read_image (Image, ImageNameStart + '01')
dev_close_window ()
get_image_size (Image, Width, Height)
dev_open_window (0, 0, Width, Height, 'black', WindowHandle)
dev_set_line_width (2)
dev_set_draw ('margin')
dev_display (Image)
set_display_font (WindowHandle, 14, 'mono', 'true', 'false')
ParamName := ['color_0','color_1','color_2','color_3','color_4','color_5','color_6','alpha_6']
ParamValue := ['red','green','blue','red','green','blue','white',0.7]
* Labels for the visualized 3D object models.
tuple_gen_const (7, '', Labels)
Labels[0] := 'Robot\'s Tool'
Labels[3] := 'Robot\'s Base'
Instructions[0] := 'Rotate: Left button'
Instructions[1] := 'Zoom:   Shift + left button'
Instructions[2] := 'Move:   Ctrl  + left button'
* Set size for 3D visualization in [m]
ArrowThickness := 0.005
ArrowLength := 0.05
gen_robot_tool_and_base_object_model_3d (ArrowThickness, ArrowLength, OM3DToolOrigin, OM3DBase)
* Load the calibration plate description file.
* Make sure that the file is in the current directory or
* in HALCONROOT/calib, or use an absolute path.
CalTabFile := 'C:/Users/alw/Desktop/caltab.descr'
* Read the initial values for the internal camera parameters
* read_cam_par (DataNameStart + 'start_campar.dat', StartCamParam)
* Create the calibration model for the hand eye calibration
* where the calibration object is observed with a camera
* Calibration 02: Code generated by Calibration 02

StartCamParam := ['area_scan_division',0.008,0,8.3e-006,8.3e-006,640,480,1280,960]

create_calib_data ('hand_eye_moving_cam', 1, 1, CalibDataID)
* Set the camera type used
set_calib_data_cam_param (CalibDataID, 0, [], StartCamParam)
* Set the calibration object
set_calib_data_calib_object (CalibDataID, 0, CalTabFile)
* Start the loop over the calibration images
* Set the optimization method to be used
set_calib_data (CalibDataID, 'model', 'general', 'optimization_method', 'nonlinear')
disp_message (WindowHandle, 'The calibration data model was created', 'window', 12, 12, 'black', 'true')
disp_continue_message (WindowHandle, 'black', 'true')
stop ()

dev_open_window (0, Width + 10, Width, Height, 'black', WindowHandleR)
set_display_font (WindowHandleR, 14, 'mono', 'true', 'false')
for I := 1 to NumImages - 1 by 1
    dev_set_window (WindowHandle)
    dev_clear_window ()
    read_image (Image, ImageNameStart + I$'02d')
    dev_display (Image)
    * Search for the calibration plate, extract the marks and the
    * pose of it, and store the results in the calibration data
    * The poses are stored in the calibration data model for use by
    * the hand eye calibration and do not have to be set explicitly
    find_calib_object (Image, CalibDataID, 0, 0, I, [], [])
    get_calib_data_observ_contours (Caltab, CalibDataID, 'caltab', 0, 0, I)
    get_calib_data_observ_points (CalibDataID, 0, 0, I, RCoord, CCoord, Index, PoseForCalibrationPlate)
    * Visualize the extracted calibration marks and the estimated pose (coordinate system)
    dev_set_color ('green')
    dev_display (Image)
    dev_display (Caltab)
    dev_set_color ('yellow')
    disp_cross (WindowHandle, RCoord, CCoord, 6, 0)
    dev_set_colored (3)
    disp_3d_coord_system (WindowHandle, StartCamParam, PoseForCalibrationPlate, 0.01)
    disp_message (WindowHandle, 'Extracting data from calibration image ' + (I + 1) + ' of ' + NumImages, 'window', 12, 12, 'black', 'true')
    * Read pose of tool in robot base coordinates (ToolInBasePose)
    read_pose (DataNameStart + 'robot_pose_' + I$'02d' + '.dat', ToolInBasePose)
    if (I == 1)
        PoseIn := [-0.006,-0.296,12,178,2,270,0]
    else
        PoseIn := PoseOut
    endif
    rigid_trans_object_model_3d (OM3DToolOrigin, ToolInBasePose, OM3DTool)
    visualize_object_model_3d (WindowHandleR, [OM3DTool,OM3DBase], [], PoseIn, ParamName, ParamValue, 'Position of robot tool coordinate system in robot base coordinate system', Labels, Instructions, PoseOut)
    * Set the pose tool in robot base coordinates in the calibration data model
    set_calib_data (CalibDataID, 'tool', I, 'tool_in_base_pose', ToolInBasePose)
endfor
dev_set_window (WindowHandleR)
dev_close_window ()
disp_message (WindowHandle, 'All relevant data has been set in the calibration data model', 'window', 12, 12, 'black', 'true')
disp_continue_message (WindowHandle, 'black', 'true')
stop ()
* Check the input poses for consistency
check_hand_eye_calibration_input_poses (CalibDataID, 0.05, 0.005, Warnings)
if (|Warnings| != 0)
    * There were problem detected in the input poses. Inspect Warnings and
    * remove erroneous poses with remove_calib_data and remove_calib_data_observ.
    dev_inspect_ctrl (Warnings)
    stop ()
endif
*
* Perform the hand eye calibration and store the results to file
* The calibration of the cameras is done internally prior
* to the hand eye calibration
dev_display (Image)
disp_message (WindowHandle, 'Performing the hand-eye calibration', 'window', 12, 12, 'black', 'true')
calibrate_hand_eye (CalibDataID, Errors)
* Query the error of the camera calibration
get_calib_data (CalibDataID, 'model', 'general', 'camera_calib_error', CamCalibError)
* Query the camera parameters and the poses
get_calib_data (CalibDataID, 'camera', 0, 'params', CamParam)
* Get poses computed by the hand eye calibration
get_calib_data (CalibDataID, 'camera', 0, 'tool_in_cam_pose', ToolInCamPose)
get_calib_data (CalibDataID, 'calib_obj', 0, 'obj_in_base_pose', CalObjInBasePose)
* Get the plane in base coordinate system pose by translating the
* CalObjInBasePose by the calibration object's thickness in the
* z-direction.
set_origin_pose (CalObjInBasePose, 0, 0, 0.005, PlaneInBasePose)
try
    * Handle situation where user does not have the permission
    * to write in the current directory.
    *
    * Store the camera parameters to file
    write_cam_par (CamParam, DataNameStart + 'final_campar.dat')
    * Save the hand eye calibration results to file
    write_pose (ToolInCamPose, DataNameStart + 'final_pose_cam_tool.dat')
    write_pose (CalObjInBasePose, DataNameStart + 'final_pose_base_calplate.dat')
    write_pose (PlaneInBasePose, DataNameStart + 'final_pose_base_plane.dat')
catch (Exception)
    * do nothing
endtry
dev_display (Image)
* Display calibration errors
disp_results (WindowHandle, CamCalibError, Errors)
disp_continue_message (WindowHandle, 'black', 'true')
stop ()
* For the given camera, get the corresponding pose indices and calibration object indices
query_calib_data_observ_indices (CalibDataID, 'camera', 0, CalibObjIdx, PoseIds)
* Compute the pose of the calibration object in the camera coordinate
* system via calibrated poses and the ToolInBasePose and visualize it.
* Set sizes for 3D visualization in [m]
CameraSize := 0.05
CameraConeLength := 0.3
get_calib_data (CalibDataID, 'calib_obj', 0, 'x', PX)
get_calib_data (CalibDataID, 'calib_obj', 0, 'y', PY)
get_calib_data (CalibDataID, 'calib_obj', 0, 'z', PZ)
gen_object_model_3d_from_points (PX, PY, PZ, OM3DObjectOrig)
rigid_trans_object_model_3d (OM3DObjectOrig, CalObjInBasePose, OM3DObject)
dev_open_window (0, Width + 10, Width, Height, 'black', WindowHandleR)
set_display_font (WindowHandleR, 14, 'mono', 'true', 'false')
ParamName := ['color_0','color_1','color_2','color_3','color_4','color_5','color_6','color_7','alpha_7','color_8','color_9','color_10','alpha_8','alpha_9','alpha_10','point_size']
ParamValue := ['red','red','green','blue','red','green','blue','white',0.7,'magenta','yellow','white',0.5,0.5,0.5,5]
* Labels for the visualized 3D object models.
tuple_gen_const (11, '', Labels)
Labels[0] := 'Calibration Object'
Labels[1] := 'Robot\'s Tool'
Labels[4] := 'Robot\'s Base'
Labels[8] := 'Camera'
for I := 1 to NumImages - 1 by 1
    dev_set_window (WindowHandle)
    dev_clear_window ()
    read_image (Image, ImageNameStart + I$'02d')
    dev_display (Image)
    * Obtain the pose of the tool in robot base coordinates used in the calibration.
    * The index corresponds to the index of the pose of the observation object.
    * set_calib_data (CalibDataID, 'tool', I, 'tool_in_base_pose', ToolInBasePose)
    get_calib_data (CalibDataID, 'tool', I, 'tool_in_base_pose', ToolInBasePose)
*       get_calib_data (CalibDataID, 'tool', PoseIds[I], 'tool_in_base_pose', ToolInBasePose)
    * Compute the pose of the calibration object relative to the camera
    calc_calplate_pose_movingcam (CalObjInBasePose, ToolInCamPose, ToolInBasePose, CalObjInCamPose)
    * Display the coordinate system
    dev_set_colored (3)
    disp_3d_coord_system (WindowHandle, CamParam, CalObjInCamPose, 0.01)
    Message := 'Using the calibration results to display '
    Message[1] := 'the coordinate system in image ' + (I + 1) + ' of ' + NumImages
    disp_message (WindowHandle, Message, 'window', 12, 12, 'black', 'true')
    gen_camera_and_tool_moving_cam_object_model_3d (ToolInCamPose, ToolInBasePose, CameraSize, CameraConeLength, OM3DToolOrigin, CamParam, OM3DCamera, OM3DTool)
    if (I == 1)
        PoseIn := [-0.006,-0.296,12,178,2,270,0]
    else
        PoseIn := PoseOut
    endif
    visualize_object_model_3d (WindowHandleR, [OM3DObject,OM3DTool,OM3DBase,OM3DCamera], [], PoseIn, ParamName, ParamValue, [], Labels, Instructions, PoseOut)
endfor
* Clear the data model
clear_calib_data (CalibDataID)
dev_set_window (WindowHandleR)
dev_close_window ()
*
* After the hand-eye calibration the computed pose
* ToolInCamPose can be used in robotic grasping applications.
* To grasp an object with the robot, typically, its pose
* with respect to the camera is determined (which
* is simulated here by setting the object's pose to the
* pose of the calibration object)
ObjInCamPose := CalObjInCamPose
* If the tool coordinate system is placed at the gripper
* and a detected object ObjInCamPose shall be grasped
* (here the calibration object),
* the pose of the detected object relative
* to the robot base coordinate system has to be computed.
pose_invert (ToolInCamPose, CamInToolPose)
pose_compose (ToolInBasePose, CamInToolPose, CamInBasePose)
pose_compose (CamInBasePose, ObjInCamPose, ObjInBasePose)
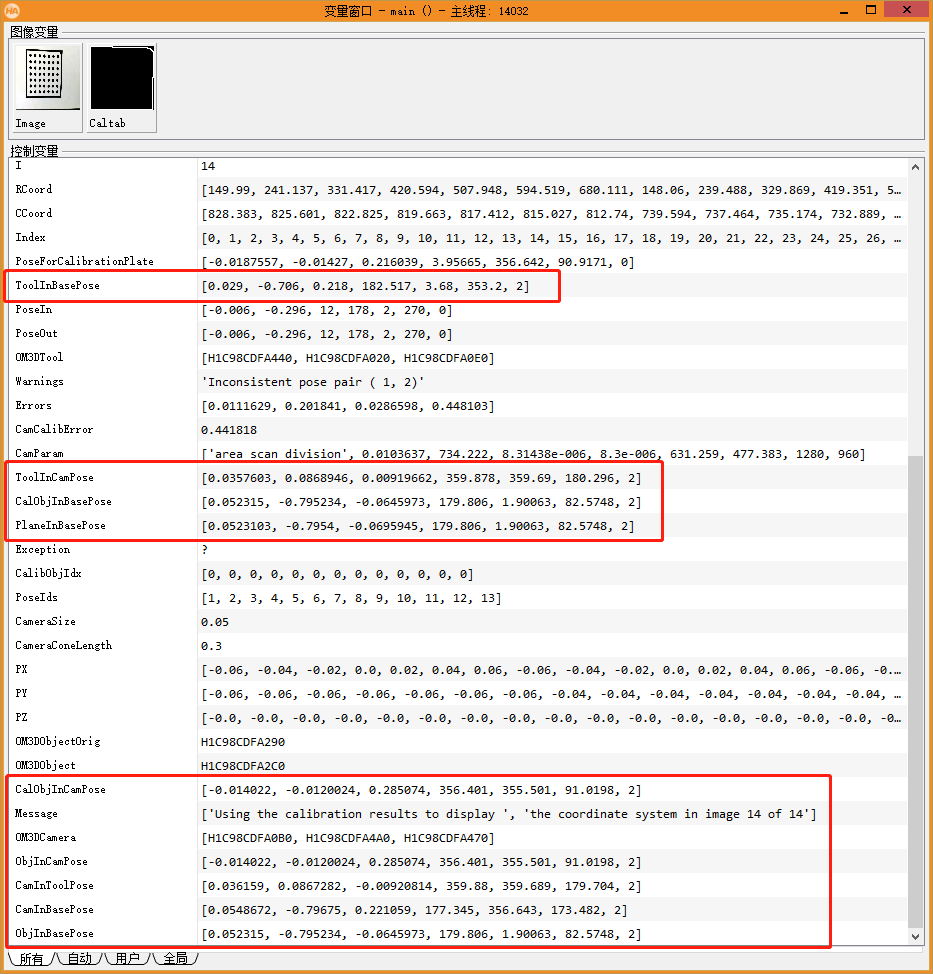
4.查看结果
最后,在窗口–打开变量控制窗口,查看最后的标定结果
发布者:全栈程序员-用户IM,转载请注明出处:https://javaforall.cn/134205.html原文链接:https://javaforall.cn
【正版授权,激活自己账号】: Jetbrains全家桶Ide使用,1年售后保障,每天仅需1毛
【官方授权 正版激活】: 官方授权 正版激活 支持Jetbrains家族下所有IDE 使用个人JB账号...
