大家好,又见面了,我是你们的朋友全栈君。
写在前面:
上学期学习了Android,从一开始的什么都不懂到后来成功做出一个课程设计作品,回忆起来一路还是充满坎坷和辛酸泪的啊。
遗忘是可怕的,为了防止以后把好不容易学到的东西忘得一干二净,我打算写一系列的AndroidStudio教程记录一些有用的知识点,当然,我会从最基础的地方写起,希望可以帮助到一些初学者~
最后,如果时间和精力允许的情况下,我会一步步的还原我的课程设(≧∀≦)ゞ
目录
1.认识目录

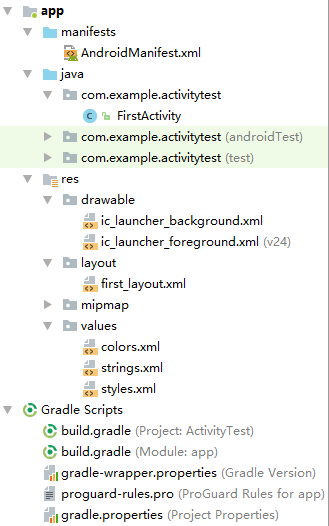
以FirstActivity为例子,我们需要掌握的文件有:
- manifest
- java
- drawable
- layout
- values
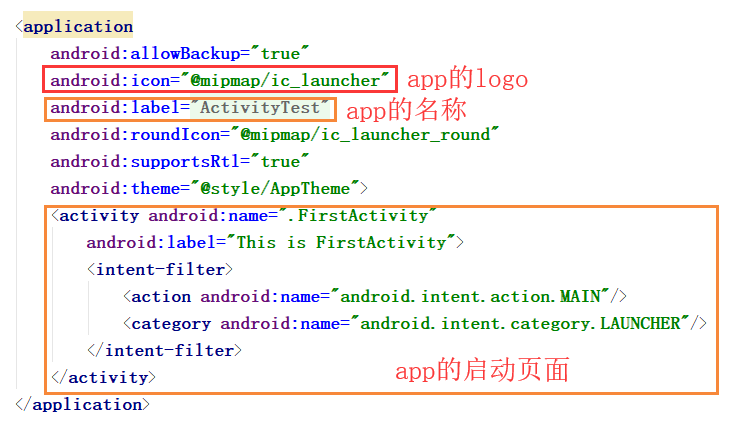
①manifest文件夹里面只有一个AndroidManifest.xml文件,在这个文件里,我们是对整个app进行一些设置,例如app的logo,app一进去的启动页面,app的名字…
②java文件夹里面是.java文件,负责整个app的逻辑处理,是完成整个app的核心所在。java文件真的超级powerful,后续会慢慢用例子体现,现在说一大堆显得有点空洞。
TIPS:初学者一般Java文件建立好了之后,不会随便移动它的位置。
③drawable文件夹里面放app需要用到的图片
④layout文件夹里面放的是“画页面”的.xml文件,里面的文件也叫布局文件。如果你会html&css&js的话,就很好理解了。.xml文件的作用就和.html和.css文件的作用类似,页面需要什么组件?怎么布局?用一些什么样式?都在.xml里面设置。但是对于一些复杂的样式,在.xml文件里面可能设置不了那么精美,就可以在java文件里面设置。
⑤value文件夹里面放了一些字符串,颜色等常量,例如:
//color.xml
<resources>
    <color name="colorPrimary">#3F51B5</color>
</resources>


//firstActivity.xml
<Button
    android:background="@color/colorPrimary"
    />
对于颜色#3F51B5,我给它起名字叫colorPrimary,之后我在布局文件中用这个颜色,就只需要喊它的名字colorPrimary就可以了。
最后总结一些基本思想:
- layout和java文件夹是最重要的。如果把app比作一个人,layout就是一个人的脸,java就是一个人是灵魂。前者决定了这个app长什么样子,后者决定了这个app可以实现那么功能。
- 对于初学者,AndroidManifest.xml和value文件夹的作用不用着急掌握,到了某一天你需要实现某个功能需要用到这些,你就可以真真切切的知道它的用处了。
2.RelativeLayout
AndroidStudio里面支持的布局有挺多种的,但是最最重要的是RelativeLayout(相对布局)和LinearLayout(线性布局),熟练掌握这两种布局也非常够用了,当然还有GridLayout…但是对于初学者,先学会了相对布局和线性布局,再去学习其他布局,就会觉得非常简单轻松了。还有一个非常有用的布局,叫RecyclerLayout,因为要结合adapter使用,所以对于初学者略难,这里就先不讲了,之后会非常详细的介绍它。
学习布局需要掌握的东西很简单,就是它有的属性,以及取不同属性值可以达到的效果,下面我就慢慢列出来。
- layout_width
- layout_height
这两个属性就决定了布局的宽度和高度,把RelativeLayout想象成一个相框或者一个容器,在这个相框里面可以装其他的组件。对于嵌套在相框里面的组件,其所在的相框就是它的父空间。这个相框的大小呢,就用上面这两个属性举例,取值有三种:
- wrap_content 刚刚把文字组件包裹满的长度
- match_parent 撑满整个父空间的长度
- 100px 具体的像素值
对于相对布局有一个地方要注意!!!
相对布局里面的组件需要设置id(在同一个.xml文件里面的所有组件,其id不可以重复哦~)然后用layout_below设置组件的相对位置。
<?xml version="1.0" encoding="utf-8"?>
<RelativeLayout
xmlns:android="http://schemas.android.com/apk/res/android"
android:layout_width="match_parent"
android:layout_height="match_parent">
<Button
android:id="@+id/button_1"
android:layout_width="wrap_content"
android:layout_height="wrap_content"
android:text="Button 1"
/>
<Button
android:id="@+id/button_2"
android:layout_below="@id/button_1"
android:layout_width="wrap_content"
android:layout_height="wrap_content"
android:text="Button 2"
/>
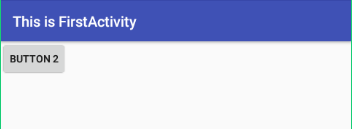
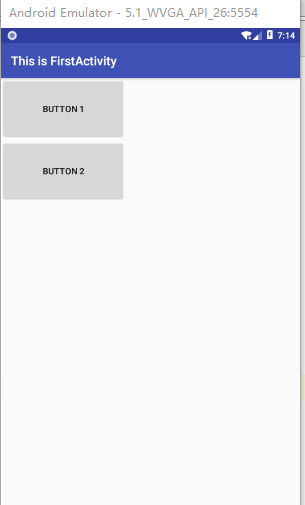
</RelativeLayout>例如上面这个例子,在RelativeLayout里面有两个按钮,第一个按钮的id是button_1,android:id=”@+id/button_1“,第二个按钮的id是button_2,为button_2设置了android:layout_below=”@id/button_1″表示按钮2在按钮1的下面。所以效果图如下:

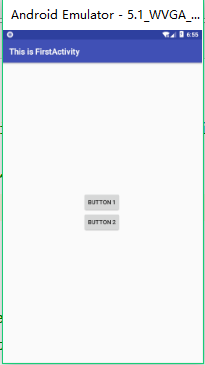
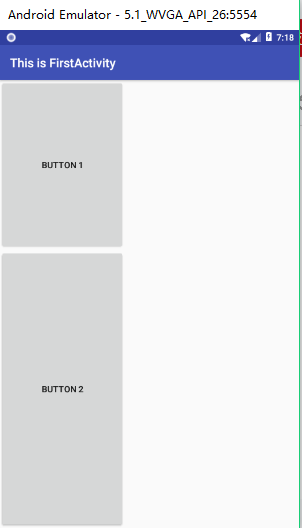
如果我不为按钮2设置相对向下的对象会怎样呢?也就是删掉android:layout_below=”@id/button_1″。答案是按钮二会覆盖按钮一。
如果想让按钮居中怎么办?答案就是为RelativeLayout添加一个属性 android:gravity=”center”
如果继续追问,我希望按钮一和按钮二并排在一起怎么办?答案是:sorry,RelativeLayout做不到啊~~
但是LinearLayout可以做到哦!
RelativeLayout还有很多其他的属性,可以自己试着玩,重要的属性就是上面这些,我用红色的粗体标记啦~
3.LinearLayout
线性布局要灵活一些,在实际应用上也是最最最广泛的。
- layout_width
- layout_height
和相对布局一样的用法和属性值,我就不赘述了!
区别于RelativeLayout,LinearLayout就不要求每个组件都要设置自己的id了,但是最好还是设置一下,这是一个好习惯哦。
那么问题来了,我怎么设置两个组件是横着并排还是竖着并排呢??现在就隆重介绍线性布局的重要属性 orientation
取值有两种:vertical(垂直)和 horizontal(水平)
<LinearLayout
    xmlns:android="http://schemas.android.com/apk/res/android"
    android:layout_width="match_parent"
    android:layout_height="match_parent"
    android:orientation="horizontal"
    >

    <Button
        android:id="@+id/button_1"
        android:layout_width="200px"
        android:layout_height="100px"
        android:text="Button 1"
        />

    <Button
        android:id="@+id/button_2"
        android:layout_width="200px"
        android:layout_height="100px"
        android:text="Button 2"
        />

    <Button
        android:id="@+id/button_3"
        android:layout_width="200px"
        android:layout_height="100px"
        android:text="Button 3"
        />

</LinearLayout>

android:orientation=”horizontal” 决定了容器里面的所有组件都绝对是水平排列的
!!!需要注意的就是,哪怕我的组件已经装不下了,也不会被挤到下一排,而是只显示一截,甚至完全不显示。
<?xml version="1.0" encoding="utf-8"?>
<LinearLayout
    xmlns:android="http://schemas.android.com/apk/res/android"
    android:layout_width="match_parent"
    android:layout_height="match_parent"
    android:orientation="vertical"
    >

    <Button
        android:id="@+id/button_1"
        android:layout_width="200px"
        android:layout_height="100px"
        android:text="Button 1"
        />

    <Button
        android:id="@+id/button_2"
        android:layout_width="200px"
        android:layout_height="100px"
        android:text="Button 2"
        />

</LinearLayout>
android:orientation=”vertical”决定了容器里的组件都是垂直排列,这就很好理解了。
线性布局还有一个重要的属性 layout_weight 取值一般是1、2、3…表示权重的大小,例如:
<LinearLayout
    xmlns:android="http://schemas.android.com/apk/res/android"
    android:layout_width="match_parent"
    android:layout_height="match_parent"
    android:orientation="vertical"
    >

    <Button
        android:id="@+id/button_1"
        android:layout_width="200px"
        android:layout_height="100px"
        android:layout_weight="1"
        android:text="Button 1"
        />

    <Button
        android:id="@+id/button_2"
        android:layout_width="200px"
        android:layout_height="100px"
        android:layout_weight="2"
        android:text="Button 2"
        />

</LinearLayout>
LinearLayout的强大就在于它是可以嵌套的,从而实现很多复杂的布局。
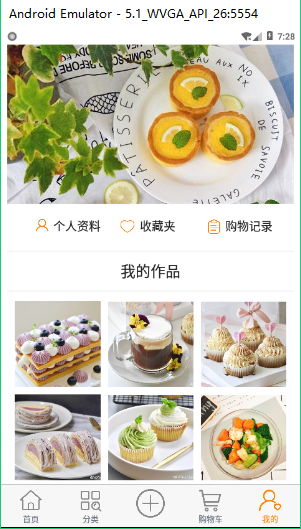
为了巩固你对它的认识,我出一个小小的题目,这是我的课程设计的一个页面,你会怎么设计这个布局呢??
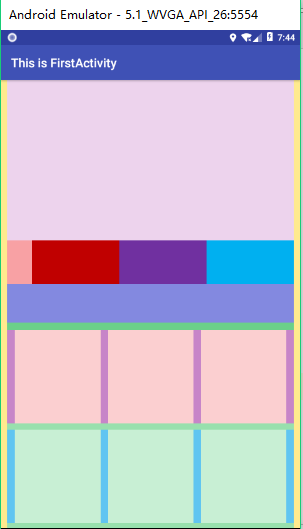
我自己也再试了试:
<?xml version="1.0" encoding="utf-8"?>
<LinearLayout
    xmlns:android="http://schemas.android.com/apk/res/android"
    android:layout_width="match_parent"
    android:layout_height="match_parent"
    android:orientation="vertical"
    android:paddingLeft="10dp"
    android:paddingRight="10dp"
    android:background="#FFEA8E"
    >
    <RelativeLayout
        android:layout_width="match_parent"
        android:layout_height="match_parent"
        android:background="#98E0AD">

                <ImageView
                    android:id="@+id/image_bg"
                    android:layout_width="match_parent"
                    android:layout_height="258dp"
                    android:background="#EDD3ED"/>

                <LinearLayout
                    android:layout_below="@id/image_bg"
                    android:id="@+id/layout_button"
                    android:layout_width="match_parent"
                    android:layout_height="70dp"
                    android:background="#F8A1A4"
                    android:orientation="vertical">

                    <RadioGroup
                        android:id="@+id/rg_main"
                        android:layout_width="match_parent"
                        android:layout_height="70dp"
                        android:layout_marginLeft="40dp"
                        android:layout_alignParentBottom="true"
                        android:background="#C785C8"
                        android:orientation="horizontal">

                        <RadioButton
                            android:id="@+id/rb_me"
                            android:layout_width="0dp"
                            android:layout_height="match_parent"
                            android:layout_weight="1"
                            android:paddingRight="28dp"
                            android:background="#C00000"
                            android:button="@null"
                            android:gravity="center"
                            android:textSize="19sp" />

                        <RadioButton
                            android:id="@+id/rb_heart"
                            android:layout_width="0dp"
                            android:layout_height="match_parent"
                            android:paddingRight="33dp"
                            android:layout_weight="1"
                            android:button="@null"
                            android:background="#7030A0"
                            android:gravity="center"
                            android:textSize="19sp" />

                        <RadioButton
                            android:id="@+id/rb_order"
                            android:layout_width="0dp"
                            android:layout_height="match_parent"
                            android:layout_weight="1"
                            android:background="#00B0F0"
                            android:paddingRight="34dp"
                            android:button="@null"
                            android:gravity="center"
                            android:textSize="19sp" />
                    </RadioGroup>
                </LinearLayout>


                <LinearLayout
                    android:id="@+id/layout_mywork"
                    android:layout_below="@id/layout_button"
                    android:layout_width="match_parent"
                    android:layout_height="74dp"
                    android:background="#6BD089"
                    android:orientation="vertical">

                    <TextView
                        android:layout_width="match_parent"
                        android:layout_height="62dp"
                        android:textColor="#212122"
                        android:gravity="center"
                        android:background="#8389E0"
                        android:textSize="24sp"
                        />

                </LinearLayout>

                <LinearLayout
                    android:id="@+id/layout_work1"
                    android:layout_below="@id/layout_mywork"
                    android:layout_width="match_parent"
                    android:orientation="horizontal"
                    android:paddingRight="6dp"
                    android:paddingLeft="6dp"
                    android:background="#C785C8"
                    android:layout_height="150dp">

                    <ImageView
                        android:padding="0dp"
                        android:layout_width="match_parent"
                        android:layout_weight="1"
                        android:layout_height="160dp"
                        android:background="#FBCFD0"
                        android:layout_marginRight="6dp"
                        android:layout_marginLeft="6dp"
                        />

                    <ImageView
                        android:layout_width="match_parent"
                        android:layout_weight="1"
                        android:background="#FBCFD0"
                        android:layout_marginRight="6dp"
                        android:layout_marginLeft="6dp"
                        android:layout_height="160dp"
                        />

                    <ImageView
                        android:id="@+id/work1"
                        android:layout_width="match_parent"
                        android:layout_weight="1"
                        android:background="#FBCFD0"
                        android:layout_marginRight="6dp"
                        android:layout_marginLeft="6dp"
                        android:layout_height="160dp"
                        />

                </LinearLayout>

                <LinearLayout
                    android:id="@+id/layout_work2"
                    android:layout_below="@id/layout_work1"
                    android:layout_width="match_parent"
                    android:layout_marginTop="10px"
                    android:orientation="horizontal"
                    android:paddingRight="6dp"
                    android:paddingLeft="6dp"
                    android:background="#60C5F1"
                    android:layout_height="150dp">

                    <ImageView
                        android:padding="0dp"
                        android:layout_width="match_parent"
                        android:layout_weight="1"
                        android:layout_height="160dp"
                        android:layout_marginRight="6dp"
                        android:layout_marginLeft="6dp"
                        android:background="#C8EFD4"
                        />

                    <ImageView
                        android:layout_width="match_parent"
                        android:layout_weight="1"
                        android:layout_marginRight="6dp"
                        android:layout_marginLeft="6dp"
                        android:layout_height="160dp"
                        android:background="#C8EFD4"
                       />

                    <ImageView
                        android:layout_width="match_parent"
                        android:layout_weight="1"
                        android:layout_marginRight="6dp"
                        android:layout_marginLeft="6dp"
                        android:layout_height="160dp"
                        android:background="#C8EFD4"
                        />

                </LinearLayout>

            </RelativeLayout>

</LinearLayout>
总结:
这一篇主要讲了布局,都是在layout文件夹的.xml文件中实现,现在还没涉及到java文件。
下一步是介绍一些常用的组件~~ 传送门
~~~~~~~~~~~~~~~~~~~~~~~~~~~~~~~~~~~~~~~~~~~~~~~~~~~~~~~~~~
2021.9.15更新
距离这篇博客发布已经三年了,真的没想到这篇博客能让这么多人,截至现在已经有693个收藏了,太让我意外了,能帮到别人感觉真的很开心。
不过,最近陆陆续续有一些小伙伴私信我关于安卓的问题,我真的一头雾水,我是真的不知道该怎么回答,因为我本身不是软件工程专业的,学习安卓是在大二下的一门选修课,安卓开发我也只是了解皮毛。当初写这篇博客是因为有一个初中同学在学安卓,来问我问题,我发现VX上一两句话说不清楚,我就写了这篇博客给她看。
看到小伙伴私信问我问题,我不能回答,那种爱莫能助的感觉其实挺难受的,因为我也曾经给博主发过私信问问题,还是很期待能够得到答复的。
最后,我还是希望用我小小的影响力帮助到别人,写这篇博客的时候是一个大三学生,现在我已经是直博二年级的研究生,我目前在NUDT的系统工程学院的管理科学与工程专业,研究方向是数据挖掘,复杂网络。如果有想报考这个学校 or 计划保研 or 想交流大学期间的学习竞赛心得 or ……的小伙伴可以私信我,CSDN我还是经常看的,但是安卓我现在是真不会了….
发布者:全栈程序员-用户IM,转载请注明出处:https://javaforall.cn/132144.html原文链接:https://javaforall.cn
【正版授权,激活自己账号】: Jetbrains全家桶Ide使用,1年售后保障,每天仅需1毛
【官方授权 正版激活】: 官方授权 正版激活 支持Jetbrains家族下所有IDE 使用个人JB账号...
