大家好,又见面了,我是你们的朋友全栈君。
okio是Square开源框架之一,它对java.io和java.nio做了补充,使访问,存储和数据处理变得更加容易。它最早是Okhttp组件之一。

1、ByteString与Buffer
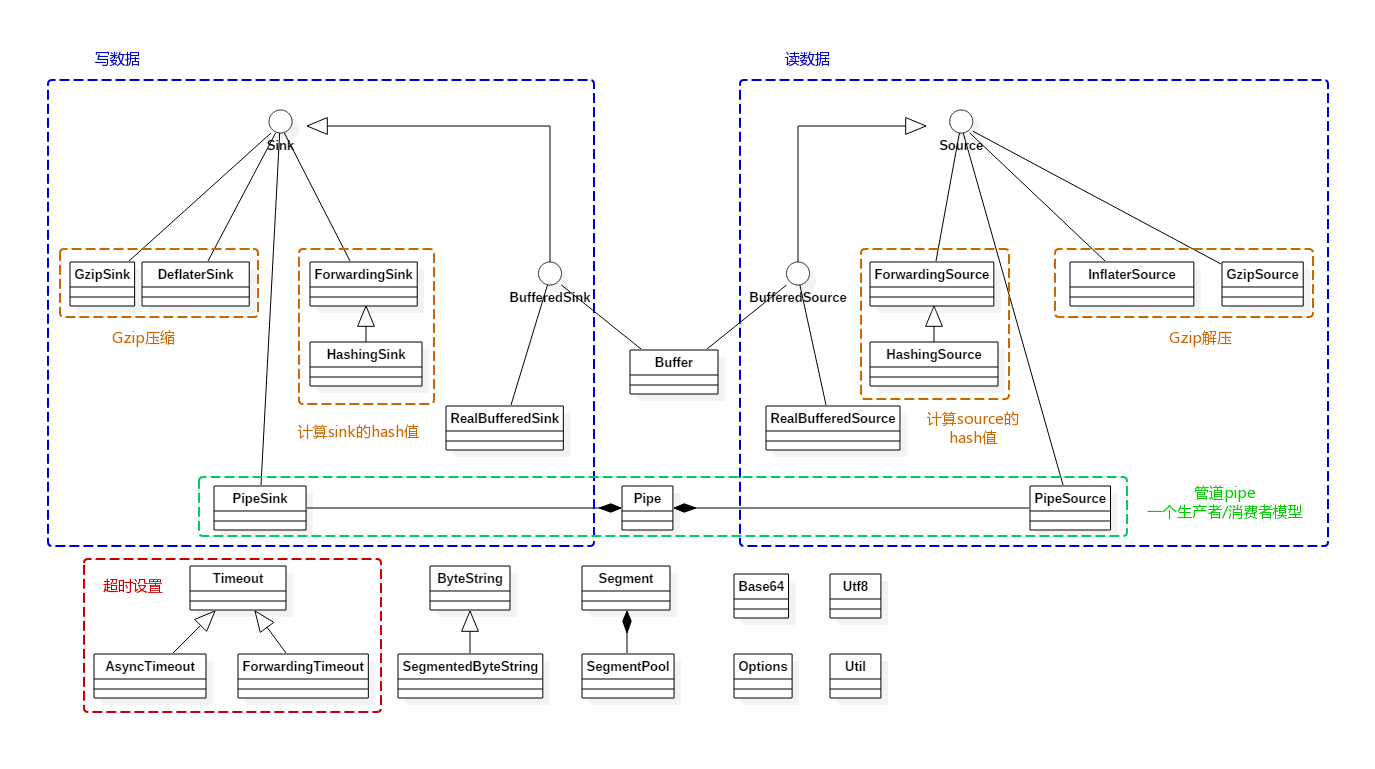
Okio主要围绕ByteString与Buffer这两个类展开,其主要功能都封装在这两个类中:
ByteString:是一个类似String的不可变类,它可以很容易的在byte与String之间进行转换。该类提供了编/解码为hex,md5,base64及UTF-8等方法。Buffer:是一个可变的字节序列。 与ArrayList一样,无需提前调整缓冲区大小。Buffer内部维护了一个双向链表,从链表尾部写入数据,头部读取数据。
ByteString和Buffer做了一些节省CPU和内存的操作。 如果将一个字符串编码为ByteString,ByteString就会缓存对该字符串的引用(以空间换时间),这样如果以后对其进行编/解码等操作,则无需在byte与String之间进行转换。
  //字符串对应的字节数据,避免再一次转换
  final byte[] data;
  //字符串
  transient String utf8; // Lazily computed.
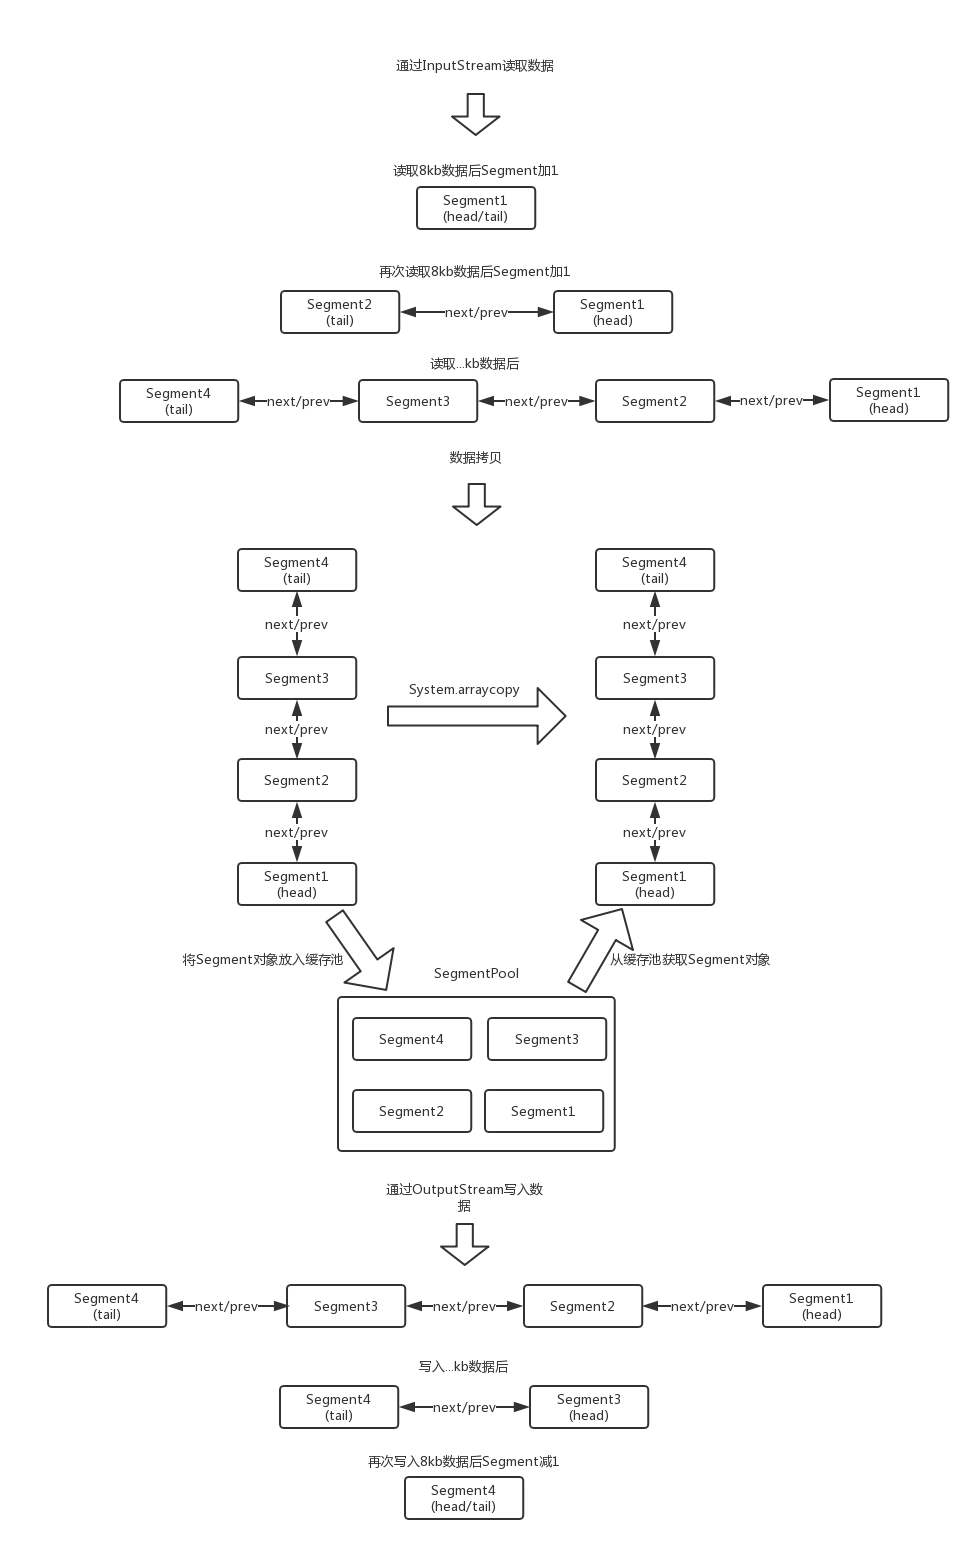
Buffer内部维护了一个以Segment为节点的双向链表。 当数据从一个Buffer移动到另一个Buffer时,仅需要进行一次数据拷贝,且它会重新分配Segment的所有权,而不是重新创建Segment对象。
2、Source与Sink
Okio包含自己的流类型,称为Source和Sink,其工作方式虽然类似InputStream和OutputStream,但它与Java I/O相比具有以下优势(参考自Android学习笔记——Okio):
Okio实现了I/O读写的超时机制(Timeout),防止读写出错从而导致一直阻塞。- N合一,
OKio精简了输入输出流的类个数 - 低的CPU和内存消耗,引入
Segment和SegmentPool复用机制 - 使用方便。
ByteString处理不变byte,Buffer处理可变byte。 - 提供了一系列的工具。
OKio支持md5、sha、base64等数据处理
Source、Sink可以与InputStream、OutputStream互相操作。我们可以将任何Source视为InputStream,也可以将任何InputStream视为Source。同样适用于Sink和InputStream。
3、Okio数据读写流程
前面简单介绍了Okio,下面就来看看如何使用。
    //okio实现图片复制
    public void copyImage(File sinkFile, File sourceFile) throws IOException {

        //try里面的代码是Okio的标准写法,不能改变
        try (Sink sink = Okio.sink(sinkFile);
             BufferedSink bufferedSink = Okio.buffer(sink);
             //从文件读取数据
             Source source = Okio.source(sourceFile);
             BufferedSource bufferedSource = Okio.buffer(source)) {

            //图片复制
            bufferedSink.write(bufferedSource.readByteArray());
            //设置超时时间为1秒中,
            sink.timeout().deadline(1, TimeUnit.SECONDS);
            //写入数据,将字符串以UTF-8格式写入,Okio专门针对utf-8做了处理
            bufferedSink.writeUtf8(entry.getKey())
                     .writeUtf8("=")
                     .writeUtf8(entry.getValue())
                     .writeUtf8("\n");
            //读取数据
            String str=bufferedSource.readUtf8();
            //读取数据并返回一个ByteString
            ByteStringstr=bufferedSource.readByteString();

        }
    }
正如前面所说的那样,Okio使用起来非常方便。由于Java字符串采用的是UTF-16编码,而一般开发中使用的都是UTF-8编码,所以Okio对字符串编码做了特殊处理。
3.1、Okio读数据原理分析
Source的意思是水源,它对应着输入流,在Okio中通过Okio.source方法来获得一个Source对象。
  //在Okio这个类中关于source重载的方法还是蛮多的,这里以文件为例
  public static Source source(File file) throws FileNotFoundException {

    if (file == null) throw new IllegalArgumentException("file == null");
    return source(new FileInputStream(file));
  }
  public static Source source(InputStream in) {

    return source(in, new Timeout());
  }
  private static Source source(final InputStream in, final Timeout timeout) {

    ...
    //这里才是真正读去数据的地方
    return new Source() {

      @Override public long read(Buffer sink, long byteCount) throws IOException {

        ...
        try {

          //每次写数据时都先检查是否超时,默认未设置超时
          timeout.throwIfReached();
          //获取链表的尾节点
          Segment tail = sink.writableSegment(1);
          //由于每个Segment的SIZE为8KB,所以每一次拷贝不能超过这个值
          int maxToCopy = (int) Math.min(byteCount, Segment.SIZE - tail.limit);
          //通过InputStream读取数据
          int bytesRead = in.read(tail.data, tail.limit, maxToCopy);
          //数据读取完毕
          if (bytesRead == -1) return -1;
          //可写取位置往后移
          tail.limit += bytesRead;
          //读取的总字节数
          sink.size += bytesRead;
          //返回当前读取的字节数
          return bytesRead;
        } catch (AssertionError e) {

          ...
        }
      }
      ...
    };
  }
可以发现,这个的Source是一个匿名对象。得到Source对象后,通过Okio.buffer方法将该对象传递给BufferedSource,BufferedSource是一个接口,它的具体实现类是RealBufferedSource。
在上面例子中是调用RealBufferedSource的readByteArray方法来读取数据,下面就来看这个方法的实现。
  //RealBufferedSource对应的Buffer
  public final Buffer buffer = new Buffer();
  @Override public byte[] readByteArray() throws IOException {

    //将数据写入buffer
    buffer.writeAll(source);
    //将所有数据已字节数组形式返回
    return buffer.readByteArray();
  }
在readByteArray方法中会首先将数据写入到Buffer中,并生成一个双向链表。
  @Override public long writeAll(Source source) throws IOException {

    if (source == null) throw new IllegalArgumentException("source == null");
    long totalBytesRead = 0;
    //这里的source就是前面在Okio中创建的匿名Source对象
    for (long readCount; (readCount = source.read(this, Segment.SIZE)) != -1; ) {

      totalBytesRead += readCount;
    }
    return totalBytesRead;
  }
将数据写入Buffer后,调用Buffer的readByteArray方法生成一个字节数组并返回。
    @Override
    public byte[] readByteArray() {

        try {

            //在读取数据时,就会得到size的大小
            return readByteArray(size);
        } catch (EOFException e) {

            throw new AssertionError(e);
        }
    }
    @Override
    public byte[] readByteArray(long byteCount) throws EOFException {

        checkOffsetAndCount(size, 0, byteCount);
        ...
        //创建一个大小为size的byte数组
        byte[] result = new byte[(int) byteCount];
        //将读取的数据写入这个数组中
        readFully(result);
        return result;
    }
    @Override
    public void readFully(byte[] sink) throws EOFException {

        int offset = 0;
        while (offset < sink.length) {

            //不断的将数据写入sink数组中
            int read = read(sink, offset, sink.length - offset);
            if (read == -1) throw new EOFException();
            offset += read;
        }
    }
    @Override
    public int read(byte[] sink, int offset, int byteCount) {

        checkOffsetAndCount(sink.length, offset, byteCount);

        Segment s = head;
        if (s == null) return -1;
        int toCopy = Math.min(byteCount, s.limit - s.pos);
        //进行数据拷贝
        System.arraycopy(s.data, s.pos, sink, offset, toCopy);

        s.pos += toCopy;
        size -= toCopy;
        //释放Segment并将其放入缓冲池
        if (s.pos == s.limit) {

            head = s.pop();
            SegmentPool.recycle(s);
        }

        return toCopy;
    }
这样就将数据写入到一个新的数组中,并将链表中的所有Segment重新初始化并放入池中。
3.2、Okio写数据原理分析
Sink的意思是水槽,它对应着输出流。通过Okio.sink来获取一个Sink对象。
  public static Sink sink(File file) throws FileNotFoundException {

    if (file == null) throw new IllegalArgumentException("file == null");
    return sink(new FileOutputStream(file));
  }
  public static Sink sink(OutputStream out) {

    return sink(out, new Timeout());
  }

  private static Sink sink(final OutputStream out, final Timeout timeout) {

    ...
    //创建一个匿名Sink对象
    return new Sink() {

      @Override public void write(Buffer source, long byteCount) throws IOException {

        checkOffsetAndCount(source.size, 0, byteCount);
        //写入数据
        while (byteCount > 0) {

          //每次写数据时都先检查是否超时,默认未设置超时
          timeout.throwIfReached();
          //获取头结点
          Segment head = source.head;
          //能copy的最小字节
          int toCopy = (int) Math.min(byteCount, head.limit - head.pos);
          //通过OutputStream来写入数据
          out.write(head.data, head.pos, toCopy);
          //可读取的位置向后移动
          head.pos += toCopy;
          //减少可写入的字节数
          byteCount -= toCopy;
          //减少buffer中字节数
          source.size -= toCopy;
          //达到最大可写的位置
          if (head.pos == head.limit) {

            //释放节点
            source.head = head.pop();
            SegmentPool.recycle(head);
          }
        }
      }

      ...
    };
  }
获得Sink对象后,将该对象传递给BufferedSink,BufferedSink是一个接口,它的具体实现是RealBufferedSink。
  public static BufferedSink buffer(Sink sink) {

    return new RealBufferedSink(sink);
  }
在3.1节中讲了通过InputStream读取数据并返回一个字节数组。这里就将这个数组通过RealBufferedSink的write方法写入到新的文件中。
  @Override public BufferedSink write(byte[] source) throws IOException {

    if (closed) throw new IllegalStateException("closed");
    buffer.write(source);
    return emitCompleteSegments();
  }
写入数据跟读取数据流程基本上一样,需要先将数据写入到Buffer中。
    @Override
    public Buffer write(byte[] source) {

        if (source == null) throw new IllegalArgumentException("source == null");
        return write(source, 0, source.length);
    }
    @Override
    public Buffer write(byte[] source, int offset, int byteCount) {

        ...

        int limit = offset + byteCount;
        while (offset < limit) {

            Segment tail = writableSegment(1);

            int toCopy = Math.min(limit - offset, Segment.SIZE - tail.limit);
            //进行数据拷贝
            System.arraycopy(source, offset, tail.data, tail.limit, toCopy);

            offset += toCopy;
            tail.limit += toCopy;
        }

        size += byteCount;
        return this;
    }
前面说过Buffer维护的是一个链表,所以这里也是将数据写入一个链表中,由于在数据读取完毕后会将Segment对象重新初始化并放入到池中,所以这里就不用创建新的Segment对象,直接从池中获取即可。在写入Buffer成功后,再调用emitCompleteSegments方法,该方法就是将数据从Buffer写入到新文件。
  @Override public BufferedSink emitCompleteSegments() throws IOException {

    if (closed) throw new IllegalStateException("closed");
    long byteCount = buffer.completeSegmentByteCount();
    if (byteCount > 0) sink.write(buffer, byteCount);
    return this;
  }
这里的Sink就是在Okio中创建的匿名对象,在Sink对象中通过OutputStream将数据写入到新文件。
总体流程如下。
4、Segment及SegmentPool
Segment是Okio中非常重要的一环,它可以说是Buffer中数据的载体。容量是8kb,头结点为head。
final class Segment {

  //Segment的容量,最大为8kb
  static final int SIZE = 8192;

  //如果Segment中字节数 > SHARE_MINIMUM时(大Segment),就可以共享,不能添加到SegmentPool
  static final int SHARE_MINIMUM = 1024;
  //存储的数据
  final byte[] data;

  //下一次读取的开始位置
  int pos;

 //写入的开始位置
  int limit;

  //当前Segment是否可以共享
  boolean shared;

  //data是否仅当前Segment独有,不share
  boolean owner;

  //后继节点
  Segment next;

  //前驱节点
  Segment prev;

  ...

  //移除当前Segment
  public final @Nullable Segment pop() {

    Segment result = next != this ? next : null;
    prev.next = next;
    next.prev = prev;
    next = null;
    prev = null;
    return result;
  }

  //在当前节点后添加一个新的节点
  public final Segment push(Segment segment) {

    segment.prev = this;
    segment.next = next;
    next.prev = segment;
    next = segment;
    return segment;
  }

  //将当前Segment分裂成2个Segment结点。前面结点pos~limit数据范围是[pos..pos+byteCount),后面结点pos~limit数据范围是[pos+byteCount..limit)
  public final Segment split(int byteCount) {

    if (byteCount <= 0 || byteCount > limit - pos) throw new IllegalArgumentException();
    Segment prefix;

    //如果字节数大于SHARE_MINIMUM则拆分成共享节点
    if (byteCount >= SHARE_MINIMUM) {

      prefix = sharedCopy();
    } else {

      prefix = SegmentPool.take();
      System.arraycopy(data, pos, prefix.data, 0, byteCount);
    }

    prefix.limit = prefix.pos + byteCount;
    pos += byteCount;
    prev.push(prefix);
    return prefix;
  }

  //当前Segment结点和prev前驱结点合并成一个Segment,统一合并到prev,然后当前Segment结点从双向链表移除并添加到SegmentPool复用。当然合并的前提是:2个Segment的字节总和不超过8K。合并后可能会移动pos、limit
  public final void compact() {

    if (prev == this) throw new IllegalStateException();
    if (!prev.owner) return; // Cannot compact: prev isn't writable.
    int byteCount = limit - pos;
    int availableByteCount = SIZE - prev.limit + (prev.shared ? 0 : prev.pos);
    if (byteCount > availableByteCount) return; // Cannot compact: not enough writable space.
    writeTo(prev, byteCount);
    pop();
    SegmentPool.recycle(this);
  }

  //从当前节点移动byteCount个字节到sink中
  public final void writeTo(Segment sink, int byteCount) {

    if (!sink.owner) throw new IllegalArgumentException();
    if (sink.limit + byteCount > SIZE) {

      // We can't fit byteCount bytes at the sink's current position. Shift sink first.
      if (sink.shared) throw new IllegalArgumentException();
      if (sink.limit + byteCount - sink.pos > SIZE) throw new IllegalArgumentException();
      System.arraycopy(sink.data, sink.pos, sink.data, 0, sink.limit - sink.pos);
      sink.limit -= sink.pos;
      sink.pos = 0;
    }

    System.arraycopy(data, pos, sink.data, sink.limit, byteCount);
    sink.limit += byteCount;
    pos += byteCount;
  }
}
SegmentPool是一个Segment池,内部维护了一个Segment单向链表,容量为64kb(8个Segment),回收不用的Segment对象。
final class SegmentPool {

    //SegmentPool的最大容量
    static final long MAX_SIZE = 64 * 1024; // 64 KiB.

    //后继节点
    static Segment next;

    //当前池内的总字节数
    static long byteCount;

    private SegmentPool() {

    }
    //从池中获取一个Segment对象
    static Segment take() {

        synchronized (SegmentPool.class) {

            if (next != null) {

                Segment result = next;
                next = result.next;
                result.next = null;
                byteCount -= Segment.SIZE;
                return result;
            }
        }
        return new Segment(); // Pool is empty. Don't zero-fill while holding a lock.
    }
    //将Segment状态初始化并放入池中
    static void recycle(Segment segment) {

        if (segment.next != null || segment.prev != null) throw new IllegalArgumentException();
        if (segment.shared) return; // This segment cannot be recycled.
        synchronized (SegmentPool.class) {

            if (byteCount + Segment.SIZE > MAX_SIZE) return; // Pool is full.
            byteCount += Segment.SIZE;
            segment.next = next;
            segment.pos = segment.limit = 0;
            next = segment;
        }
    }
}
当从InputStream中读数据时,读取的数据会写进以Segment为节点的双向链表中。如果Segment容量不够(容量大于8kb),就会从SegmentPool中take一个Segment对象并添加到双向链表尾部。
当通过OutputStrem写数据时,会从双向链表的head节点开始读取,当Segment中的数据读取完毕后,就会将该Segment从双向链表中移除,并回收到SegmentPool中,等待下次复用。
5、超时机制
Okio的亮点之一就是增加了超时机制,防止因为意外导致I/O一直阻塞的问题,默认的超时机制是同步的。AsyncTimeout是Okio中异步超时机制的实现,它是一个单链表,结点按等待时间从小到大排序,head是一个头结点,起占位作用。使用了一个WatchDog的后台线程来不断的遍历所有节点,如果某个节点超时就会将该节点从链表中移除,并关闭Socket。
AsyncTimeout提供了3个方法enter、exit、timeout,分别用于流操作开始、结束、超时三种情况调用。
public class AsyncTimeout extends Timeout {

    //头结点,占位使用
    static
    AsyncTimeout head;

    //是否在链表中
    private boolean inQueue;

    //后继节点
    private
    AsyncTimeout next;

    //超时时间
    private long timeoutAt;
    //把当前AsyncTimeout对象加入节点
    public final void enter() {

        ...
        scheduleTimeout(this, timeoutNanos, hasDeadline);
    }

    private static synchronized void scheduleTimeout(
            AsyncTimeout node, long timeoutNanos, boolean hasDeadline) {

        //创建占位头结点并开启子线程
        if (head == null) {

            head = new AsyncTimeout();
            new Watchdog().start();
        }

        ...

        //插入到链表中,按照时间长短进行排序,等待事件越长越靠后
        for (AsyncTimeout prev = head; true; prev = prev.next) {

            if (prev.next == null || remainingNanos < prev.next.remainingNanos(now)) {

                node.next = prev.next;
                prev.next = node;
                if (prev == head) {

                    AsyncTimeout.class.notify(); // Wake up the watchdog when inserting at the front.
                }
                break;
            }
        }
    }

    //从链表中移除节点
    public final boolean exit() {

        if (!inQueue) return false;
        inQueue = false;
        return cancelScheduledTimeout(this);
    }

    //执行真正的移除操作
    private static synchronized boolean cancelScheduledTimeout(AsyncTimeout node) {

        // Remove the node from the linked list.
        for (AsyncTimeout prev = head; prev != null; prev = prev.next) {

            if (prev.next == node) {

                prev.next = node.next;
                node.next = null;
                return false;
            }
        }

        // The node wasn't found in the linked list: it must have timed out!
        return true;
    }

    //在子类中重写了该方法,主要是进行socket的关闭
    protected void timedOut() {

    }

    //监听节点是否超时的子线程
    private static final class Watchdog extends Thread {

        Watchdog() {

            super("Okio Watchdog");
            setDaemon(true);
        }

        public void run() {

            while (true) {

                try {

                    AsyncTimeout timedOut;
                    synchronized (AsyncTimeout.class) {

                        timedOut = awaitTimeout();
                        //代表头结点的后继节点已超时,
                        if (timedOut == null) continue;
                        //除头结点外没有任何其他节点
                        if (timedOut == head) {

                            head = null;
                            return;
                        }
                    }

                    //关闭socket
                    timedOut.timedOut();
                } catch (InterruptedException ignored) {

                }
            }
        }
    }


    static AsyncTimeout awaitTimeout() throws InterruptedException {

        AsyncTimeout node = head.next;
        //除了头结点外没有任何其他节点
        if (node == null) {

            long startNanos = System.nanoTime();
            AsyncTimeout.class.wait(IDLE_TIMEOUT_MILLIS);
            return head.next == null && (System.nanoTime() - startNanos) >= IDLE_TIMEOUT_NANOS
                    ? head  // The idle timeout elapsed.
                    : null; // The situation has changed.
        }

        long waitNanos = node.remainingNanos(System.nanoTime());

        //进行等待
        if (waitNanos > 0) {

            //等待
            long waitMillis = waitNanos / 1000000L;
            waitNanos -= (waitMillis * 1000000L);
            AsyncTimeout.class.wait(waitMillis, (int) waitNanos);
            return null;
        }

        //代表node节点已超时
        head.next = node.next;
        node.next = null;
        return node;
    }
}
默认都是未设置超时时间的,需要我们自己来设置,同步及异步的超时时间设置方式是一样的,通过下面代码即可。
    sink.timeout().deadline(1, TimeUnit.SECONDS);
    source.timeout().deadline(1,TimeUnit.MILLISECONDS);
6、生产者/消费者模型
在Okio中可以使用Pipe来实现一个生产者/消费者模型。Pipe维护了一个一定大小Buffer。当该Buffer容量达到最大时,线程就会等待直到该Buffer有剩余的空间。
public final class Pipe {

  //Pipe的最大容量
  final long maxBufferSize;
  //Pipe对应的Buffer
  final Buffer buffer = new Buffer();
  boolean sinkClosed;
  boolean sourceClosed;
  //写入流,对应着生产者
  private final Sink sink = new PipeSink();
  //读取流,对应着消费者
  private final Source source = new PipeSource();

  public Pipe(long maxBufferSize) {

    //最大容量不能小于1
    if (maxBufferSize < 1L) {

      throw new IllegalArgumentException("maxBufferSize < 1: " + maxBufferSize);
    }
    this.maxBufferSize = maxBufferSize;
  }
  ...
  //写入数据到Pipe中
  final class PipeSink implements Sink {

    final Timeout timeout = new Timeout();

    @Override public void write(Buffer source, long byteCount) throws IOException {

      synchronized (buffer) {

        ...

        while (byteCount > 0) {

          ...

          long bufferSpaceAvailable = maxBufferSize - buffer.size();
          if (bufferSpaceAvailable == 0) {

            //buffer中,没有剩余空间,等待消费者消费
            timeout.waitUntilNotified(buffer); // Wait until the source drains the buffer.
            continue;
          }

          long bytesToWrite = Math.min(bufferSpaceAvailable, byteCount);
          buffer.write(source, bytesToWrite);
          byteCount -= bytesToWrite;
          //通知buffer,有新的数据了,
          buffer.notifyAll(); // Notify the source that it can resume reading.
        }
      }
    }

    ...
  }
  //从Pipe中读取数据
  final class PipeSource implements Source {

    final Timeout timeout = new Timeout();

    @Override public long read(Buffer sink, long byteCount) throws IOException {

      synchronized (buffer) {

        ...

        while (buffer.size() == 0) {

          if (sinkClosed) return -1L;
          //Pipe中没有数据,等待生产者写入
          timeout.waitUntilNotified(buffer); // Wait until the sink fills the buffer.
        }

        long result = buffer.read(sink, byteCount);
        buffer.notifyAll(); // Notify the sink that it can resume writing.
        return result;
      }
    }
    ...
  }
}
Pipe的代码还是比较少的。下面就来如何使用Pipe。
    public void pipe() throws IOException {

        //设置Pipe的容量为1024字节,即1kb
        Pipe pipe = new Pipe(1024);
        new Thread(new Runnable() {

            @Override
            public void run() {

                try (BufferedSource bufferedSource = Okio.buffer(pipe.source())) {

                    //将Pipe中数据写入env4.txt这个文件中
                    bufferedSource.readAll(Okio.sink(new File("file/env4.txt")));
                } catch (IOException e) {

                    e.printStackTrace();
                }
            }
        }).start();

        new Thread(new Runnable() {

            @Override
            public void run() {

                try (BufferedSink bufferedSink = Okio.buffer(pipe.sink())) {

                    //将env3.txt中数据写入到Pipe中
                    bufferedSink.writeAll(Okio.source(new File("file/env3.txt")));
                } catch (IOException e) {

                    e.printStackTrace();
                }
            }
        }).start();
    }
7、总结
虽然没有将Okio的全部功能点一一讲解(如GZip),但经过前面梳理想必对Okio有了一个比较全面的了解。这对在以后的开发中熟练的使用Okio非常有帮助。需要注意的是,虽然Okio很好用,但Okio是在Java I/O、nio的基础上做了封装、优化,并不具备非阻塞I/O的特性。关于非阻塞I/O可以去学习netty这个库。
【参考资料】
拆轮子系列:拆 Okio
OkHttp之Okio源码分析(三)Okio读写流程梳理
Android学习笔记——Okio
深入理解okio的优化思想
发布者:全栈程序员-用户IM,转载请注明出处:https://javaforall.cn/131725.html原文链接:https://javaforall.cn
【正版授权,激活自己账号】: Jetbrains全家桶Ide使用,1年售后保障,每天仅需1毛
【官方授权 正版激活】: 官方授权 正版激活 支持Jetbrains家族下所有IDE 使用个人JB账号...
