大家好,又见面了,我是你们的朋友全栈君。
Springboot之前出现的问题
Spring框架需要进行大量的配置
项目的依赖管理冲突
为什么是SpringBoot
Spring Boot本身并不提供Spring框架的核心特性以及扩展功能,只是用于快速、敏捷地开发新一代基于Spring框架的应用程序。也就是说,它并不是用来替代Spring的解决方案,而是和Spring框架紧密结合用于提升Spring开发者体验的工具。
Spring Boot继承了Spring的优点,并新增了一些新功能和特性
(0)从字面理解,Boot是引导的意思,因此SpringBoot帮助开发者快速搭建Spring框架,Spring 项目引导页面可以在几秒构建一个项目
(1)Spring Boot 内置了多种种强大的测试框架,只需要在项目中引入spring-boot-start-test依赖包
(2)Spring Boot 的自动配置让配置变简单;
(3)SpringBoot的起步依赖让依赖管理更加简单;
(4)Spring Boot Actuator对应用系统监控的集成功能;
(5)现在spring boot和spring cloud是现在java开发框架的主流了
Spring Boot提供了一种新的编程范式,能在最小的阻力下开发Spring应用程序。有了它,你可以更加敏捷地开发Spring应用程序,专注于应用程序的功能,不用在Spring的配置上多花功夫,甚至完全不用配置。实际上,Spring Boot的一项重要工作就是让Spring不再成为你成功路上的绊脚石。 ——《SpringBoot实战》
springboot如何做到
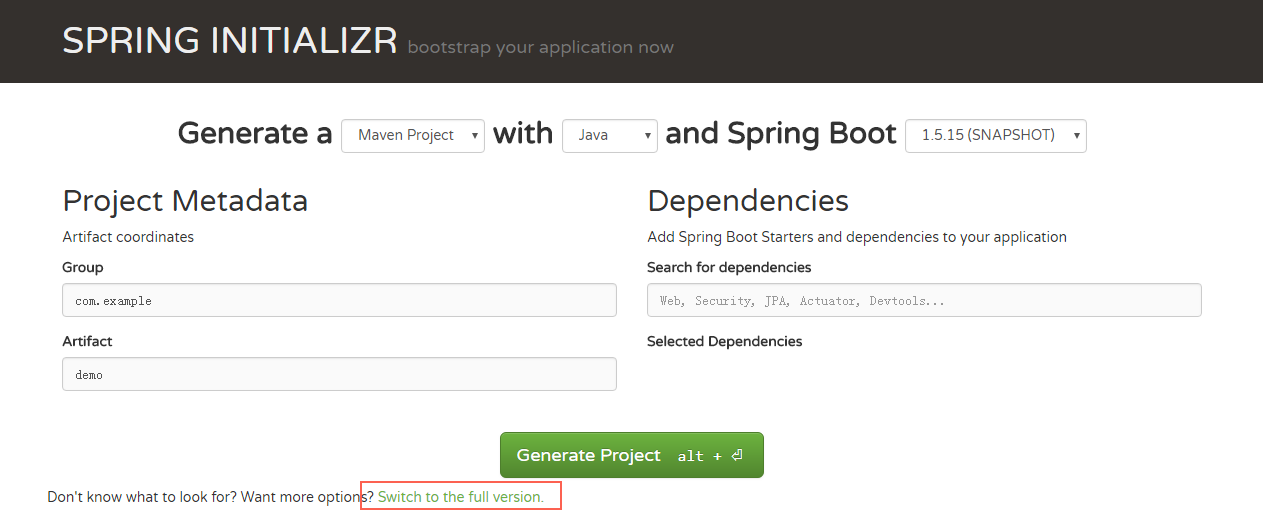
构建springboot项目
访问http://start.spring.io/
选择构建工具Maven Project、Spring Boot版本以及一些工程基本信息

下载压缩包以后直接导入到ide中就可以了,大概就是这个样子
这个是我大致画的一些spring的东西,先从代码结构说吧
http://naotu.baidu.com/file/e8972e3eff7fc8a1a54dd7c2d6d946d5
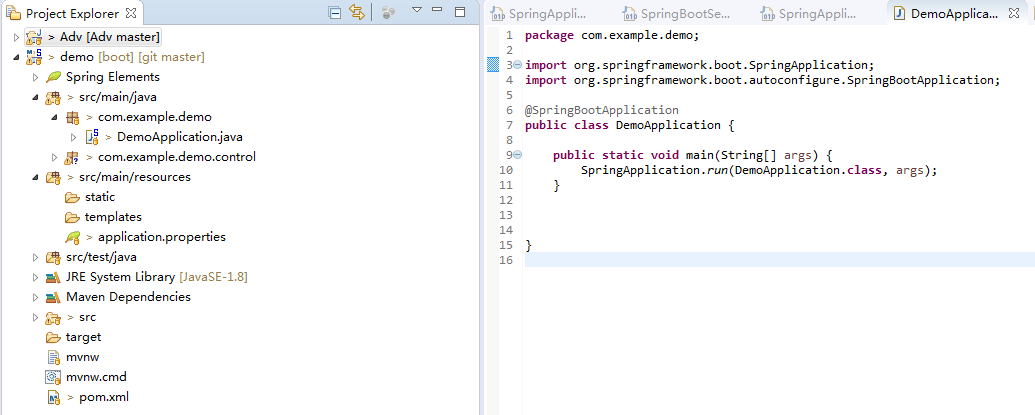
这是一般的主程序入口,当然在我们的项目中,因为并没有使用springboot内置的tomcat,所以启动方式有所不同
@SpringBootApplication
public class DemoApplication {
       public static void main(String[] args) {
              SpringApplication.run(DemoApplication.class, args);
       }
}
不适用内置tomcat的情况,原理没有区别
@SpringBootApplication
@EnableAutoConfiguration(exclude = { DataSourceAutoConfiguration.class, RedisAutoConfiguration.class,
DataSourceTransactionManagerAutoConfiguration.class, })
@ComponentScan({ "com.fanli.*" })
public class Application extends SpringBootServletInitializer {
@Override
protected SpringApplicationBuilder configure(SpringApplicationBuilder application) {
return application.sources(Application.class);
}
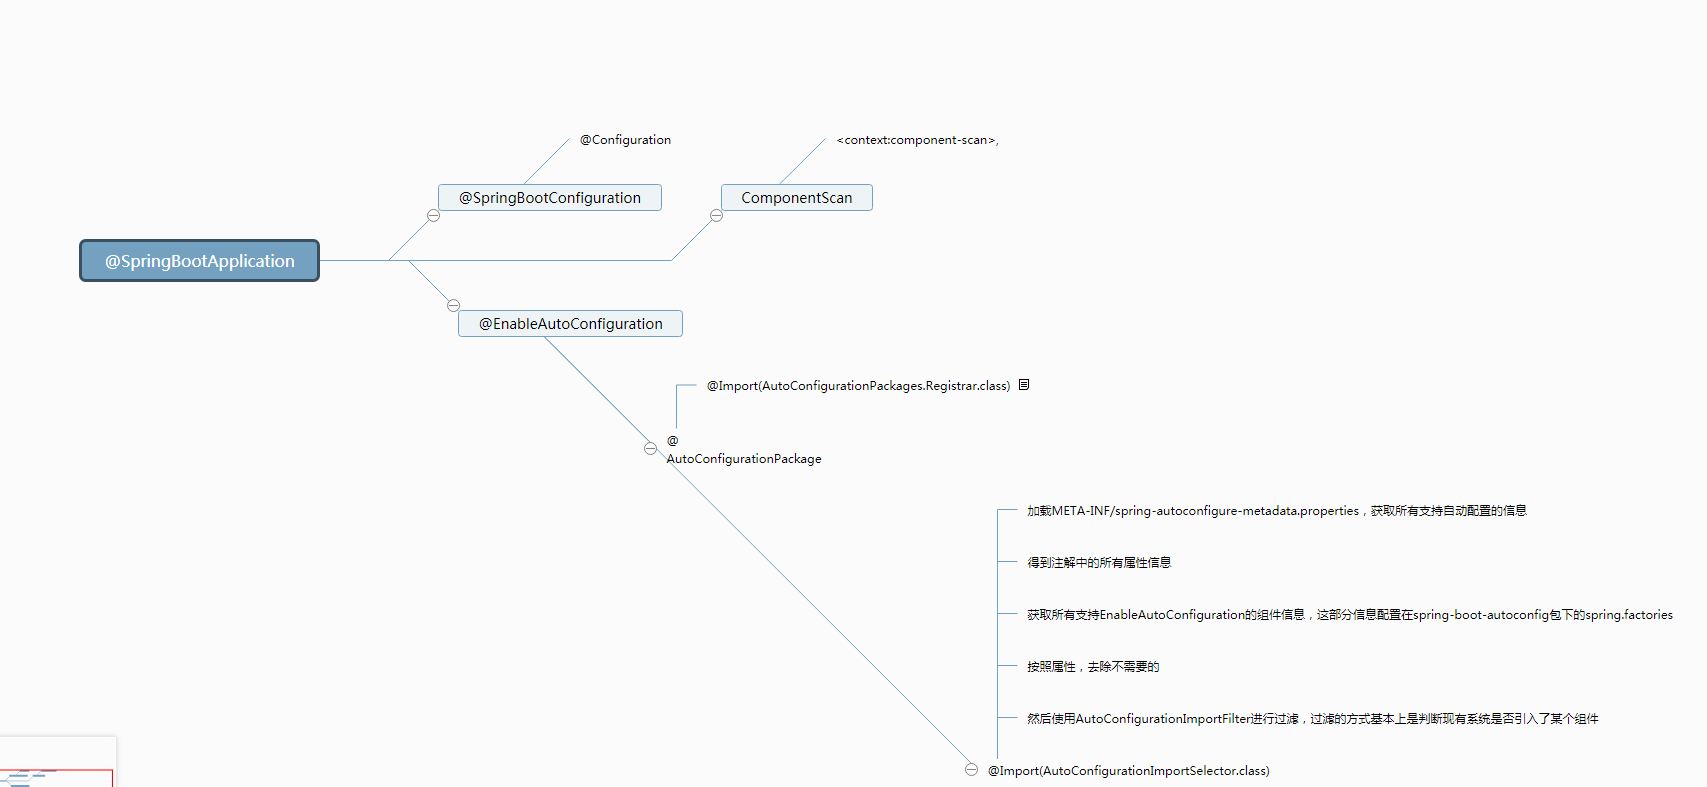
}按照下图分别讲一下源码
@SpringBootApplication
/** * Indicates a {
   @link Configuration configuration} class that declares one or more * {
   @link Bean @Bean} methods and also triggers {
   @link EnableAutoConfiguration * auto-configuration} and {
   @link ComponentScan component scanning}. This is a convenience * annotation that is equivalent to declaring {
   @code @Configuration}, * {
   @code @EnableAutoConfiguration} and {
   @code @ComponentScan}. * * @author Phillip Webb * @author Stephane Nicoll * @since 1.2.0 */
@Target(ElementType.TYPE)
@Retention(RetentionPolicy.RUNTIME)
@Documented
@Inherited
@SpringBootConfiguration
@EnableAutoConfiguration
@ComponentScan(excludeFilters = {
              @Filter(type = FilterType.CUSTOM, classes = TypeExcludeFilter.class),
              @Filter(type = FilterType.CUSTOM, classes = AutoConfigurationExcludeFilter.class) })
public @interface SpringBootApplication {
     ......
}
@SpringBootApplication实际是@SpringBootConfiguration,@EnableAutoConfiguration以及@ComponentScan的组合
/** * Indicates that a class provides Spring Boot application * {
   @link Configuration @Configuration}. Can be used as an alternative to the Spring's * standard {
   @code @Configuration} annotation so that configuration can be found * automatically (for example in tests). * <p> * Application should only ever include <em>one</em> {
   @code @SpringBootConfiguration} and * most idiomatic Spring Boot applications will inherit it from * {
   @code @SpringBootApplication}. * * @author Phillip Webb * @since 1.4.0 */
@Target(ElementType.TYPE)
@Retention(RetentionPolicy.RUNTIME)
@Documented
@Configuration
public @interface SpringBootConfiguration {
}
@SpringBootConfiguration而@Configuration有相同的作用,配备了该注解的类就能够以JavaConfig的方式完成一些配置,可以不再使用XML配置
@ComponentScan注解完成的是自动扫描的功能,相当于Spring XML配置文件中的
<context:component-scan >如果不设置的话默认扫描@ComponentScan注解所在类的同级类和同级目录下的所有类,所以对于一个Spring Boot项目,一般会把入口类放在顶层目录中,这样就能够保证源码目录下的所有类都能够被扫描到。如果需要设置的话如下代码
@SpringBootApplication
@EnableAutoConfiguration(exclude = { DataSourceAutoConfiguration.class, RedisAutoConfiguration.class,
              DataSourceTransactionManagerAutoConfiguration.class, })
@ComponentScan({ "com.fanli.*" })
public class Application extends SpringBootServletInitializer {
   。。。。。。
@EnableAutoConfiguration(核心)
这个注释告诉SpringBoot“猜”你将如何想配置Spring,基于你已经添加的依赖项,如果我们使用了spring-boot-starter-web并且已经添加Tomcat和Spring MVC,@EnableAutoConfiguration自动将假设您正在开发一个web应用程序并添加相应的Spring设置。
Spring Boot的自动配置是一个运行时(更准确地说,是应用程序启动时)的过程,考虑了众多因素,才决定Spring配置应该用哪个,不该用哪个。举个例子。Spring的JdbcTemplate是不是在Classpath里?如果是,并且有DataSource的Bean,则自动配置一个JdbcTemplate的Bean。每当应用程序启动的时候,Spring Boot的自动配置都要做将近200个这样的决定,涵盖安全、集成、持久化、Web开发等诸多方面。所有这些自动配置就是为了尽量不让你自己写配置。
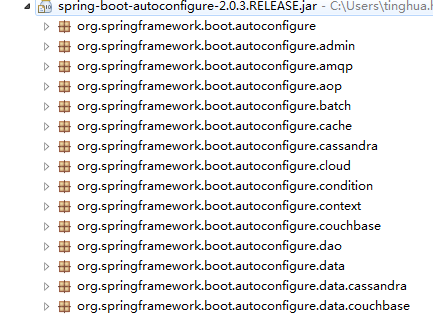
在向应用程序加入Spring Boot时,有个名为spring-boot-autoconfigure的JAR文件,其中包含了很多自动配置类(自动配置类就是普通的Spring @Configuration类,通过SpringFactoriesLoader机制完成加载,实现上通常使用@Conditional(比如@ConditionalOnClass或者@ConditionalOnMissingBean))。
每个配置类都在应用程序的Classpath里,都有机会为应用程序的配置添砖加瓦。这些配置类里有用于AOP的配置,有用于Spring Data JPA的配置,有用于Spiring MVC的配置,还有很多其他东西的配置,你可以自己选择是否在Spring应用程序里使用它们。
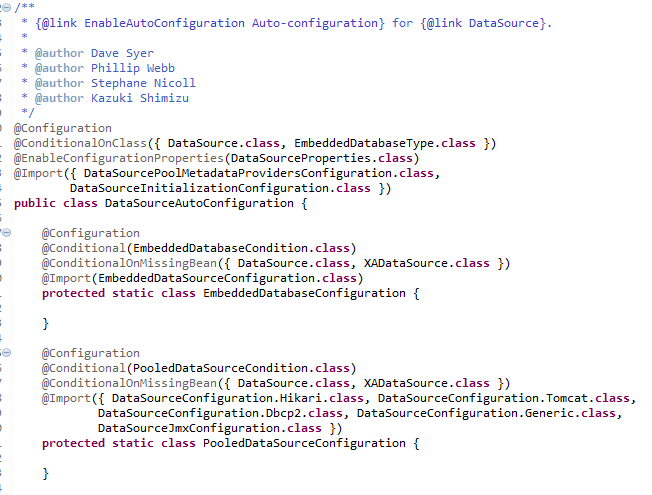
@SuppressWarnings("deprecation")
@Target(ElementType.TYPE)
@Retention(RetentionPolicy.RUNTIME)
@Documented
@Inherited
@AutoConfigurationPackage
@Import(EnableAutoConfigurationImportSelector.class)
public @interface EnableAutoConfiguration {
    // ... }
这个@AutoConfigurationPackage仅限于引入@Import(AutoConfigurationPackages.Registrar.class)
@Target(ElementType.TYPE)
@Retention(RetentionPolicy.RUNTIME)
@Documented
@Inherited
@Import(AutoConfigurationPackages.Registrar.class)
public @interface AutoConfigurationPackage {
    }
@Order(Ordered.HIGHEST_PRECEDENCE)
static class Registrar implements ImportBeanDefinitionRegistrar, DeterminableImports {
@Override
public void registerBeanDefinitions(AnnotationMetadata metadata,
BeanDefinitionRegistry registry) {
register(registry, new PackageImport(metadata).getPackageName());
}
@Override
public Set<Object> determineImports(AnnotationMetadata metadata) {
return Collections.<Object>singleton(new PackageImport(metadata));
}
} /**
* Programmatically registers the auto-configuration package names. Subsequent
* invocations will add the given package names to those that have already been
* registered. You can use this method to manually define the base packages that will
* be used for a given {@link BeanDefinitionRegistry}. Generally it's recommended that
* you don't call this method directly, but instead rely on the default convention
* where the package name is set from your {@code @EnableAutoConfiguration}
* configuration class or classes.
* @param registry the bean definition registry
* @param packageNames the package names to set
*/
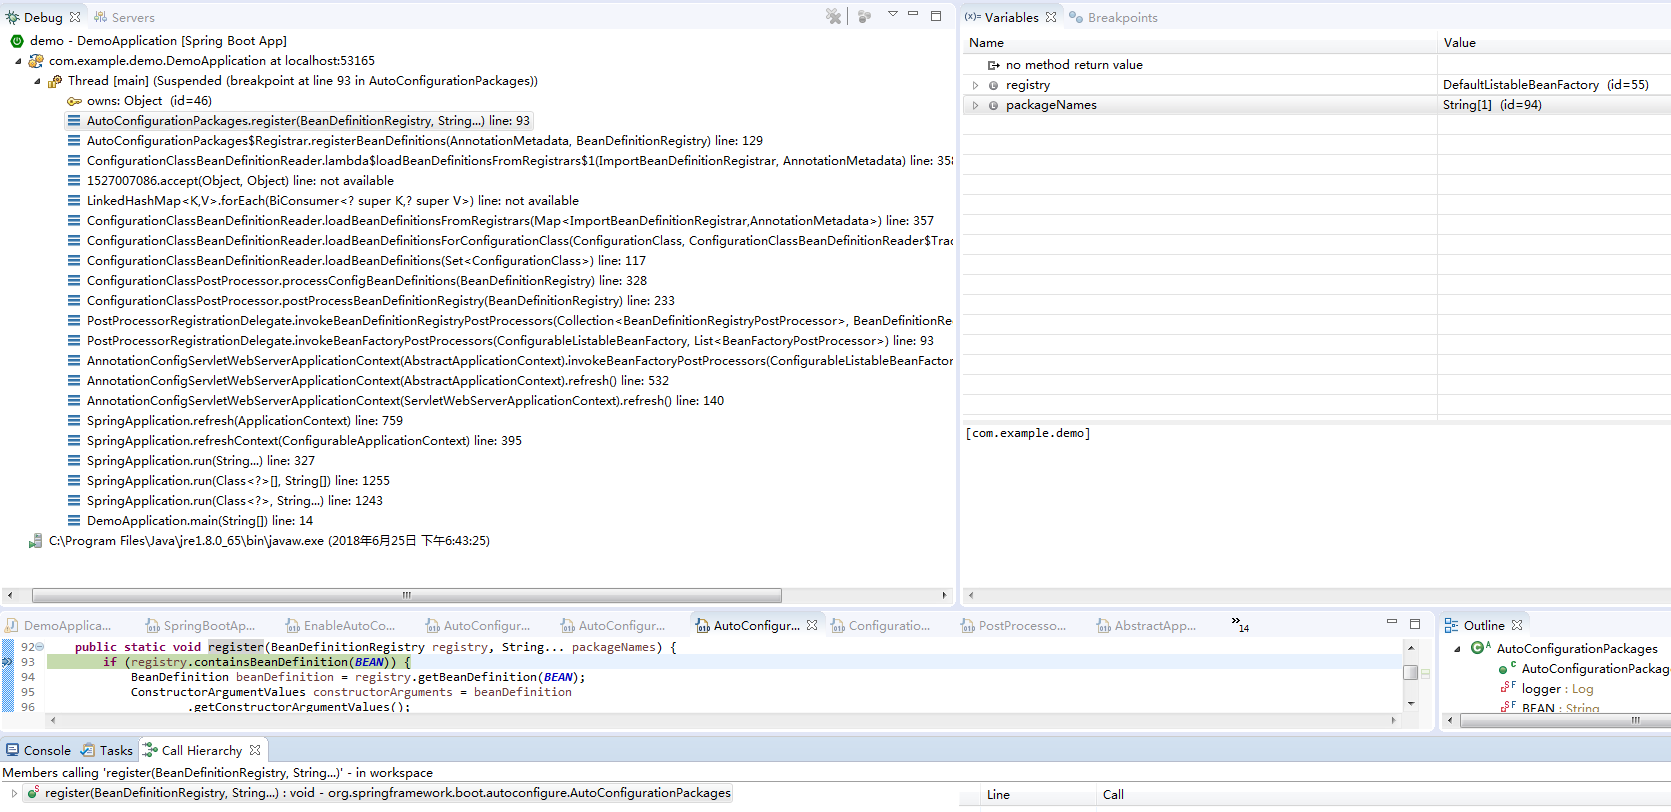
public static void register(BeanDefinitionRegistry registry, String... packageNames) {
if (registry.containsBeanDefinition(BEAN)) {
BeanDefinition beanDefinition = registry.getBeanDefinition(BEAN);
ConstructorArgumentValues constructorArguments = beanDefinition
.getConstructorArgumentValues();
constructorArguments.addIndexedArgumentValue(0,
addBasePackages(constructorArguments, packageNames));
}
else {
GenericBeanDefinition beanDefinition = new GenericBeanDefinition();
beanDefinition.setBeanClass(BasePackages.class);
beanDefinition.getConstructorArgumentValues().addIndexedArgumentValue(0,
packageNames);
beanDefinition.setRole(BeanDefinition.ROLE_INFRASTRUCTURE);
registry.registerBeanDefinition(BEAN, beanDefinition);
}
}从注释中可以看出,它的功能简单说就是将应用的 package给注册到Spring容器中,供后续使用,还说了不推荐手动来注册
然后debug的时候看一下,packageNames只有我们的rootpackage(com.example.demo),这里也就是将应用的root package给注册到Spring容器中,供后续使用。
顺便还可以看看调用栈,调用register方法的时间在容器刷新期间:
refresh -> invokeBeanFactoryPostProcessors -> invokeBeanDefinitionRegistryPostProcessors -> postProcessBeanDefinitionRegistry -> processConfigBeanDefinitions(开始处理配置Bean的定义) -> loadBeanDefinitions -> loadBeanDefinitionsForConfigurationClass(读取配置Class中的Bean定义) -> loadBeanDefinitionsFromRegistrars(这里开始准备进入上面的register方法) -> registerBeanDefinitions(即上述方法)
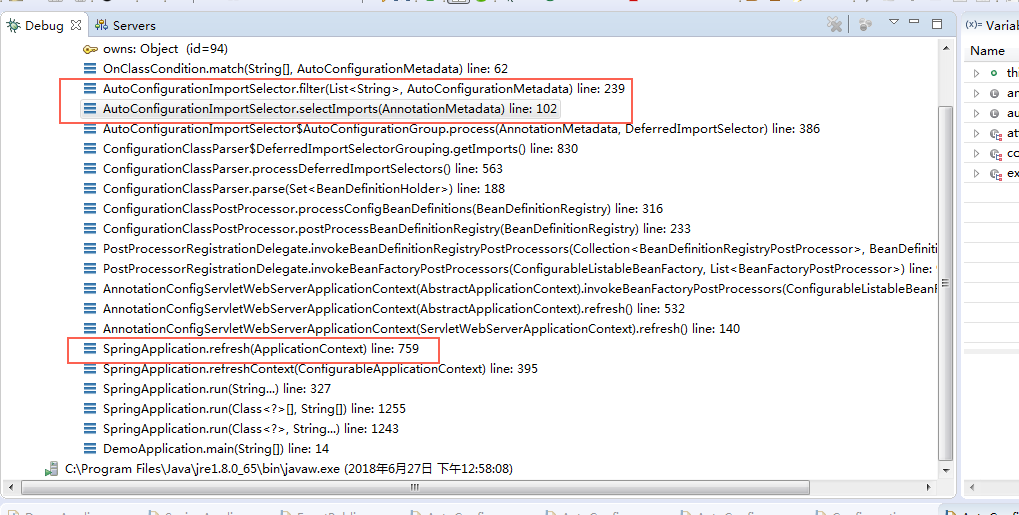
@Import(AutoConfigurationImportSelector.class)
       /** * 最主要的方法 * annotationMetadata * [@org.springframework.boot.autoconfigure.SpringBootApplication * (scanBasePackageClasses=[], excludeName=[], exclude=[], scanBasePackages=[])] * @param annotationMetadata * @return */
       @Override
       public String[] selectImports(AnnotationMetadata annotationMetadata) {
              if (!isEnabled(annotationMetadata)) {
                     return NO_IMPORTS;
              }
              /** * 加载META-INF/spring-autoconfigure-metadata.properties,获取所有支持自动配置的信息 */
              AutoConfigurationMetadata autoConfigurationMetadata = AutoConfigurationMetadataLoader
                           .loadMetadata(this.beanClassLoader);
              /** * 得到注解中的所有属性信息{excludeName=[], exclude=[]} */
              AnnotationAttributes attributes = getAttributes(annotationMetadata);
              /** * 获取所有支持EnableAutoConfiguration的组件信息,这部分信息配置在spring-boot-autoconfig包下的spring.factories下 * * 使用了内部工具使用SpringFactoriesLoader,查找classpath上所有jar包中的 * META-INF\spring.factories,找出其中key为 * org.springframework.boot.autoconfigure.EnableAutoConfiguration * 的属性定义的工厂类名称。 */
              List<String> configurations = getCandidateConfigurations(annotationMetadata,
                           attributes);
              configurations = removeDuplicates(configurations);
              /** * 去除不需要的 * @EnableAutoConfiguration(exclude = { DataSourceAutoConfiguration.class, RedisAutoConfiguration.class, DataSourceTransactionManagerAutoConfiguration.class, }) */
              Set<String> exclusions = getExclusions(annotationMetadata, attributes);
              checkExcludedClasses(configurations, exclusions);
              configurations.removeAll(exclusions);
              /** * 然后使用AutoConfigurationImportFilter进行过滤,过滤的方式基本上是判断现有系统是否引入了某个组件,(系统是否使用哪个组件是在pom定义的时候就确定了的) * ,如果有的话则进行相关配置。比如ServletWebServerFactoryAutoConfiguration * ,会在ServletRequest.class等条件存在的情况下进行配置, * 而EmbeddedTomcat会在Servlet.class, Tomcat.class存在的情况下创建TomcatServletWebServerFactory * * org.springframework.boot.autoconfigure.condition.OnClassCondition * 总而言之,此过滤器会检查候选配置类的注解@ConditionalOnClass,如果要求的类在classpath 中不存在,则这个候选配置类会被排除掉 */
              configurations = filter(configurations, autoConfigurationMetadata);
               /** * 现在已经找到所有需要被应用的候选配置类 * 广播事件AutoConfigurationImportEvent */
              fireAutoConfigurationImportEvents(configurations, exclusions);
              return StringUtils.toStringArray(configurations);
       }


private void fireAutoConfigurationImportEvents(List<String> configurations,
                     Set<String> exclusions) {
              List<AutoConfigurationImportListener> listeners = getAutoConfigurationImportListeners();
              if (!listeners.isEmpty()) {
                     AutoConfigurationImportEvent event = new AutoConfigurationImportEvent(this,
                                  configurations, exclusions);
                     for (AutoConfigurationImportListener listener : listeners) {
                           invokeAwareMethods(listener);
                           listener.onAutoConfigurationImportEvent(event);
                     }
              }
 }
# Auto Configuration Import Listeners
org.springframework.boot.autoconfigure.AutoConfigurationImportListener=\
org.springframework.boot.autoconfigure.condition.ConditionEvaluationReportAutoConfigurationImportListenerprotected List<String> getCandidateConfigurations(AnnotationMetadata metadata, AnnotationAttributes attributes) {
List<String> configurations = SpringFactoriesLoader.loadFactoryNames(getSpringFactoriesLoaderFactoryClass(),getBeanClassLoader());
Assert.notEmpty(configurations, "No auto configuration classes found in META-INF/spring.factories. If you "
+ "are using a custom packaging, make sure that file is correct.");
return configurations;
}// 传入的factoryClass:org.springframework.boot.autoconfigure.EnableAutoConfiguration
public static List<String> loadFactoryNames(Class<?> factoryClass, ClassLoader classLoader) {
String factoryClassName = factoryClass.getName();
try {
Enumeration<URL> urls = (classLoader != null ? classLoader.getResources(FACTORIES_RESOURCE_LOCATION)
: ClassLoader.getSystemResources(FACTORIES_RESOURCE_LOCATION));
List<String> result = new ArrayList<String>();
while (urls.hasMoreElements()) {
URL url = urls.nextElement();
Properties properties = PropertiesLoaderUtils.loadProperties(new UrlResource(url));
String factoryClassNames = properties.getProperty(factoryClassName);
result.addAll(Arrays.asList(StringUtils.commaDelimitedListToStringArray(factoryClassNames)));
}
return result;
} catch (IOException ex) {
throw new IllegalArgumentException("Unable to load [" + factoryClass.getName()
+ "] factories from location [" + FACTORIES_RESOURCE_LOCATION + "]", ex);
}
}
// 相关常量 public static final String FACTORIES_RESOURCE_LOCATION =
// "META-INF/spring.factories";这段代码的意图很明确,在第一篇文章讨论Spring Boot启动过程的时候就已经接触到了。它会从类路径中拿到所有名为META-INF/spring.factories的配置文件,然后按照factoryClass的名称取到对应的值。那么我们就来找一个META-INF/spring.factories配置文件看看。
# Auto Configure
org.springframework.boot.autoconfigure.EnableAutoConfiguration=\
org.springframework.boot.autoconfigure.admin.SpringApplicationAdminJmxAutoConfiguration,\
org.springframework.boot.autoconfigure.aop.AopAutoConfiguration,\
org.springframework.boot.autoconfigure.amqp.RabbitAutoConfiguration,\
org.springframework.boot.autoconfigure.batch.BatchAutoConfiguration,\
org.springframework.boot.autoconfigure.cache.CacheAutoConfiguration,\
org.springframework.boot.autoconfigure.cassandra.CassandraAutoConfiguration,\
org.springframework.boot.autoconfigure.cloud.CloudAutoConfiguration,\
org.springframework.boot.autoconfigure.context.ConfigurationPropertiesAutoConfiguration,\
org.springframework.boot.autoconfigure.context.MessageSourceAutoConfiguration,\
org.springframework.boot.autoconfigure.context.PropertyPlaceholderAutoConfiguration,\
。。。。。。
列举了非常多的自动配置候选项,挑一个AOP相关的AopAutoConfiguration看看究竟:
/ 如果设置了spring.aop.auto=false,那么AOP不会被配置
// 需要检测到@EnableAspectJAutoProxy注解存在才会生效
// 默认使用JdkDynamicAutoProxyConfiguration,如果设置了spring.aop.proxy-target-class=true,那么使用CglibAutoProxyConfiguration
@Configuration
@ConditionalOnClass({ EnableAspectJAutoProxy.class, Aspect.class, Advice.class })
@ConditionalOnProperty(prefix = “spring.aop”, name = “auto”, havingValue = “true”, matchIfMissing = true)
public class AopAutoConfiguration {
@Configuration
@EnableAspectJAutoProxy(proxyTargetClass = false)
@ConditionalOnProperty(prefix = “spring.aop”, name = “proxy-target-class”, havingValue = “false”, matchIfMissing = true)
public static class JdkDynamicAutoProxyConfiguration {
}
@Configuration
@EnableAspectJAutoProxy(proxyTargetClass = true)
@ConditionalOnProperty(prefix = “spring.aop”, name = “proxy-target-class”, havingValue = “true”, matchIfMissing = false)
public static class CglibAutoProxyConfiguration {
}
}
如果存在并且值为true的话使用基于CGLIB字节码操作的动态代理方案,否则使用JDK自带的动态代理机制。在这个配置类中,使用到了两个全新的注解:
@ConditionalOnClass
@ConditionalOnProperty
从这两个注解的名称,就大概能够猜出它们的功能了:
@ConditionalOnClass
当类路径上存在指定的类时,满足条件。
@ConditionalOnProperty
当配置中存在指定的属性时,满足条件。
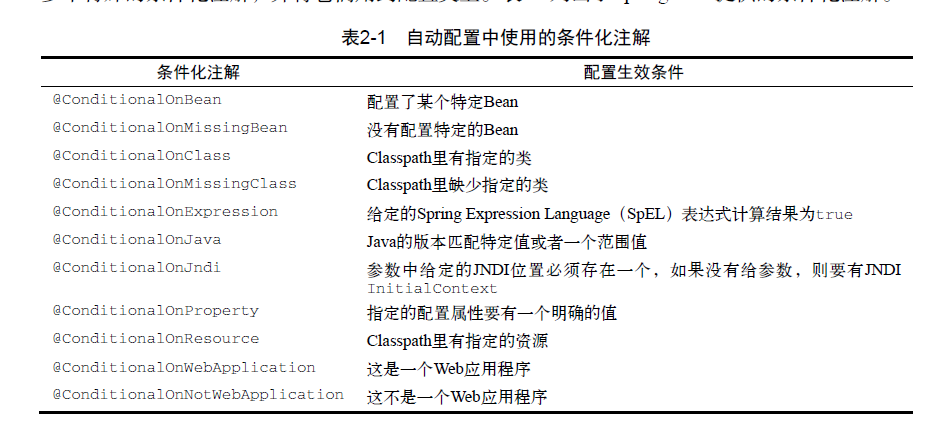
其实除了这两个注解之外,还有几个类似的,它们都在org.springframework.boot.autoconfigure.condition这个包下,在具体介绍实现之前,下面先来看看Spring Boot对于@Conditional的扩展。
Spring Boot对于@Conditional的扩展Spring Boot提供了一个实现了Condition接口的抽象类SpringBootCondition。这个类的主要作用是打印一些用于诊断的日志,告诉用户哪些类型被自动配置了。它实现Condition接口的方法:
   @Override
   public final boolean matches(ConditionContext context, AnnotatedTypeMetadata metadata) {
          String classOrMethodName = getClassOrMethodName(metadata);
          try {
                 ConditionOutcome outcome = getMatchOutcome(context, metadata);
                 logOutcome(classOrMethodName, outcome);
                 recordEvaluation(context, classOrMethodName, outcome);
                 return outcome.isMatch();
          } catch (NoClassDefFoundError ex) {
                 throw new IllegalStateException("Could not evaluate condition on " + classOrMethodName + " due to "
                              + ex.getMessage() + " not " + "found. Make sure your own configuration does not rely on "
                              + "that class. This can also happen if you are "
                              + "@ComponentScanning a springframework package (e.g. if you "
                              + "put a @ComponentScan in the default package by mistake)", ex);
          } catch (RuntimeException ex) {
                 throw new IllegalStateException("Error processing condition on " + getName(metadata), ex);
          }
   }
   /**
    * * Determine the outcome of the match along with suitable log output. * @param
    * context the condition context * @param metadata the annotation metadata
    * * @return the condition outcome
    */
   public abstract ConditionOutcome getMatchOutcome(ConditionContext context, AnnotatedTypeMetadata metadata);
在Spring里可以很方便地编写你自己的条件,你所要做的就是实现Condition接口,覆盖它的matches()方法
Spring Boot定义了很多更有趣的条件,并把它们运用到了配置类上,这些配置类构成了Spring Boot的自动配置。Spring Boot运用条件化配置的方法是,定义
多个特殊的条件化注解,并将它们用到配置类上。
看一下这个calss的调用栈
在说一下springboot的启动过程
@SpringBootApplication
public class DemoApplication {

       public static void main(String[] args) {
              SpringApplication.run(DemoApplication.class, args);
       }
}


       /** * Static helper that can be used to run a {@link SpringApplication} from the * specified sources using default settings and user supplied arguments. * @param primarySources the primary sources to load * @param args the application arguments (usually passed from a Java main method) * @return the running {@link ApplicationContext} */
       public static ConfigurableApplicationContext run(Class<?>[] primarySources,
                     String[] args) {
              return new SpringApplication(primarySources).run(args);
       }
它实际上会构造一个SpringApplication的实例,然后运行它的run方法,而run方法返回一个ConfigurableApplicationContext,看一下构造SpringApplication实列的地方
/** * Create a new {@link SpringApplication} instance. The application context will load * beans from the specified primary sources (see {@link SpringApplication class-level} * documentation for details. The instance can be customized before calling * {@link #run(String...)}. * @param resourceLoader the resource loader to use * @param primarySources the primary bean sources * @see #run(Class, String[]) * @see #setSources(Set) */
@SuppressWarnings({ "unchecked", "rawtypes" })
public SpringApplication(ResourceLoader resourceLoader, Class<?>... primarySources) {
this.resourceLoader = resourceLoader;//resourceLoader接口,提供资源导入,见链接https://www.cnblogs.com/doit8791/p/5774743.html
Assert.notNull(primarySources, "PrimarySources must not be null");
this.primarySources = new LinkedHashSet<>(Arrays.asList(primarySources)); //此处为DemoApplication.class
//推断应用类型,Standard还是Web
this.webApplicationType = deduceWebApplicationType();
//
/** * 设置初始化器(Initializer) * getSpringFactoriesInstances(ApplicationContextInitializer.class) * 从类路径的META-INF/spring.factories处读取相应配置文件,然后进行遍历,读取配置文件中Key为: * org.springframework.context.ApplicationContextInitializer的value * value是一系列类名,实例化后this.initializers.addAll(initializers);全部set到SpringApplication中 * 在Spring上下文被刷新之前进行初始化的操作。典型地比如在Web应用中,注册Property Sources或者是激活Profiles。 * Property Sources比较好理解,就是配置文件。Profiles是Spring为了在不同环境下(如DEV,TEST,PRODUCTION等),加载不同的配置项而抽象出来的一个实体 *ConfigurableApplicationContext.refresh()或SpringApplication.run()中用到 * */
setInitializers((Collection) getSpringFactoriesInstances(
ApplicationContextInitializer.class));
/** * 设置setListeners,设置方式和初始化器一样 */
setListeners((Collection) getSpringFactoriesInstances(ApplicationListener.class));
/** * 获取入口类的信息 */
this.mainApplicationClass = deduceMainApplicationClass();
}
其实就是获得容器ConfigurableApplicationContext之前初始化了一系列Initializers和Listeners
实际run方法:
public ConfigurableApplicationContext run(String... args) {
// 计时工具
StopWatch stopWatch = new StopWatch();
stopWatch.start();
ConfigurableApplicationContext context = null;
Collection<SpringBootExceptionReporter> exceptionReporters = new ArrayList<>();
// 设置java.awt.headless系统属性为true - 没有图形化界面
configureHeadlessProperty();
/** * 获取SpringApplicationRunListeners * getSpringFactoriesInstances方法,从META-INF/spring.factories中读取 * Key为org.springframework.boot.SpringApplicationRunListener的Values * SpringApplicationEvent:它会利用一个内部的ApplicationEventMulticaster在上下文实际被刷新之前对事件进行处理 * 它实际上是一个事件中转器,它能够感知到Spring Boot启动过程中产生的事件,然后有选择性的将事件进行中转 */
// Spring事件体系 https://blog.csdn.net/caihaijiang/article/details/7460888
SpringApplicationRunListeners listeners = getRunListeners(args);
// 发出开始执行的事件
listeners.starting();
try {
ApplicationArguments applicationArguments = new DefaultApplicationArguments(args);
// 根据SpringApplicationRunListeners以及参数来准备环境
ConfigurableEnvironment environment = prepareEnvironment(listeners, applicationArguments);
configureIgnoreBeanInfo(environment);
// 准备Banner打印器 - 就是启动Spring Boot的时候打印在console上的ASCII艺术字体
Banner printedBanner = printBanner(environment);
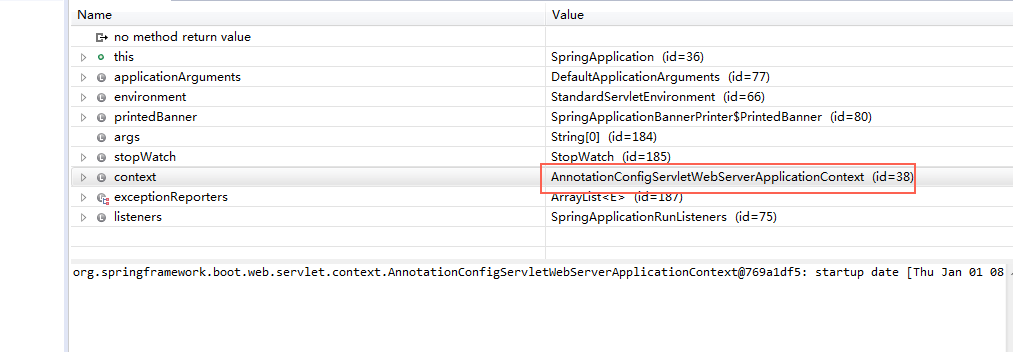
// 创建Spring上下文,根据之前获得的应用类型,创建ConfigurableApplicationContext实列可以看到实际上创建的是AnnotationConfigApplicationContext或AnnotationConfigEmbeddedWebApplicationContext。
context = createApplicationContext();
//SpringBootExceptionReporter,在spring.factories中能看到
exceptionReporters = getSpringFactoriesInstances(SpringBootExceptionReporter.class,
new Class[] { ConfigurableApplicationContext.class }, context);
// Spring上下文前置处理,prepareContext方法中将会执行每个initializers的逻辑
prepareContext(context, environment, listeners, applicationArguments, printedBanner);
// Spring上下文刷新
refreshContext(context);
// Spring上下文后置处理
afterRefresh(context, applicationArguments);
// 发出结束执行的事件
stopWatch.stop();
if (this.logStartupInfo) {
new StartupInfoLogger(this.mainApplicationClass).logStarted(getApplicationLog(), stopWatch);
}
listeners.started(context);
callRunners(context, applicationArguments);
} catch (Throwable ex) {
handleRunFailure(context, ex, exceptionReporters, listeners);
throw new IllegalStateException(ex);
}
try {
listeners.running(context);
} catch (Throwable ex) {
handleRunFailure(context, ex, exceptionReporters, null);
throw new IllegalStateException(ex);
}
return context;
}
private void prepareContext(ConfigurableApplicationContext context,
ConfigurableEnvironment environment, SpringApplicationRunListeners listeners,
ApplicationArguments applicationArguments, Banner printedBanner) {
context.setEnvironment(environment);
postProcessApplicationContext(context);
//调用之前准备好的ApplicationContextInitializer
applyInitializers(context);
listeners.contextPrepared(context);
if (this.logStartupInfo) {
logStartupInfo(context.getParent() == null);
logStartupProfileInfo(context);
}
// Add boot specific singleton beans
context.getBeanFactory().registerSingleton("springApplicationArguments",
applicationArguments);
if (printedBanner != null) {
context.getBeanFactory().registerSingleton("springBootBanner", printedBanner);
}
// Load the sources
Set<Object> sources = getAllSources();
Assert.notEmpty(sources, "Sources must not be empty");
load(context, sources.toArray(new Object[0]));
//将SpringApplication自己拥有的ApplicationListener加入到ApplicationContext,发送ApplicationPreparedEvent
listeners.contextLoaded(context);
}# Application Context Initializers
org.springframework.context.ApplicationContextInitializer=\
org.springframework.boot.context.ConfigurationWarningsApplicationContextInitializer,\ // to report warnings for common misconfiguration,用来报告Spring容器的一些常见的错误配置的
org.springframework.boot.context.ContextIdApplicationContextInitializer,\//为ApplicationContext设置id
org.springframework.boot.context.config.DelegatingApplicationContextInitializer,\//委派处理ApplicationContext初始化器
org.springframework.boot.web.context.ServerPortInfoApplicationContextInitializer//添加一个EmbeddedServletContainerInitializedEvent事件监听,触发设置嵌入的WEB服务启动端口。通过属性local.[namespace].port来设置启动端口,其中namespace为ApplicationContext指定的命名空间,如果命名空间为空,则使用local.server.port属性来表示配置的端口
最终可以看到AbstractApplicationContext的refresh方法
      @Override
       public void refresh() throws BeansException, IllegalStateException {
              synchronized (this.startupShutdownMonitor) {
                     // Prepare this context for refreshing.
                     prepareRefresh();
                     // Tell the subclass to refresh the internal bean factory.
                     ConfigurableListableBeanFactory beanFactory = obtainFreshBeanFactory();
                     // Prepare the bean factory for use in this context.
                     prepareBeanFactory(beanFactory);
                     try {
                           // Allows post-processing of the bean factory in context subclasses.
                           postProcessBeanFactory(beanFactory);
                           // Invoke factory processors registered as beans in the context.
                           invokeBeanFactoryPostProcessors(beanFactory);
                           // Register bean processors that intercept bean creation.
                           registerBeanPostProcessors(beanFactory);
                           // Initialize message source for this context.
                           initMessageSource();
                           // Initialize event multicaster for this context.
                           initApplicationEventMulticaster();
                           // Initialize other special beans in specific context subclasses.
                           onRefresh();
                           // Check for listener beans and register them.
                           registerListeners();
                           // Instantiate all remaining (non-lazy-init) singletons.
                           finishBeanFactoryInitialization(beanFactory);
                           // Last step: publish corresponding event.
                           finishRefresh();
                     }
                     catch (BeansException ex) {
                           if (logger.isWarnEnabled()) {
                                  logger.warn("Exception encountered during context initialization - " +
                                                "cancelling refresh attempt: " + ex);
                           }
                           // Destroy already created singletons to avoid dangling resources.
                           destroyBeans();
                           // Reset 'active' flag.
                           cancelRefresh(ex);
                           // Propagate exception to caller.
                           throw ex;
                     }
                     finally {
                           // Reset common introspection caches in Spring's core, since we
                           // might not ever need metadata for singleton beans anymore...
                           resetCommonCaches();
                     }
              }
       }
在之前的的讲解中可以看到调用栈 invokeBeanFactoryPostProcessors(beanFactory);这里的时候,自动配置会起作用
SpringApplication实例的构建过程
其中主要涉及到了初始化器(Initializer)以及监听器(Listener)这两大概念,它们都通过META-INF/spring.factories完成定义。
SpringApplication实例run方法的执行过程
其中主要有一个SpringApplicationRunListeners的概念,它作为Spring Boot容器初始化时各阶段事件的中转器,将事件派发给感兴趣的Listeners(在SpringApplication实例的构建过程中得到的)。这些阶段性事件将容器的初始化过程给构造起来,提供了比较强大的可扩展性。
改造过程中遇到的坑
1.原先项目改造中,有大量的xml配置文件,如果单纯的改为springboot项目的无xml配置,反而很麻烦,和springboot的某些目的背道而驰
@Configuration
@ImportResource(locations={

  "classpath:context/ehcache.xml"})
public class EncacheConfig {

}
2.在一个系统中,出现多个datasource时候出现的问题
自动装配(autowiring)要求bean的匹配具备唯一性,否则就会产生歧义,从而抛出异常
@EnableAutoConfiguration(exclude = { DataSourceAutoConfiguration.class, RedisAutoConfiguration.class,
              DataSourceTransactionManagerAutoConfiguration.class, })
3.spring项目启动太慢的问题
54607 ms
删除@SpringBootApplication 52118ms 几乎没有区别
修改import 36238 ms
最终改为
@Configuration
@Import({
        DispatcherServletAutoConfiguration.class,
// EmbeddedServletContainerAutoConfiguration.class,
// ErrorMvcAutoConfiguration.class,
// HttpEncodingAutoConfiguration.class,
        HttpMessageConvertersAutoConfiguration.class,
// JacksonAutoConfiguration.class,
// JmxAutoConfiguration.class,
// MultipartAutoConfiguration.class,
        ServerPropertiesAutoConfiguration.class,
        WebMvcAutoConfiguration.class,
// WebSocketAutoConfiguration.class,
})
@ComponentScan({ "com.fanli.*" })
public class Application extends SpringBootServletInitializer {
@SpringBootApplication注解来自动获取应用的配置信息,但这样也会带来一些副作用。使用这个注解后,会触发自动配置(auto-configuration)和组件扫描(component scanning),这跟使用@Configuration、@EnableAutoConfiguration和@ComponentScan三个注解的作用是
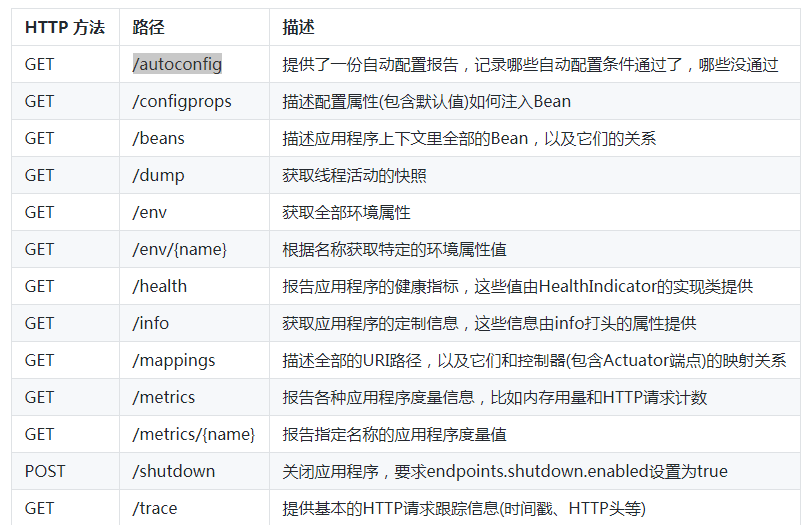
可以通过Actuator的/autoconfig接口去看
4.多个springboot项目在同一台机器上启动(内测)时候的问题,多应用在同一个容器中
spring.jmx.default-domain=opendomain
endpoints.jmx.domain=opendomain
指定JMX domain name
https://www.zhihu.com/question/36688387
https://stackoverflow.com/questions/28197414/spring-cloud-error-deploying-two-eureka-clients-in-one-container
5.log日志的问题
@Order(1)
public class CommonInitializer implements WebApplicationInitializer {

    @Override
    public void onStartup(ServletContext servletContext)
            throws ServletException {
        //Log4jConfigListener
       servletContext.setInitParameter("webAppRootKey", "mall-open-api.root");
        servletContext.setInitParameter("log4jConfigLocation", "classpath:properties/log4j.properties");
        servletContext.addListener(Log4jConfigListener.class);
        //OpenSessionInViewFilter

    }
}
ServletContainerInitializer
Servlet 3.0引入的接口,用于在web应用启动时动态添加servlet、filter和listener;
基于spi机制,META-INF/services/javax.servlet.ServletContainerInitializer文件中存放实现该接口的类,这些类会被容器调用
SpringServletContainerInitializer作为ServletContainerInitializer的实现类,通过SPI机制,在web容器加载的时候会自动的被调用。(这个类上还有一个注解@HandlesTypes,它的作用是将感兴趣的一些类注入到ServletContainerInitializerde), 而这个类的方法又会扫描找到WebApplicationInitializer的实现类,调用它的onStartup方法,从而起到启动web.xml相同的作用。
发布者:全栈程序员-用户IM,转载请注明出处:https://javaforall.cn/131720.html原文链接:https://javaforall.cn
【正版授权,激活自己账号】: Jetbrains全家桶Ide使用,1年售后保障,每天仅需1毛
【官方授权 正版激活】: 官方授权 正版激活 支持Jetbrains家族下所有IDE 使用个人JB账号...
