大家好,又见面了,我是你们的朋友全栈君。
IDEA GridLayout
用xml就直接加就好
详见
https://blog.csdn.net/weixin_39251617/article/details/79711668
但是用Java代码添加就比较麻烦
代码:
xml
<?xml version="1.0" encoding="utf-8"?>
<RelativeLayout  xmlns:android="http://schemas.android.com/apk/res/android" xmlns:tools="http://schemas.android.com/tools" xmlns:app="http://schemas.android.com/apk/res-auto" android:layout_width="match_parent" android:layout_height="match_parent" tools:context=".MainActivity">

    <TextView  android:id="@+id/t1" android:layout_width="match_parent" android:layout_height="wrap_content" android:text="just a text view!" android:background="@android:color/white" android:textSize="50sp" android:gravity="center" app:layout_constraintTop_toTopOf="parent"/>

    <GridLayout  android:id="@+id/g1" android:columnCount="4" android:rowCount="5" android:layout_below="@+id/t1" android:layout_width="match_parent" android:layout_height="wrap_content">
        <TextView  android:id="@+id/t2" android:layout_width="match_parent" android:layout_height="wrap_content" android:text="grid_text" android:background="@android:color/holo_green_light" android:textSize="50sp" android:layout_columnSpan="4" android:gravity="center" app:layout_constraintTop_toTopOf="parent"/>
    </GridLayout>

</RelativeLayout>
Java代码:
package com.example.ruchu.gridlayout;

import android.support.v7.app.AppCompatActivity;
import android.os.Bundle;
import android.view.Gravity;
import android.widget.Button;
import android.widget.GridLayout;

public class MainActivity extends AppCompatActivity {

    GridLayout gridLayout;

    @Override
    protected void onCreate(Bundle savedInstanceState) {
        super.onCreate(savedInstanceState);
        setContentView(R.layout.activity_main);

        gridLayout = findViewById(R.id.g1);

        for (int i = 0; i < 4 ; i++) {

            for (int j = 0; j <4 ; j++) {

                Button bn = new Button(this);
                bn.setText("lll");
                bn.setTextSize(40);
                bn.setBackgroundColor(0);
                bn.setPadding(bn.getLeft(),bn.getTop(),bn.getRight(),bn.getBottom());

                GridLayout.Spec rowSpec;
                rowSpec = GridLayout.spec(i+1);
                GridLayout.Spec columnSpec;
                columnSpec = GridLayout.spec(j);

                GridLayout.LayoutParams params = new GridLayout.LayoutParams(rowSpec,columnSpec);

                params.setGravity(Gravity.FILL);

                gridLayout.addView(bn,params);
            }
        }
    }
}
效果图:

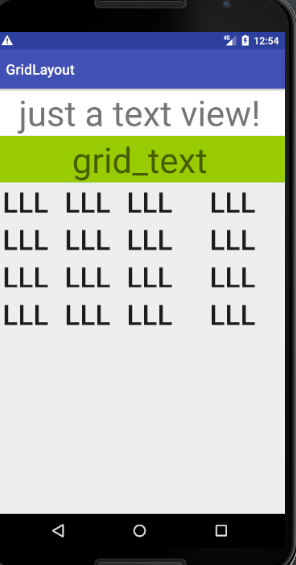
其中注意GridLayout的声明成MainActivity的成员,不能在成员函数内声明(我在这检查了半天),还有xml中第二个TextView的android:layout_columnSpan=”4”不能省略,不然下面的“LLL”就只有一列。
版权声明:本文内容由互联网用户自发贡献,该文观点仅代表作者本人。本站仅提供信息存储空间服务,不拥有所有权,不承担相关法律责任。如发现本站有涉嫌侵权/违法违规的内容, 请发送邮件至 举报,一经查实,本站将立刻删除。
发布者:全栈程序员-用户IM,转载请注明出处:https://javaforall.cn/131275.html原文链接:https://javaforall.cn
【正版授权,激活自己账号】: Jetbrains全家桶Ide使用,1年售后保障,每天仅需1毛
【官方授权 正版激活】: 官方授权 正版激活 支持Jetbrains家族下所有IDE 使用个人JB账号...
