大家好,又见面了,我是你们的朋友全栈君。
-
一般使用realsense时会保存视频序列,当保存深度图像时,需要注意保存的图像矩阵的格式,不然可能造成深度值的丢失。
-
在众多图像库中,一般会使用
opencv中的imwrite()函数进行深度图像的保存。 -
一般深度图像中深度值的单位是
mm,因此一般使用np.uint16作为最终数据格式保存。
例子:
import numpy as np
import cv2

def fun1(im):
	im=np.asarray(im,np.float32)
	return im
def fun2(im):
	im=np.asarray(im,np.uint16)
	return im
if __name__ == '__main__':
	#set a depth map using np.random
	im=np.random.randint(100,800,size=(96,96))
	#1. float save
	im1=fun1(im)
	cv2.imwrite('float_saved.png',im1)
	im2=fun2(im)
	cv2.imwrite('uint_saved.png',im2)
重新读取保存的图像:
import numpy as np
import matplotlib.pyplot as plt
from PIL import Image
def load_image(filename):
	im=Image.open(filename)
	return im
if __name__ == '__main__':
	im1=load_image('float_saved.png')
	im2=load_image('uint_saved.png')
	plt.subplot(121)
	plt.imshow(im1)
	plt.subplot(122)
	plt.imshow(im2)
	plt.show()
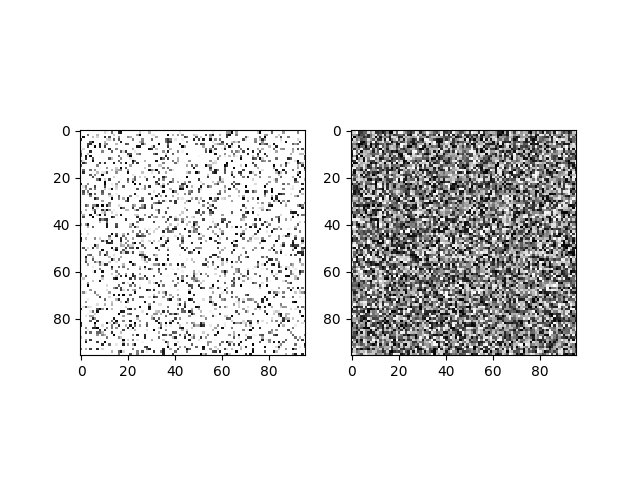
结果显示:
左边是float,右边是uint16保存方法,左边数据出现了数据压缩,被压缩在0-255之间,而右边值正常。

附上完整的realsense采集深度图像的代码
import pyrealsense2 as rs
import numpy as np
import cv2


class realsense_im(object):
    def __init__(self,image_size=(640,480)):
        self.pipeline = rs.pipeline()
        config = rs.config()
        config.enable_stream(rs.stream.depth, image_size[0], image_size[1], rs.format.z16, 30)
        config.enable_stream(rs.stream.color, image_size[0], image_size[1], rs.format.bgr8, 30)
        self.profile = self.pipeline.start(config)

    def __get_depth_scale(self):
        depth_sensor = self.profile.get_device().first_depth_sensor()

        depth_scale = depth_sensor.get_depth_scale()

        return depth_scale

    def get_image(self):

        frames = self.pipeline.wait_for_frames()
        depth_frame = frames.get_depth_frame()
        color_frame = frames.get_color_frame()
        depth_image = np.asarray(depth_frame.get_data(), dtype=np.float32)
        color_image = np.asarray(color_frame.get_data(), dtype=np.uint8)
        color_image_pad = np.pad(color_image, ((20, 0), (0, 0), (0, 0)), "edge")
        depth_map_end = depth_image * self.__get_depth_scale() * 1000
        return depth_map_end,color_image

    def process_end(self):
        self.pipeline.stop()

rs_t=realsense_im()

i=0
try:
    while True:

        depth_map,rgb_map=rs_t.get_image()
        print  rgb_map.shape
        cv2.imwrite('./examples/savefig/rgb/image_r_{}.png'.format(str(i).zfill(5)), rgb_map)
        i+=1

        cv2.imwrite('./examples/savefig/depth/Tbimage_d_{}.png'.format(str(0).zfill(5)), np.asarray(depth_map,np.uint16))

        cv2.namedWindow('RGB Example', cv2.WINDOW_AUTOSIZE)
        cv2.imshow('RGB Example', rgb_map)
        key = cv2.waitKey(1)
        # Press esc or 'q' to close the image window
        if key & 0xFF == ord('q') or key == 27:
            cv2.destroyAllWindows()
            break

finally:
    pass
版权声明:本文内容由互联网用户自发贡献,该文观点仅代表作者本人。本站仅提供信息存储空间服务,不拥有所有权,不承担相关法律责任。如发现本站有涉嫌侵权/违法违规的内容, 请发送邮件至 举报,一经查实,本站将立刻删除。
发布者:全栈程序员-用户IM,转载请注明出处:https://javaforall.cn/129865.html原文链接:https://javaforall.cn
【正版授权,激活自己账号】: Jetbrains全家桶Ide使用,1年售后保障,每天仅需1毛
【官方授权 正版激活】: 官方授权 正版激活 支持Jetbrains家族下所有IDE 使用个人JB账号...
