前言:
mybatis可以说是目前互联网公司使用最广泛半自动的ORM框架,它不仅能够替代我们编写繁琐的JDBC代码,而且手动编写sql可以编写出更高性能的sql语句。这么优秀的开源框架,我觉得我们应该学习一下。
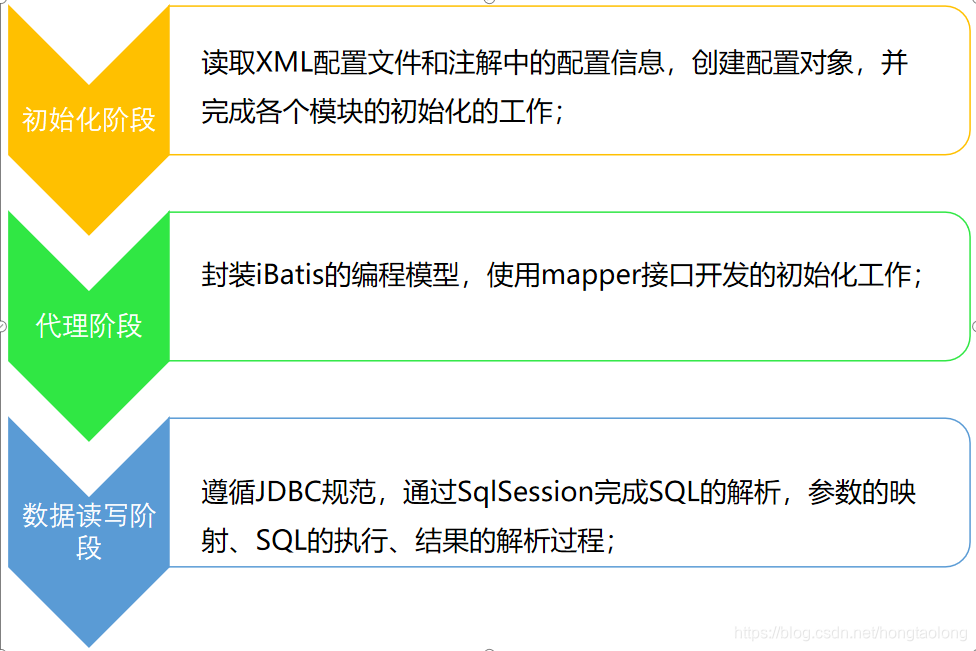
mybatis的源码其实相对来说还是算比较简单,他是按功能划分模块,所以会使阅读者非常清晰容易理解。比如,cache、binding、logging、reflection、datasource…这些模块是不是让人一看上去就知道是要干啥的。今天我们不会详细的解析里面每个模块,里面涉及到很多的设计模式,感兴趣的同学可以自己去阅读一下,理解里面的思想,我们今天重点学习mybatis的核心流程,包括:初始化阶段、代理阶段、数据读写阶段,如下图描述所示

一、初始化阶段
初始化阶段就是mybatis解析xml文件(mybatis-config.xml和xxxmapper.xml),将xml里面的内容解析到Configuration对象中(全局单例模式)。
在将解析的流程之前先介绍一下几个对象
XmlConfigBuilder:解析mybatis-config.xml
XmlMapperBuilder:解析xxxMapper.xml
XmlStatementBuilder:解析xxxMapper.xml中的增删改查的sql
我们通过debug模式来跟踪源代码
(1)SqlSessionFactoryBuilder.build(inputStream)

(2)build()
public SqlSessionFactory build(InputStream inputStream, String environment, Properties properties) {
    try {
      XMLConfigBuilder parser = new XMLConfigBuilder(inputStream, environment, properties);
      return build(parser.parse());//开始解析
    } catch (Exception e) {
      throw ExceptionFactory.wrapException("Error building SqlSession.", e);
    } finally {
      ErrorContext.instance().reset();
      try {
        inputStream.close();
      } catch (IOException e) {
        // Intentionally ignore. Prefer previous error.
      }
    }
  }
这里就开始使用我们上面介绍的XmlConfigBuilder来解析xml文件了
(3)XmlConfigBuilder.parse()
public Configuration parse() {
    if (parsed) {
      throw new BuilderException("Each XMLConfigBuilder can only be used once.");
    }
    parsed = true;
    //从configuration根节点开始解析
    parseConfiguration(parser.evalNode("/configuration"));
    return configuration;
  }
(4)parseConfiguration(root)
private void parseConfiguration(XNode root) {
    try {
      //issue #117 read properties first
      //下面都是解析mybatis-config.xml文件中的标签
      propertiesElement(root.evalNode("properties"));
      Properties settings = settingsAsProperties(root.evalNode("settings"));
      loadCustomVfs(settings);
      typeAliasesElement(root.evalNode("typeAliases"));
      pluginElement(root.evalNode("plugins"));
      objectFactoryElement(root.evalNode("objectFactory"));
      objectWrapperFactoryElement(root.evalNode("objectWrapperFactory"));
      reflectorFactoryElement(root.evalNode("reflectorFactory"));
      settingsElement(settings);
      // read it after objectFactory and objectWrapperFactory issue #631
      environmentsElement(root.evalNode("environments"));
      databaseIdProviderElement(root.evalNode("databaseIdProvider"));
      typeHandlerElement(root.evalNode("typeHandlers"));
      //从这里开始解析mapper.xml文件
      mapperElement(root.evalNode("mappers"));
    } catch (Exception e) {
      throw new BuilderException("Error parsing SQL Mapper Configuration. Cause: " + e, e);
    }
  }
这里就是解析mybatis-config.xml,可以看出mybatis的代码些的非常清晰易懂,最终将解析的内容放到Configuration中,比如我们看一个pluginElement()
private void pluginElement(XNode parent) throws Exception {
    if (parent != null) {
      for (XNode child : parent.getChildren()) {
        String interceptor = child.getStringAttribute("interceptor");
        Properties properties = child.getChildrenAsProperties();
        Interceptor interceptorInstance = (Interceptor) resolveClass(interceptor).newInstance();
        interceptorInstance.setProperties(properties);
        //设置到configuration中
        configuration.addInterceptor(interceptorInstance);
      }
    }
  }
上面就是的步骤完成了mybatis-config.xml的文件的解析,并且放到了Configuration中(可以先大概的看一下configuration的数据结构,如何存储这些信息的),接下来我们看看最后一行解析mappers标签,其实就是开始解析另外的多个*Mapper.xml文件。
(5)XmlConfigBuilder.mapperElement(parent)
private void mapperElement(XNode parent) throws Exception {
    if (parent != null) {
    	//有多个mapper.xml一半一个pojo对应一个mapper.xml
      for (XNode child : parent.getChildren()) {
    	  //通过package配置mapper.xml路径
        if ("package".equals(child.getName())) {
          String mapperPackage = child.getStringAttribute("name");
          configuration.addMappers(mapperPackage);
        } else {
          String resource = child.getStringAttribute("resource");
          String url = child.getStringAttribute("url");
          String mapperClass = child.getStringAttribute("class");
          //通过resource配置mapper.xml路径
          if (resource != null && url == null && mapperClass == null) {
            ErrorContext.instance().resource(resource);
            InputStream inputStream = Resources.getResourceAsStream(resource);
            //第二个关键的类登场了XMLMapperBuilder解析&Mapper.xml文件
            XMLMapperBuilder mapperParser = new XMLMapperBuilder(inputStream, configuration, resource, configuration.getSqlFragments());
            mapperParser.parse();
            //通过url配置mapper.xml路径
          } else if (resource == null && url != null && mapperClass == null) {
            ErrorContext.instance().resource(url);
            InputStream inputStream = Resources.getUrlAsStream(url);
            XMLMapperBuilder mapperParser = new XMLMapperBuilder(inputStream, configuration, url, configuration.getSqlFragments());
            mapperParser.parse();
            //通过class配置mapper.xml路径
          } else if (resource == null && url == null && mapperClass != null) {
            Class<?> mapperInterface = Resources.classForName(mapperClass);
            configuration.addMapper(mapperInterface);
          } else {
            throw new BuilderException("A mapper element may only specify a url, resource or class, but not more than one.");
          }
        }
      }
    }
  }
这里主要就是准备解析mapper.xml文件,在mybatis中有好几种方式配置mapper,xml,上面的代码都做了判断,我们重点看下通过resource找到mapper.xml并解析,这里引入了第二个类XmlMapperBuilder来解析mapper.xml文件,是不是再一次看出mybatis的命名以及思路都非常的清晰。
(6)XmlMapperBuilder.parse()
public void parse() {
	  //判断是否已经加载过这个mapper.xml,加载未加载的文件
    if (!configuration.isResourceLoaded(resource)) {
      //开始解析
      configurationElement(parser.evalNode("/mapper"));
      //放入configuration中,也是上面的if的判断依据
      configuration.addLoadedResource(resource);
      //namespace和mapper绑定,这里等下回过头来看
      bindMapperForNamespace();
    }
    //下面应该是更新已经加载,但是修改了的mapper.xml的内容,用作兜底
    parsePendingResultMaps();
    parsePendingCacheRefs();
    parsePendingStatements();
  }
这里就开始解析相应的mapper.xml文件拉,代码写的很严谨,我们接着重点往下面看,如何解析mapper.xml文件
(7)configurationElement(context)
private void configurationElement(XNode context) {
    try {
    	//获取namespace
      String namespace = context.getStringAttribute("namespace");
      //如果mapper.xml中没有配置namespace就抛异常
      if (namespace == null || namespace.equals("")) {
        throw new BuilderException("Mapper's namespace cannot be empty");
      }
      //帮助类设置值,等下绑定namespace和xml时要用
      builderAssistant.setCurrentNamespace(namespace);
      //下面开始解析mapper.xml中的标签cache-ref
      cacheRefElement(context.evalNode("cache-ref"));
    //下面开始解析mapper.xml中的标签cache-ref
      cacheElement(context.evalNode("cache"));
      //解析parameterMap
      parameterMapElement(context.evalNodes("/mapper/parameterMap"));
      //解析resultmap
      resultMapElements(context.evalNodes("/mapper/resultMap"));
      //解析sql
      sqlElement(context.evalNodes("/mapper/sql"));
      //解析增删该查的标签内容
      buildStatementFromContext(context.evalNodes("select|insert|update|delete"));
    } catch (Exception e) {
      throw new BuilderException("Error parsing Mapper XML. The XML location is '" + resource + "'. Cause: " + e, e);
    }
  }
这里就是具体解析mapper.xml的内容了,和前面解析mybatis-config.xml的流程差不多,同样是将解析的内容放到Configuration中对应的属性中,重点可以看一下如何解析resultMap,和insert、delete、update和select,毕竟这几个标签在mapper.xml中比较重要。接着流程往下看,如何解析增删改查对应的内容。再继续流程之前还是带大家一起看一下resultMap标签如何解析吧
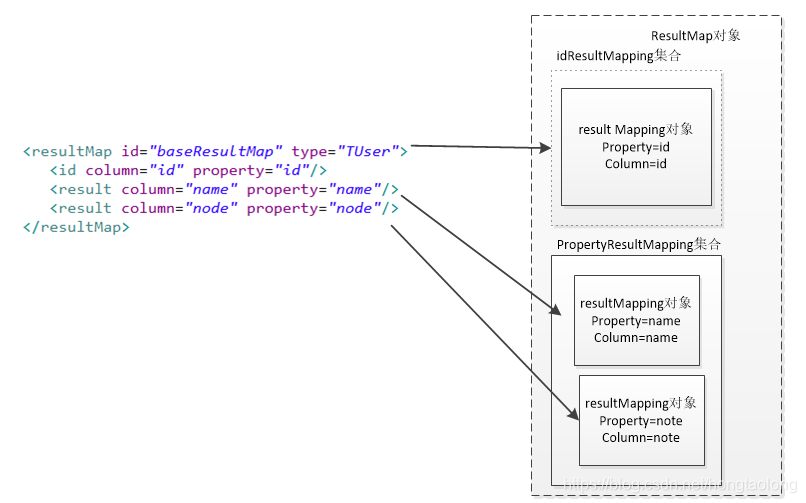
(7-1)resultMapElement()
private ResultMap resultMapElement(XNode resultMapNode, List<ResultMapping> additionalResultMappings, Class<?> enclosingType) throws Exception {
    ErrorContext.instance().activity("processing " + resultMapNode.getValueBasedIdentifier());
    //1,获取resultMap中的属性信息
    String id = resultMapNode.getStringAttribute("id",
        resultMapNode.getValueBasedIdentifier());
    String type = resultMapNode.getStringAttribute("type",
        resultMapNode.getStringAttribute("ofType",
            resultMapNode.getStringAttribute("resultType",
                resultMapNode.getStringAttribute("javaType"))));
    String extend = resultMapNode.getStringAttribute("extends");
    Boolean autoMapping = resultMapNode.getBooleanAttribute("autoMapping");
    Class<?> typeClass = resolveClass(type);
    if (typeClass == null) {
      typeClass = inheritEnclosingType(resultMapNode, enclosingType);
    }
    Discriminator discriminator = null;
    List<ResultMapping> resultMappings = new ArrayList<>();
    resultMappings.addAll(additionalResultMappings);
    List<XNode> resultChildren = resultMapNode.getChildren();
    //2,解析resultmap标签中的子标签
    for (XNode resultChild : resultChildren) {
      if ("constructor".equals(resultChild.getName())) {//构造器
        processConstructorElement(resultChild, typeClass, resultMappings);
      } else if ("discriminator".equals(resultChild.getName())) {//鉴别器
        discriminator = processDiscriminatorElement(resultChild, typeClass, resultMappings);
      } else {
        List<ResultFlag> flags = new ArrayList<>();
        if ("id".equals(resultChild.getName())) {//id,关联数据库id
          flags.add(ResultFlag.ID);
        }
        resultMappings.add(buildResultMappingFromContext(resultChild, typeClass, flags));//result内容
      }
    }
    //resultMapResolver封装了上面解析出来的信息
    ResultMapResolver resultMapResolver = new ResultMapResolver(builderAssistant, id, typeClass, extend, discriminator, resultMappings, autoMapping);
    try {
    	//重点看这里,这个方法返回ResultMap对象
      return resultMapResolver.resolve();
    } catch (IncompleteElementException  e) {
      configuration.addIncompleteResultMap(resultMapResolver);
      throw e;
    }
  }
(7-2)resultMapResolver.resolve()
public ResultMap resolve() {
    return assistant.addResultMap(this.id, this.type, this.extend, this.discriminator, this.resultMappings, this.autoMapping);
  }
(7-3)addResultMap()
public ResultMap addResultMap(
      String id,
      Class<?> type,
      String extend,
      Discriminator discriminator,
      List<ResultMapping> resultMappings,
      Boolean autoMapping) {
    id = applyCurrentNamespace(id, false);
    extend = applyCurrentNamespace(extend, true);

    if (extend != null) {
      if (!configuration.hasResultMap(extend)) {
        throw new IncompleteElementException("Could not find a parent resultmap with id '" + extend + "'");
      }
      //获取继承的reusultmap,resultmap标签是可以继承的
      ResultMap resultMap = configuration.getResultMap(extend);
      List<ResultMapping> extendedResultMappings = new ArrayList<>(resultMap.getResultMappings());
      extendedResultMappings.removeAll(resultMappings);
      // Remove parent constructor if this resultMap declares a constructor.
      boolean declaresConstructor = false;
      for (ResultMapping resultMapping : resultMappings) {
        if (resultMapping.getFlags().contains(ResultFlag.CONSTRUCTOR)) {
          declaresConstructor = true;
          break;
        }
      }
      if (declaresConstructor) {
        Iterator<ResultMapping> extendedResultMappingsIter = extendedResultMappings.iterator();
        while (extendedResultMappingsIter.hasNext()) {
          if (extendedResultMappingsIter.next().getFlags().contains(ResultFlag.CONSTRUCTOR)) {
            extendedResultMappingsIter.remove();
          }
        }
      }
      resultMappings.addAll(extendedResultMappings);
    }
    //建造者模式创建resultmap
    ResultMap resultMap = new ResultMap.Builder(configuration, id, type, resultMappings, autoMapping)
        .discriminator(discriminator)
        .build();
    //加入到configuration中的resultmaps集合中
    configuration.addResultMap(resultMap);
    return resultMap;
  }
(7-4)configuration.addResultMap()
public void addResultMap(ResultMap rm) {
    resultMaps.put(rm.getId(), rm);
    checkLocallyForDiscriminatedNestedResultMaps(rm);
    checkGloballyForDiscriminatedNestedResultMaps(rm);
  }
总结上面解析resultMap标签,就是解析resultmap中的内容(idMapping,resultMapping…)然后封装成resultmap对象放到configuration的resultMaps的大集合中。到这里除了insert、update、delete、select标签没有解析(使用XMLStatementBuilder解析)其他的都已经解析了,我们看一下上面(6)中的 bindMapperForNamespace(),如何将namespace和mapper绑定
(7-5)bindMapperForNamespace()
private void bindMapperForNamespace() {
	  //获取namespace,上面解析mapper.xml时已经给assitant赋值过了
    String namespace = builderAssistant.getCurrentNamespace();
    if (namespace != null) {
    	//获取类型
      Class<?> boundType = null;
      try {
        boundType = Resources.classForName(namespace);
      } catch (ClassNotFoundException e) {
        //ignore, bound type is not required
      }
      if (boundType != null) {
    	  //判断是否已经再configuration中存在
        if (!configuration.hasMapper(boundType)) {
          // Spring may not know the real resource name so we set a flag
          // to prevent loading again this resource from the mapper interface
          // look at MapperAnnotationBuilder#loadXmlResource
        	//不存在则同时加入
          configuration.addLoadedResource("namespace:" + namespace);
          configuration.addMapper(boundType);
        }
      }
    }
  }
同样是保存在configuration中保存相应的内容,顺便看下相应的数据结构
(7-6)configuration.addMapper()
public <T> void addMapper(Class<T> type) {
//configuration中的mapper的注册中心(就是间接保存*mapper的动态代理对象)
    mapperRegistry.addMapper(type);
  }
这里比较重要,感兴趣的可以先深入的了解一下,因为后面的代理阶段,就是在这里通过动态代理生成一个代理对象然后去调用请求的(这也是apache基于ibatis的封装,从而成了mybatis)。我们继续解析insert、update、delete、select
(8)buildStatementFromContext(list)
private void buildStatementFromContext(List<XNode> list) {
    if (configuration.getDatabaseId() != null) {
      buildStatementFromContext(list, configuration.getDatabaseId());
    }
    buildStatementFromContext(list, null);
  }

  private void buildStatementFromContext(List<XNode> list, String requiredDatabaseId) {
    for (XNode context : list) {
    	//新建XmlStatementBuilder来解析增删改查对应的内容
      final XMLStatementBuilder statementParser = new XMLStatementBuilder(configuration, builderAssistant, context, requiredDatabaseId);
      try {
    	  //开始解析
        statementParser.parseStatementNode();
      } catch (IncompleteElementException e) {
        configuration.addIncompleteStatement(statementParser);
      }
    }
  }
(9)statementparser.parseStatementNode()
public void parseStatementNode() {
    String id = context.getStringAttribute("id");
    String databaseId = context.getStringAttribute("databaseId");

    if (!databaseIdMatchesCurrent(id, databaseId, this.requiredDatabaseId)) {
      return;
    }
    //下面是解析insert、delete、update、select标签中的属性
    Integer fetchSize = context.getIntAttribute("fetchSize");
    Integer timeout = context.getIntAttribute("timeout");
    String parameterMap = context.getStringAttribute("parameterMap");
    String parameterType = context.getStringAttribute("parameterType");
    Class<?> parameterTypeClass = resolveClass(parameterType);
    String resultMap = context.getStringAttribute("resultMap");
    String resultType = context.getStringAttribute("resultType");
    String lang = context.getStringAttribute("lang");
    LanguageDriver langDriver = getLanguageDriver(lang);
    //返回值的的类型
    Class<?> resultTypeClass = resolveClass(resultType);
    String resultSetType = context.getStringAttribute("resultSetType");
    StatementType statementType = StatementType.valueOf(context.getStringAttribute("statementType", StatementType.PREPARED.toString()));
    ResultSetType resultSetTypeEnum = resolveResultSetType(resultSetType);

    String nodeName = context.getNode().getNodeName();
    //具体对应sql的(insert、delete、update、select)的哪一种
    SqlCommandType sqlCommandType = SqlCommandType.valueOf(nodeName.toUpperCase(Locale.ENGLISH));
    boolean isSelect = sqlCommandType == SqlCommandType.SELECT;
    boolean flushCache = context.getBooleanAttribute("flushCache", !isSelect);
    boolean useCache = context.getBooleanAttribute("useCache", isSelect);
    boolean resultOrdered = context.getBooleanAttribute("resultOrdered", false);

    // Include Fragments before parsing
    XMLIncludeTransformer includeParser = new XMLIncludeTransformer(configuration, builderAssistant);
    includeParser.applyIncludes(context.getNode());

    // Parse selectKey after includes and remove them.
    processSelectKeyNodes(id, parameterTypeClass, langDriver);

    // Parse the SQL (pre: <selectKey> and <include> were parsed and removed)
    SqlSource sqlSource = langDriver.createSqlSource(configuration, context, parameterTypeClass);
    String resultSets = context.getStringAttribute("resultSets");
    String keyProperty = context.getStringAttribute("keyProperty");
    String keyColumn = context.getStringAttribute("keyColumn");
    KeyGenerator keyGenerator;
    String keyStatementId = id + SelectKeyGenerator.SELECT_KEY_SUFFIX;
    keyStatementId = builderAssistant.applyCurrentNamespace(keyStatementId, true);
    if (configuration.hasKeyGenerator(keyStatementId)) {
      keyGenerator = configuration.getKeyGenerator(keyStatementId);
    } else {
      keyGenerator = context.getBooleanAttribute("useGeneratedKeys",
          configuration.isUseGeneratedKeys() && SqlCommandType.INSERT.equals(sqlCommandType))
          ? Jdbc3KeyGenerator.INSTANCE : NoKeyGenerator.INSTANCE;
    }

    builderAssistant.addMappedStatement(id, sqlSource, statementType, sqlCommandType,
        fetchSize, timeout, parameterMap, parameterTypeClass, resultMap, resultTypeClass,
        resultSetTypeEnum, flushCache, useCache, resultOrdered,
        keyGenerator, keyProperty, keyColumn, databaseId, langDriver, resultSets);
  }
这里还是解析insert、delete、update、select对应的标签的属性,并且通过builderAssistant.addMappedStatement()将这些属性组成一个MappedStatement放到configuration中的map集合中
(10)addMappedStatement()
public MappedStatement addMappedStatement(
      String id,
      SqlSource sqlSource,
      StatementType statementType,
      SqlCommandType sqlCommandType,
      Integer fetchSize,
      Integer timeout,
      String parameterMap,
      Class<?> parameterType,
      String resultMap,
      Class<?> resultType,
      ResultSetType resultSetType,
      boolean flushCache,
      boolean useCache,
      boolean resultOrdered,
      KeyGenerator keyGenerator,
      String keyProperty,
      String keyColumn,
      String databaseId,
      LanguageDriver lang,
      String resultSets) {

    if (unresolvedCacheRef) {
      throw new IncompleteElementException("Cache-ref not yet resolved");
    }

    id = applyCurrentNamespace(id, false);
    boolean isSelect = sqlCommandType == SqlCommandType.SELECT;
    //建造者设计模式,因为参数比较多,创建对象比较复杂
    MappedStatement.Builder statementBuilder = new MappedStatement.Builder(configuration, id, sqlSource, sqlCommandType)
        .resource(resource)
        .fetchSize(fetchSize)
        .timeout(timeout)
        .statementType(statementType)
        .keyGenerator(keyGenerator)
        .keyProperty(keyProperty)
        .keyColumn(keyColumn)
        .databaseId(databaseId)
        .lang(lang)
        .resultOrdered(resultOrdered)
        .resultSets(resultSets)
        .resultMaps(getStatementResultMaps(resultMap, resultType, id))
        .resultSetType(resultSetType)
        .flushCacheRequired(valueOrDefault(flushCache, !isSelect))
        .useCache(valueOrDefault(useCache, isSelect))
        .cache(currentCache);

    ParameterMap statementParameterMap = getStatementParameterMap(parameterMap, parameterType, id);
    if (statementParameterMap != null) {
      statementBuilder.parameterMap(statementParameterMap);
    }
    //通过建造者模式创建mappedStatement
    MappedStatement statement = statementBuilder.build();
    //将生成的MappedStatement加入到configuration中对应的集合
    configuration.addMappedStatement(statement);
    return statement;
  }
这里代码看上去不少,但是其实比较简单,功能就是将上面解析的那么多的属性封装成一个MappedStatement对象,然后将这个对象放到configuration的map集合中,注意这里使用了建造者设计模式,感兴趣的可以自行了解一下建造者设计模式的使用场景,以及优点。
其实到这里 mybatis的初始化的过程基本上算是完成了,主要的功能就是将xml文件的内容加载到configuration这个对象中。主要是分如下三部分解析
XmlConfigBuilder:解析mybatis-config.xml
XmlMapperBuilder:解析xxxMapper.xml
XmlStatementBuilder:解析xxxMapper.xml中的增删改查的sql
初始化过程的总结:
1、将xml的内容解析到configuration中

2、configuration中的关键的属性对应到xml的内容
(1)Configuration属性填充

(2)resultMap解析
(3)MappedStatement内容图解
好了,初始化的内容先说到这里了,如有错误,欢迎大家指正,下面将会继续和大家一起学习代理阶段和数据的读写阶段。
发布者:全栈程序员-用户IM,转载请注明出处:https://javaforall.cn/111190.html原文链接:https://javaforall.cn
【正版授权,激活自己账号】: Jetbrains全家桶Ide使用,1年售后保障,每天仅需1毛
【官方授权 正版激活】: 官方授权 正版激活 支持Jetbrains家族下所有IDE 使用个人JB账号...
