大家好,又见面了,我是全栈君。
在日常的开发中,有时会遇到内容块比较多,且又可变的界面:

这个界面中有些内容块是固定出现的,比如最上面的商品详情图片、商品名称、价格等。而有些内容块则是不一定出现的,比如促销(显然不是每个商品都有促销)、已选规格(有的商品没有规格)、店铺信息(有的商品属于自营,就没有店铺)等。还有些内容要根据情况进行变化,比如评论,这里最多列出4条评论,如果没有评论,则显示“暂无评论”且不显示“查看所有评论”按钮。
对于这样的界面,相信很多人第一感觉会用TableView来做,因为中间要列出评论内容,这个用TableView的cell来填充比较合适。但如何处理评论内容之外的其他内容呢?我之前的做法是,评论内容之上的用HeaderView做,下面的用FooterView做,虽然最终实现了功能,但做起来十分麻烦。布局我是用Auto Layout来做的,由于Auto Layout本身的特点,代码中就涉及很多判断处理。比如“已选规格”块,最开始的是有一个和“促销”内容块的顶部间距约束,但“促销”内容块不一定会有,就得根据情况,调整“已选规格”块本身的约束(例如让其顶部间距约束指向“价格”内容块)。同样,“促销”内容块本身也需要类似的处理,如果没有“促销”时,要隐藏自己,而隐藏自己最简单的办法,就是将自己的高度约束设置为0(因为它还有底部到“已选规格”的间距约束,不能随意将自身移除,否则“已选规格”相关的约束得再进行调整)。
此外,还有一个麻烦的问题。界面刚进来的时候,是需要请求网络数据,这时界面就要显示成一个初始状态,而显然初始状态有些内容块是不应该显示的,比如促销,只有完成了数据请求,才能知道是否有促销,有的话才显示促销内容;比如评论,初始时应该显示成“暂无评论”,数据请求完成后,才显示相应的内容。这样,我们需要处理初始进入和数据请求完成两种状态下各个内容块的显示,十分复杂繁琐。
总结来说,用TableView的 HeaderView + 评论内容cell + FooterView + Auto Layout 的方式会带来如下问题:
- 约束本身需要依赖其他View的,而所依赖的View又是可变的内容块,会导致约束需要繁琐的判断修改增删
- 需要处理初始进入和数据请求完成两种状态的界面展示,使代码更加复杂繁琐
- 需要额外计算相应内容的高度,以更新HeaderView、FooterView的高度
可见,这种方式并不是理想的解决方案。可能有人会说,那不要用Auto Layout,直接操作frame来布局就好,这样或许能减少一些麻烦,但总体上并没有减少复杂度。也有人说,直接用ScrollView来做,这样的话,所有的内容包括评论内容的cell,都得自己手动拼接,可以想象这种做法也是比较麻烦的。所以,我们得另辟蹊径,使用其他方法来达到目的。下面就为大家介绍一种比较简便的做法,这种做法也是一个前同事分享给我的,我就借花献佛,分享给大家。
我们还是用TableView来做这个界面,和之前不同的是,我们把每一个可变内容块做成一个独立的cell,cell的粒度可以自行控制,比如可以用一个cell囊括商品图片、标题、副标题、价格,也可以拆得更细,图片、标题、副标题、价格都各自对应一个cell。这里我们选择后者,因为图片内容块,我们需要按屏幕宽度等比例拉伸;标题、副标题的文字内容可能是一行,也可能是两行,高度可变,用单独的cell来控制会更简单明了。
下面先定义好各种类型的cell:
- //基础cell,这里为了演示简便,定义这个cell,其他cell继承自这个cell
- @interface MultipleVariantBasicTableViewCell : UITableViewCell
- @property (nonatomic, weak) UILabel *titleTextLabel;
- @end
- //滚动图片
- @interface CycleImagesTableViewCell : MultipleVariantBasicTableViewCell
- @end
- //正标题
- @interface MainTitleTableViewCell : MultipleVariantBasicTableViewCell
- @end
- //副标题
- @interface SubTitleTableViewCell : MultipleVariantBasicTableViewCell
- @end
- //价格
- @interface PriceTableViewCell : MultipleVariantBasicTableViewCell
- @end
- // …其他内容块的cell声明
- // 各种内容块cell的实现,这里为了演示简便,cell中就只放了一个Label
- @implementation MultipleVariantBasicTableViewCell
- – (instancetype)initWithStyle:(UITableViewCellStyle)style reuseIdentifier:(NSString *)reuseIdentifier {
- self = [super initWithStyle:style reuseIdentifier:reuseIdentifier];
- if (self) {
- UILabel *label = [[UILabel alloc] initWithFrame:CGRectMake(0, 0, 320, 44)];
- label.numberOfLines = 0;
- [self.contentView addSubview:label];
- self.titleTextLabel = label;
- }
- return self;
- }
- @end
- @implementation CycleImagesTableViewCell
- @end
- @implementation MainTitleTableViewCell
- @end
- // …其他内容块的cell实现
- // 评论内容cell使用Auto Layout,配合iOS 8 TableView的自动算高,实现内容自适应
- @implementation CommentContentTableViewCell
- – (instancetype)initWithStyle:(UITableViewCellStyle)style reuseIdentifier:(NSString *)reuseIdentifier {
- self = [super initWithStyle:style reuseIdentifier:reuseIdentifier];
- if (self) {
- self.titleTextLabel.translatesAutoresizingMaskIntoConstraints = NO;
- self.titleTextLabel.preferredMaxLayoutWidth = [UIScreen mainScreen].bounds.size.width – 8;
- NSLayoutConstraint *leftConstraint = [NSLayoutConstraint constraintWithItem:self.titleTextLabel attribute:NSLayoutAttributeLeading relatedBy:NSLayoutRelationEqual toItem:self.contentView attribute:NSLayoutAttributeLeading multiplier:1.0f constant:4.0f];
- NSLayoutConstraint *rightConstraint = [NSLayoutConstraint constraintWithItem:self.titleTextLabel attribute:NSLayoutAttributeTrailing relatedBy:NSLayoutRelationEqual toItem:self.contentView attribute:NSLayoutAttributeTrailing multiplier:1.0f constant:-4.0f];
- NSLayoutConstraint *topConstraint = [NSLayoutConstraint constraintWithItem:self.titleTextLabel attribute:NSLayoutAttributeTop relatedBy:NSLayoutRelationEqual toItem:self.contentView attribute:NSLayoutAttributeTop multiplier:1.0f constant:4.0f];
- NSLayoutConstraint *bottomConstraint = [NSLayoutConstraint constraintWithItem:self.titleTextLabel attribute:NSLayoutAttributeBottom relatedBy:NSLayoutRelationEqual toItem:self.contentView attribute:NSLayoutAttributeBottom multiplier:1.0f constant:-4.0f];
- [self.contentView addConstraints:@[leftConstraint, rightConstraint, topConstraint, bottomConstraint]];
- }
- return self;
- }
- @end
接下来就是重点,就是如何来控制显示哪些cell及cell显示的数量。这一步如果处理不好,也会使开发变得复杂。如下面的方式:
- // 加载完数据
- self.cellCount = 0;
- if (存在促销) {
- self.cellCount++;
- }
- if (存在规格) {
- self.cellCount++;
- }
- ……
如果以这种方式来记录cell的数量,那么后续cell的展示、点击判断等都会很麻烦。这里我们采用的方式是,使用单独的类(作为一种数据结构)来保存所要展示的cell信息。
- // SKRow.h
- @interface SKRow : NSObject
- @property (nonatomic, copy) NSString *cellIdentifier;
- @property (nonatomic, strong) id data;
- @property (nonatomic, assign) float rowHeight;
- – (instancetype)initWithCellIdentifier:(NSString *)cellIdentifier
- data:(id)data
- rowHeight:(float)rowHeight;
- @end
- // SKRow.m
- #import “SKRow.h”
- @implementation SKRow
- – (instancetype)initWithCellIdentifier:(NSString *)cellIdentifier data:(id)data rowHeight:(float)rowHeight {
- if (self = [super init]) {
- self.cellIdentifier = cellIdentifier;
- self.data = data;
- self.rowHeight = rowHeight;
- }
- return self;
- }
- @end
SKRow用来存储每个cell所需的信息,包括重用标识、数据项、高度。接下来,我们就开始拼接cell信息。
- @interface ViewController ()
- @property (nonatomic, strong) NSMutableArray *> *tableSections;
- @end
- self.tableSections = [NSMutableArray array];
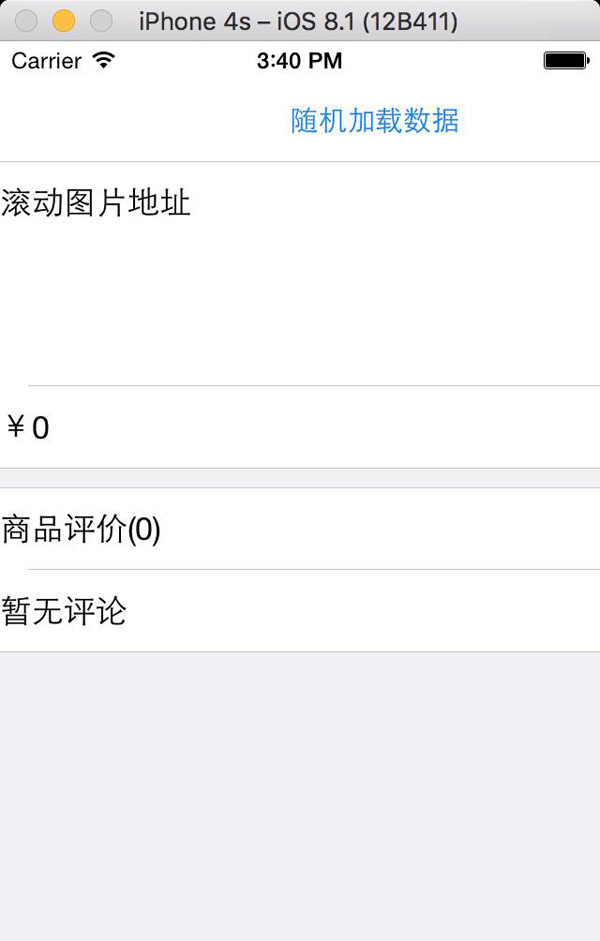
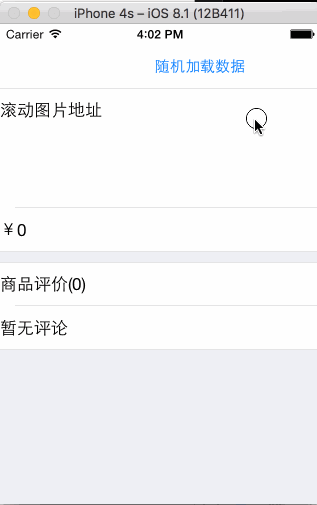
- /* 初始加载数据
- * 初始化时,只显示滚动图片、价格、评论头、无评论
- */
- // 滚动图片(宽高保持比例)
- SKRow *cycleImagesRow = [[SKRow alloc] initWithCellIdentifier:@“CycleImagesCellIdentifier” data:@[@“滚动图片地址”] rowHeight:120*[UIScreen mainScreen].bounds.size.width / 320.f];
- // 价格
- SKRow *priceRow = [[SKRow alloc] initWithCellIdentifier:@“PriceCellIdentifier” data:@“0” rowHeight:44];
- [self.tableSections addObject:@[cycleImagesRow, priceRow]];
- // 评论头
- SKRow *commentSummaryRow = [[SKRow alloc] initWithCellIdentifier:@“CommentSummaryCellIdentifier” data:@{@“title”:@“商品评价”, @“count”:@“0”} rowHeight:44];
- // 无评论
- SKRow *noCommentRow = [[SKRow alloc] initWithCellIdentifier:@“NoCommentCellIdentifier” data:@“暂无评论” rowHeight:44];
- [self.tableSections addObject:@[commentSummaryRow, noCommentRow]];
以上是初始状态时要显示的cell,我们在ViewController中声明一个数组,用来存储TableView各个section要显示的cell信息。这里我们将cell分成不同的section,实际中,要不要分,分成几个section都可以自行决定。初始状态我们有两个section,第一个section用于显示基本信息,第二个section用于显示评论信息,这样就完成了cell信息的拼接,接下来就是显示:
- – (UITableViewCell *)tableView:(UITableView *)tableView cellForRowAtIndexPath:(NSIndexPath *)indexPath {
- // 这里可以通过判断cellIdentifier来区分处理各种不同的cell,cell所需的数据从row.data上获取
- SKRow *row = self.tableSections[indexPath.section][indexPath.row];
- if ([row.cellIdentifier isEqualToString:@“CycleImagesCellIdentifier”]) {
- CycleImagesTableViewCell *cell = [tableView dequeueReusableCellWithIdentifier:row.cellIdentifier forIndexPath:indexPath];
- NSArray *urlStringArray = row.data;
- cell.titleTextLabel.text = [urlStringArray componentsJoinedByString:@“\n”];
- return cell;
- } else if ([row.cellIdentifier isEqualToString:@“MainTitleCellIdentifier”]) {
- MainTitleTableViewCell *cell = [tableView dequeueReusableCellWithIdentifier:row.cellIdentifier forIndexPath:indexPath];
- cell.titleTextLabel.text = row.data;
- return cell;
- } else if ([row.cellIdentifier isEqualToString:@“PriceCellIdentifier”]) {
- PriceTableViewCell *cell = [tableView dequeueReusableCellWithIdentifier:row.cellIdentifier forIndexPath:indexPath];
- cell.titleTextLabel.text = [NSString stringWithFormat:@“¥%@”, row.data];
- return cell;
- } else if ([row.cellIdentifier isEqualToString:@“SalePromotionCellIdentifier”]) {
- SalePromotionTableViewCell *cell = [tableView dequeueReusableCellWithIdentifier:row.cellIdentifier forIndexPath:indexPath];
- NSArray *salePromotionStringArray = row.data;
- cell.titleTextLabel.text = [salePromotionStringArray componentsJoinedByString:@“\n”];
- return cell;
- } else if ([row.cellIdentifier isEqualToString:@“SpecificationCellIdentifier”]) {
- SpecificationTableViewCell *cell = [tableView dequeueReusableCellWithIdentifier:row.cellIdentifier forIndexPath:indexPath];
- cell.titleTextLabel.text = [NSString stringWithFormat:@“已选:%@”, row.data];
- return cell;
- } else if ([row.cellIdentifier isEqualToString:@“CommentSummaryCellIdentifier”]) {
- CommentSummaryTableViewCell *cell = [tableView dequeueReusableCellWithIdentifier:row.cellIdentifier forIndexPath:indexPath];
- NSDictionary *commentSummary = row.data;
- cell.titleTextLabel.text = [NSString stringWithFormat:@“%@(%@)”, commentSummary[@“title”], commentSummary[@“count”]];
- return cell;
- } else if ([row.cellIdentifier isEqualToString:@“CommentContentCellIdentifier”]) {
- CommentContentTableViewCell *cell = [tableView dequeueReusableCellWithIdentifier:row.cellIdentifier forIndexPath:indexPath];
- cell.titleTextLabel.text = row.data;
- return cell;
- } else if ([row.cellIdentifier isEqualToString:@“AllCommentCellIdentifier”]) {
- AllCommentTableViewCell *cell = [tableView dequeueReusableCellWithIdentifier:row.cellIdentifier forIndexPath:indexPath];
- cell.titleTextLabel.text = row.data;
- return cell;
- } else if ([row.cellIdentifier isEqualToString:@“NoCommentCellIdentifier”]) {
- NoCommentTableViewCell *cell = [tableView dequeueReusableCellWithIdentifier:row.cellIdentifier forIndexPath:indexPath];
- cell.titleTextLabel.text = row.data;
- return cell;
- }
- return nil;
- }
上面的代码进行了删减,没有处理所有类型。虽然稍嫌冗长,但是逻辑非常简单,就是获取cell信息,根据重用标识来区分不同类型的内容块,将数据处理后放到cell中展示。
例如,对于商品图片,因为是滚动图片,滚动图片可以有多张,前面我们传入的数据就是数组data:@[@”滚动图片地址”]。后面获取到数据后,cell.titleTextLabel.text = [urlStringArray componentsJoinedByString:@”\n”];,出于演示,商品图片cell我们只放了一个Label,所以只是简单的将地址信息分行显示出来。在实际的开发中,可以放入一个图片滚动显示控件,并将图片地址的数组数据传给控件展示。
其他类型的cell处理也是大同小异,出于演示的原因,都只是简单的数据处理展示。当然,别忘了,设置一下TableView相关的dataSource和delegate:
- – (CGFloat)tableView:(UITableView *)tableView heightForRowAtIndexPath:(NSIndexPath *)indexPath {
- SKRow *row = self.tableSections[indexPath.section][indexPath.row];
- return row.rowHeight;
- }
- – (NSInteger)numberOfSectionsInTableView:(UITableView *)tableView {
- return self.tableSections.count;
- }
- – (NSInteger)tableView:(UITableView *)tableView numberOfRowsInSection:(NSInteger)section {
- return self.tableSections[section].count;
- }
这样我们就完成了初始状态时界面的展示
完成了cell的显示处理,接下来我们来模拟一下网络请求数据后,界面如何显示所需的cell
- self.tableSections = [NSMutableArray array];
- NSMutableArray *section1 = [NSMutableArray array];
- // 滚动图片(宽高保持比例)
- SKRow *cycleImagesRow = [[SKRow alloc] initWithCellIdentifier:@“CycleImagesCellIdentifier” data:@[@“滚动图片地址1”, @“滚动图片地址2”, @“滚动图片地址3”] rowHeight:120*[UIScreen mainScreen].bounds.size.width / 320.f];
- // 主标题
- SKRow *mainTitleRow = [[SKRow alloc] initWithCellIdentifier:@“MainTitleCellIdentifier” data:@“商品名称” rowHeight:44];
- // 副标题
- SKRow *subTitleRow = [[SKRow alloc] initWithCellIdentifier:@“SubTitleCellIdentifier” data:@“节日促销,快来买啊” rowHeight:44];
- // 价格
- SKRow *priceRow = [[SKRow alloc] initWithCellIdentifier:@“PriceCellIdentifier” data:@(arc4random()) rowHeight:44];
- [section1 addObjectsFromArray:@[cycleImagesRow, mainTitleRow, subTitleRow, priceRow]];
- // 促销(随机出现)
- if (arc4random() % 2 == 0) {
- SKRow *salePromotionRow = [[SKRow alloc] initWithCellIdentifier:@“SalePromotionCellIdentifier” data:@[@“促销信息1”, @“促销信息2”, @“促销信息3”] rowHeight:44];
- [section1 addObject:salePromotionRow];
- }
- [self.tableSections addObject:section1];
- NSMutableArray *section2 = [NSMutableArray array];
- // 规格(随机出现)
- if (arc4random() % 2 == 0) {
- SKRow *specificationRow = [[SKRow alloc] initWithCellIdentifier:@“SpecificationCellIdentifier” data:@“银色,13.3英寸” rowHeight:44];
- [section2 addObject:specificationRow];
- }
- if (section2.count > 0) {
- [self.tableSections addObject:section2];
- }
- NSMutableArray *section3 = [NSMutableArray array];
- NSArray *commentArray = [NSMutableArray array];
- // 评论内容数据(随机出现)
- if (arc4random() % 2 == 0) {
- commentArray = @[@“评论内容1”, @“评论内容2”, @“2016年6月,苹果系统iOS 10正式亮相,苹果为iOS 10带来了十大项更新。2016年6月13日,苹果开发者大会WWDC在旧金山召开,会议宣布iOS 10的测试版在2016年夏天推出,正式版将在秋季发布。2016年9月7日,苹果发布iOS 10。iOS10正式版于9月13日(北京时间9月14日凌晨一点)全面推送。”, @“评论内容4”];
- }
- // 评论头
- SKRow *commentSummaryRow = [[SKRow alloc] initWithCellIdentifier:@“CommentSummaryCellIdentifier” data:@{@“title”:@“商品评价”, @“count”:@(commentArray.count)} rowHeight:44];
- [section3 addObject:commentSummaryRow];
- if (commentArray.count > 0) {
- for (NSString *commentString in commentArray) {
- // 评论内容需要自适应高度,高度值指定为UITableViewAutomaticDimension
- SKRow *commentContentRow = [[SKRow alloc] initWithCellIdentifier:@“CommentContentCellIdentifier” data:commentString rowHeight:UITableViewAutomaticDimension];
- [section3 addObject:commentContentRow];
- }
- // 查看所有评论
- SKRow *allCommentRow = [[SKRow alloc] initWithCellIdentifier:@“AllCommentCellIdentifier” data:@“查看所有评论” rowHeight:44];
- [section3 addObject:allCommentRow];
- } else {
- // 无评论
- SKRow *noCommentRow = [[SKRow alloc] initWithCellIdentifier:@“NoCommentCellIdentifier” data:@“暂无评论” rowHeight:44];
- [section3 addObject:noCommentRow];
- }
- [self.tableSections addObject:section3];
- [self.tableView reloadData];
上面的代码同样比较冗长,但逻辑也同样十分简单。按显示顺序拼凑cell数据,有些不一定显示的内容块,如促销,则随机判断,如果显示,将数据加入到section数组中[section1 addObject:salePromotionRow];。其他类型的cell也是类似的,不再赘述。要注意的是,评论内容的文本可能有多行,我们将它的cell高设置为UITableViewAutomaticDimension:
[[SKRow alloc] initWithCellIdentifier:@”CommentContentCellIdentifier” data:commentString rowHeight:UITableViewAutomaticDimension];
由于评论内容cell我们使用了Auto Layout,这样就可以利用iOS 8 TableView的新特性,自动计算cell的高度。拼接完数据后,只要调用[self.tableView reloadData];让TableView重新加载即可。
好了,这样就大功告成
最终效果
使用上述方式制作这种内容块可变的界面虽然写起来较为啰嗦,但有如下优点:
- 逻辑清晰简单,易于理解,视图间不存在像先前HeaderView + Auto Layout + FooterView那种复杂的依赖,内容块的显示与否处理非常简便
- 易于调整。例如调换内容块的顺序,只要移动下拼凑cell数据的代码顺序即可
- 易于扩展增加新的内容块。要增加新的内容块,只需创建新的cell,在数据拼接时,增加拼接新cell类型的数据代码,同样在显示的地方增加显示新cell类型的代码即可,几乎不需要修改原有的逻辑
最后,附上Demo工程代码(https://github.com/kelystor/MultipleVariantCell)。注意,这个工程是用XCode 8创建的,低版本的XCode可能运行会有问题(XCode 8的storyboard默认好像不兼容老版本),示例是基于iOS 8,如果要兼容老版本,请自行修改(主要是涉及cell自动算高的部分)。
发布者:全栈程序员-用户IM,转载请注明出处:https://javaforall.cn/108272.html原文链接:https://javaforall.cn
【正版授权,激活自己账号】: Jetbrains全家桶Ide使用,1年售后保障,每天仅需1毛
【官方授权 正版激活】: 官方授权 正版激活 支持Jetbrains家族下所有IDE 使用个人JB账号...

