大家好,又见面了,我是你们的朋友全栈君。

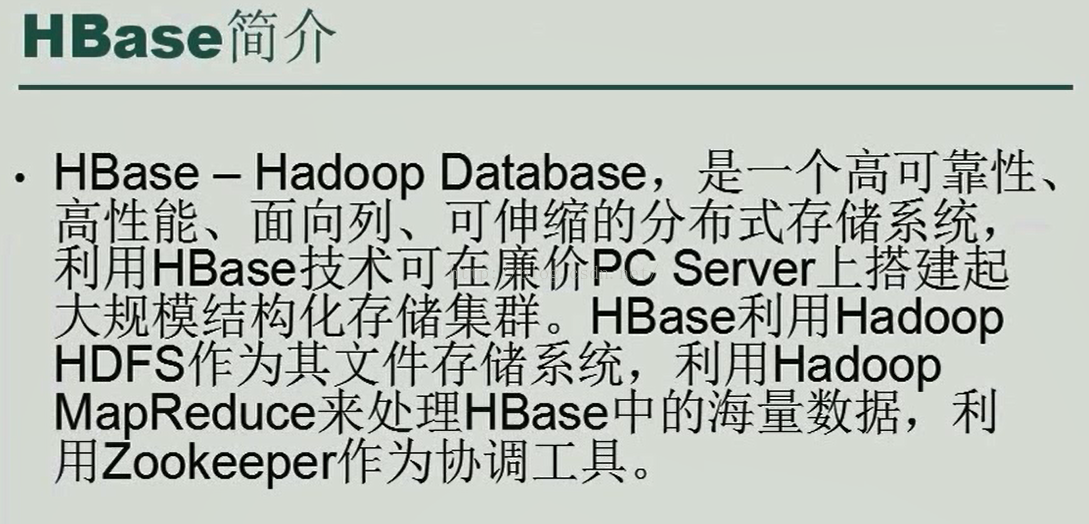
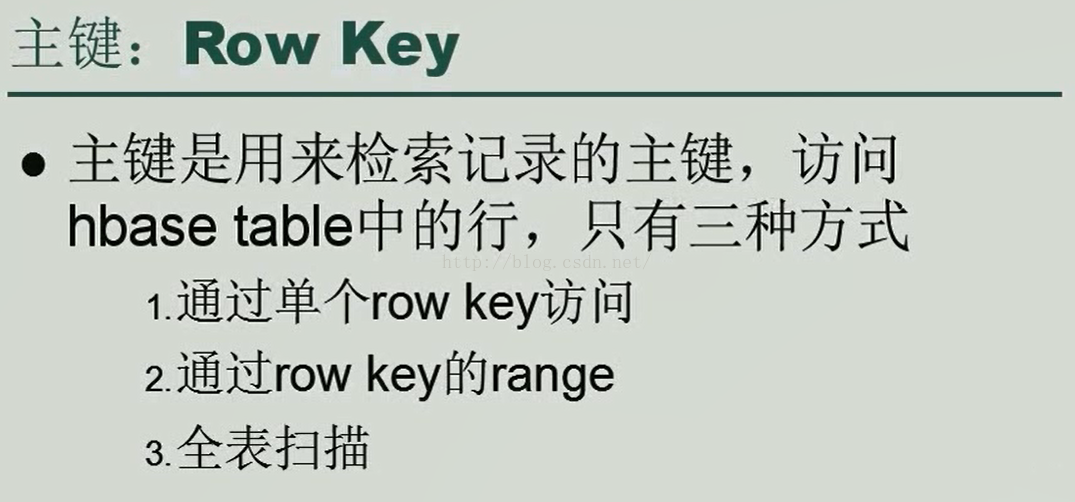
接下来我们一块儿看一下HBase的几个概念,首先来看第一个概念:Row Key,如下图所示,Row Key顾名思义,就是把一行当做主键,由于HBase建立了索引,所以我们根据行号可以迅速定位的那一行,我们还可以通过Row Key的range来定位数据,也就是查询的时候一次查多行的数据,指定一个范围,同样可以根据索引快速为我们查询出我们想要的结果。当然,也可以通过全表扫描的方式来查询我们想要的数据,这种方式相对来说就慢了。
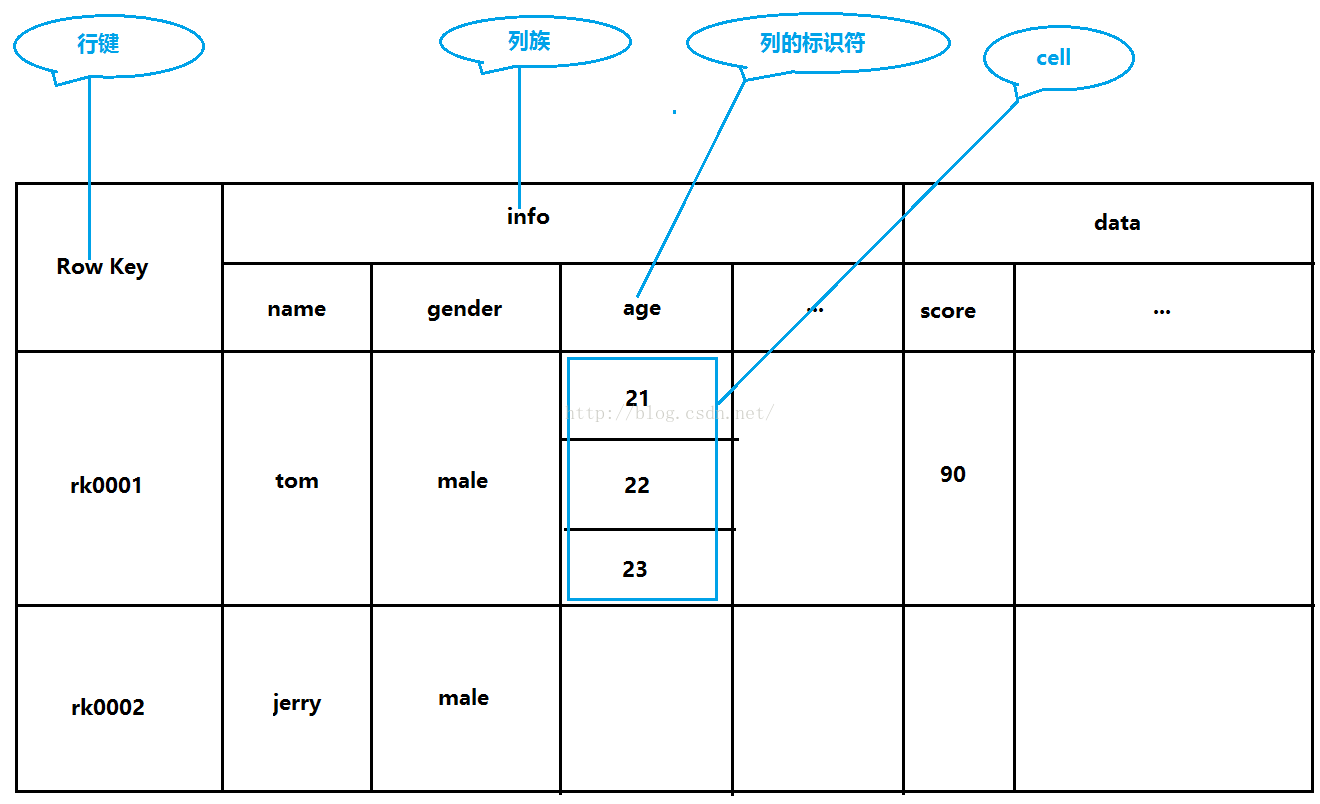
看完了第一个概念,我们接着来看一下第二个概念:列族,如下图所示。列族是在我们建表的时候就需要声明的,一个表可以指定一个到多个列族,列族当中可以包含多个列,这些列是可以动态增加的,一个列族当中可以有0到多个列。如果表创建好了又想增加列族,那么需要先停止表,然后Alter表增加列族,然后再重新启用表。

看完了第二个概念,我们接着来看一下第三个概念:timestamp,时间戳是用来建立索引的,通过时间戳我们可以快速找到我们想要的版本的数据。

2,下面下载安装hbase
下载地址:http://archive.cloudera.com/cdh5/cdh/5/
我这里下的是1.0的
下载后上传解压,修改目录名字,最后如下:
xiaoye@ubuntu3:~/Downloads$ cd ..
xiaoye@ubuntu3:~$ mv hbase-1.0.0-cdh5.5.1/ hbase
xiaoye@ubuntu3:~$ ls
apache-activemq-5.15.3 hbase Public
classes hive QueryResult.java
derby.log metastore_db SDS.java
Desktop Music sqoop
Documents mysql-connector-java-5.1.32 Templates
Downloads Pictures Videos
examples.desktop product2.java zookeeper
hadoop product.java zookeeper.out
xiaoye@ubuntu3:~$
要想跑起来HBase,我们需要简单配置一下两个文件,分别是hbase-env.sh和hbase-site.xml,首先我们来配置一下hbase-env.sh文件,如下所示,habase-env.sh文件当中的export JAVA_HOME这一行的内容原来配置的是jdk1.6版本的并且是注释掉的,我们现在去掉注释并 将jdk的版本换成我们现在用的版本。改完之后保存退出。
xiaoye@ubuntu3:~/hbase/conf$ vim hbase-env.sh
xiaoye@ubuntu3:~/hbase/conf$
# The java implementation to use. Java 1.7+ required.
export JAVA_HOME=/usr/lib/jvm/java-1.8.0-openjdk-amd64
接着我们来配置一下habase-site.xml文件,在这个文件当中我们暂且把文件系统配成本地文件系统。如下所示,注意:<configuration>与<property>之间以及<property>与其下一级之间都是用Tab键来缩进的。
xiaoye@ubuntu3:~/hbase/conf$ vim hbase-site.xml
<configuration>
<property>
<name>hbase.rootdir</name>
<value>file:///home/xiaoye/hbase</value>
</property>
</configuration>
2.1 下面进入bin目录下启动hbase
xiaoye@ubuntu3:~/hbase/conf$ vim hbase-site.xml
xiaoye@ubuntu3:~/hbase/conf$ cd ../bin
xiaoye@ubuntu3:~/hbase/bin$ ls
draining_servers.rb hbase-daemons.sh rolling-restart.sh
get-active-master.rb hbase-jruby shutdown_regionserver.rb
graceful_stop.sh hirb.rb start-hbase.cmd
hbase local-master-backup.sh start-hbase.sh
hbase-cleanup.sh local-regionservers.sh stop-hbase.cmd
hbase.cmd master-backup.sh stop-hbase.sh
hbase-common.sh region_mover.rb test
hbase-config.cmd regionservers.sh thread-pool.rb
hbase-config.sh region_status.rb zookeepers.sh
hbase-daemon.sh replication
xiaoye@ubuntu3:~/hbase/bin$ ./start-hbase.sh
xiaoye@ubuntu3:~/hbase/bin$ ./start-hbase.sh
starting master, logging to /home/xiaoye/hbase/bin/../logs/hbase-xiaoye-master-ubuntu3.out
xiaoye@ubuntu3:~/hbase/bin$ jps
16483 Jps
1431 QuorumPeerMain
2279 ResourceManager
1503 JournalNode
2196 DataNode
2424 NodeManager
jps并没有发现关于hbase的进程启动,因此可能报错了,到/hbase/logs日志下去看。有如下错:
ERROR [main] master.HMasterCommandLine: Master exiting
java.io.IOException: Could not start ZK at requested port of 2181. ZK was started at port: -1. Aborting as clients (e.g. shell) will not be able to find this ZK quorum.
看样子是hbase默认端口被占用了,百度看到有人说单机启动hbase前不要启动hadoop集群,2181这个端口好像是zookeeper的默认端口,那我们就试着改端口了。
xiaoye@ubuntu3:~/hbase/logs$ cd ../conf/
xiaoye@ubuntu3:~/hbase/conf$ vim hbase-site.xml
<configuration>
<property>
<name>hbase.rootdir</name>
<value>file:///home/xiaoye/hbase</value>
</property>
<property>
<name>hbase.zookeeper.property.clientPort</name>
<value>2182</value>
</property>
</configuration>
注意大小写也要一样。
xiaoye@ubuntu3:~/hbase/conf$ ../bin/start-hbase.sh
starting master, logging to /home/xiaoye/hbase/bin/../logs/hbase-xiaoye-master-ubuntu3.out
xiaoye@ubuntu3:~/hbase/conf$ jps
1431 QuorumPeerMain
2279 ResourceManager
17446 Jps
1503 JournalNode
2196 DataNode
2424 NodeManager
17107 HMaster
这样就启动了。
启动好了HBase,我们像检查安装好mysql那样,打开一个客户端来试试是否安装成功。我们用到的是命令是hbase,这个命令后可以跟很多命令,我们输入./habase一回车它就给我们显示./habase后面都可以跟哪些内容。如下所示。我们检查HBase用到的是shell。
我们来执行一下./hbase shell
xiaoye@ubuntu3:~/hbase/bin$ ./hbase shell
2018-04-06 04:52:06,631 INFO [main] Configuration.deprecation: hadoop.native.lib is deprecated. Instead, use io.native.lib.available
SLF4J: Class path contains multiple SLF4J bindings.
SLF4J: Found binding in [jar:file:/home/xiaoye/hbase/lib/slf4j-log4j12-1.7.5.jar!/org/slf4j/impl/StaticLoggerBinder.class]
SLF4J: Found binding in [jar:file:/home/xiaoye/hadoop/share/hadoop/common/lib/slf4j-log4j12-1.7.5.jar!/org/slf4j/impl/StaticLoggerBinder.class]
SLF4J: See http://www.slf4j.org/codes.html#multiple_bindings for an explanation.
SLF4J: Actual binding is of type [org.slf4j.impl.Log4jLoggerFactory]
2018-04-06 04:52:28,528 WARN [main] util.NativeCodeLoader: Unable to load native-hadoop library for your platform… using builtin-java classes where applicable
HBase Shell; enter ‘help<RETURN>’ for list of supported commands.
Type “exit<RETURN>” to leave the HBase Shell
Version 1.0.0-cdh5.5.1, rUnknown, Wed Dec 2 10:36:13 PST 2015
hbase(main):001:0> help
HBase Shell, version 1.0.0-cdh5.5.1, rUnknown, Wed Dec 2 10:36:13 PST 2015
Type ‘help “COMMAND”‘, (e.g. ‘help “get”‘ — the quotes are necessary) for help on a specific command.
Commands are grouped. Type ‘help “COMMAND_GROUP”‘, (e.g. ‘help “general”‘) for help on a command group.
COMMAND GROUPS:
Group name: general
Commands: status, table_help, version, whoami
Group name: ddl
Commands: alter, alter_async, alter_status, create, describe, disable, disable_all, drop, drop_all, enable, enable_all, exists, get_table, is_disabled, is_enabled, list, show_filters
Group name: namespace
Commands: alter_namespace, create_namespace, describe_namespace, drop_namespace, list_namespace, list_namespace_tables
Group name: dml
Commands: append, count, delete, deleteall, get, get_counter, incr, put, scan, truncate, truncate_preserve
Group name: tools
Commands: assign, balance_switch, balancer, catalogjanitor_enabled, catalogjanitor_run, catalogjanitor_switch, close_region, compact, compact_mob, compact_rs, flush, major_compact, major_compact_mob, merge_region, move, split, trace, unassign, wal_roll, zk_dump
Group name: replication
Commands: add_peer, append_peer_tableCFs, disable_peer, disable_table_replication, enable_peer, enable_table_replication, list_peers, list_replicated_tables, remove_peer, remove_peer_tableCFs, set_peer_tableCFs, show_peer_tableCFs
Group name: snapshots
Commands: clone_snapshot, delete_all_snapshot, delete_snapshot, list_snapshots, restore_snapshot, snapshot
Group name: configuration
Commands: update_all_config, update_config
Group name: quotas
Commands: list_quotas, set_quota
Group name: security
Commands: grant, revoke, user_permission
Group name: visibility labels
Commands: add_labels, clear_auths, get_auths, list_labels, set_auths, set_visibility
SHELL USAGE:
Quote all names in HBase Shell such as table and column names. Commas delimit
command parameters. Type <RETURN> after entering a command to run it.
Dictionaries of configuration used in the creation and alteration of tables are
Ruby Hashes. They look like this:
{‘key1’ => ‘value1’, ‘key2’ => ‘value2’, …}
and are opened and closed with curley-braces. Key/values are delimited by the
‘=>’ character combination. Usually keys are predefined constants such as
NAME, VERSIONS, COMPRESSION, etc. Constants do not need to be quoted. Type
‘Object.constants’ to see a (messy) list of all constants in the environment.
If you are using binary keys or values and need to enter them in the shell, use
double-quote’d hexadecimal representation. For example:
hbase> get ‘t1’, “key\x03\x3f\xcd”
hbase> get ‘t1’, “key\003\023\011”
hbase> put ‘t1’, “test\xef\xff”, ‘f1:’, “\x01\x33\x40”
The HBase shell is the (J)Ruby IRB with the above HBase-specific commands added.
For more on the HBase Shell, see http://hbase.apache.org/book.html
hbase(main):002:0>
根据回显信息,看出
命令是按组来分的,有general、ddl、namesapce等等组。我们常用到的组是ddl和dml。
那么ddl和dml代表的意思是什么呢?
DDL(Data Definition Language)数据库定义语言,用于定义数据库的三级结构,包括外模式、概念模式、内模式及其相互之间的映像,定义数据的完整性、安全控制等约束。DDL不需要commit。常用的命令有alter(修改表),create(创建表), describe(表结构的描述信息),drop(删除表),list(查询所有的表),可以发现都是针对表的操作。
DML(Data Manipulation Language)数据操纵语言,用于让用户或程序员使用,实现对数据库中数据的操作。DML分成交互型DML和嵌入型DML两类。依据语言的级别,DML又可分成过程性DML和非过程性DML两种。需要commit。常用的命令有scan(全表扫描,相当于select *),get(取出一条数据),put(向表中插入数据),delete(删除表中数据),等等。可以发现是对数据操作的命令。
下面我们创建一张表,看帮助有建表案例:
hbase(main):002:0> heltpp
NameError: undefined local variable or method `heltpp’ for #<Object:0x1d408060>
这里我的help输入错了,发现backspace键不能回退删除,百度说hbase的shell命令的回退键是ctrl+backspace
hbase(main):003:0> help ‘create’
Creates a table. Pass a table name, and a set of column family
specifications (at least one), and, optionally, table configuration.
Column specification can be a simple string (name), or a dictionary
(dictionaries are described below in main help output), necessarily
including NAME attribute.
Examples:
Create a table with namespace=ns1 and table qualifier=t1
hbase> create ‘ns1:t1’, {NAME => ‘f1’, VERSIONS => 5}
Create a table with namespace=default and table qualifier=t1
hbase> create ‘t1’, {NAME => ‘f1’}, {NAME => ‘f2’}, {NAME => ‘f3’}
hbase> # The above in shorthand would be the following:
hbase> create ‘t1’, ‘f1’, ‘f2’, ‘f3’
hbase> create ‘t1’, {NAME => ‘f1’, VERSIONS => 1, TTL => 2592000, BLOCKCACHE => true}
hbase> create ‘t1’, {NAME => ‘f1’, CONFIGURATION => {‘hbase.hstore.blockingStoreFiles’ => ’10’}}
Table configuration options can be put at the end.
Examples:
hbase> create ‘ns1:t1’, ‘f1′, SPLITS => [’10’, ’20’, ’30’, ’40’]
hbase> create ‘t1’, ‘f1′, SPLITS => [’10’, ’20’, ’30’, ’40’]
hbase> create ‘t1’, ‘f1’, SPLITS_FILE => ‘splits.txt’, OWNER => ‘johndoe’
hbase> create ‘t1’, {NAME => ‘f1’, VERSIONS => 5}, METADATA => { ‘mykey’ => ‘myvalue’ }
hbase> # Optionally pre-split the table into NUMREGIONS, using
hbase> # SPLITALGO (“HexStringSplit”, “UniformSplit” or classname)
hbase> create ‘t1’, ‘f1’, {NUMREGIONS => 15, SPLITALGO => ‘HexStringSplit’}
hbase> create ‘t1’, ‘f1’, {NUMREGIONS => 15, SPLITALGO => ‘HexStringSplit’, REGION_REPLICATION => 2, CONFIGURATION => {‘hbase.hregion.scan.loadColumnFamiliesOnDemand’ => ‘true’}}
You can also keep around a reference to the created table:
hbase> t1 = create ‘t1’, ‘f1’
Which gives you a reference to the table named ‘t1’, on which you can then
call methods.
hbase(main):004:0>
那我们就照着案例建一张表:
先介绍命令的意思:create不用多说,就是创建的意思,’student’是表名,{NAME => ‘info’, VERSIONS =>3}的意思是一个列族,建表的时候我们必须至少建一个列族,也可以建多个,NAME => ‘info’是给这个列族起的名字,VERSIONS =>3是指这个列族可以存储三个版本的数据,多于3个的话,最老的版本将被删除(这个后面会说到),同理,{NAME => ‘data’, VERSIONS =>1}这句的意思是建了另外一个列族,这个列族的名字是’data’,存储的版本只有1个。
hbase(main):006:0> create ‘student’,{NAME => ‘info’,VERSIONS =>3},{name => ‘data’,VERSIONS=>1}
NameError: undefined local variable or method `name’ for #<Object:0x1d408060>
hbase(main):007:0> create ‘student’,{NAME => ‘info’,VERSIONS =>3},{NAME => ‘data’,VERSIONS=>1}
0 row(s) in 2.6020 seconds
=> Hbase::Table – student
可以看出hbase 的shell命令区分大小写,
下面插入数据:
来具体说一下这条语句的意思,put的意思是插入,’student’的意思是表名,表示我们是向student表中插入数据,’rk0001’的意思是row key,可以认为是一行的唯一标识符,’info:name’的意思是一个cell(单元格),一个单元格是由列族和列名共同组成的,iinfo是列族,name是列名,’tom’是name的值。其实我们还可以指定timestamp的值,我们这里没有指定,系统会自动帮我们生成一个timestamp。
hbase(main):015:0> put ‘student’,’rk0001′ ,’info:name’,’tom’
0 row(s) in 0.3790 seconds
hbase(main):016:0> scan ‘student’
ROW COLUMN+CELL
rk0001 column=info:name, timestamp=1523017557754, value=tom
1 row(s) in 0.0590 seconds
增加另外一个列族
hbase(main):017:0> put ‘student’, ‘rk0002′,’data:score’,’99’
0 row(s) in 0.0320 seconds
hbase(main):018:0> scan ‘student’
ROW COLUMN+CELL
rk0001 column=info:name, timestamp=1523017557754, value=tom
rk0002 column=data:score, timestamp=1523017667855, value=99
2 row(s) in 0.0430 seconds
增加属性:
hbase(main):019:0> put ‘student’,’rk0001′ ,’info:age’,’22’
0 row(s) in 0.0150 seconds
hbase(main):020:0> scan ‘student’
ROW COLUMN+CELL
rk0001 column=info:age, timestamp=1523017710918, value=22
rk0001 column=info:name, timestamp=1523017557754, value=tom
rk0002 column=data:score, timestamp=1523017667855, value=99
2 row(s) in 0.0580 seconds
删除操作:
hbase(main):021:0> delete ‘student’,’rk0002′,’data:score’, 1523017667855
0 row(s) in 0.0960 seconds
hbase(main):022:0> scan ‘student’
ROW COLUMN+CELL
rk0001 column=info:age, timestamp=1523017710918, value=22
rk0001 column=info:name, timestamp=1523017557754, value=tom
1 row(s) in 0.0680 seconds
我们现在继续向student表中插入另外一名同学jerry的相关信息。如下所示,我们只添加了info:name和info:gender的信息,并没有添加age属性的值
hbase(main):026:0> put ‘student’,’rk0002′,’info:name’,’jerry4′
0 row(s) in 0.0350 seconds
hbase(main):027:0> scan ‘student’
ROW COLUMN+CELL
rk0001 column=info:age, timestamp=1523017710918, value=22
rk0001 column=info:name, timestamp=1523017557754, value=tom
rk0002 column=info:name, timestamp=1523018366607, value=jerry4
2 row(s) in 0.0470 seconds
hbase(main):028:0> put ‘student’,’rk0002′,’info:gender’,’male’
0 row(s) in 0.0150 seconds
hbase(main):029:0> scan ‘student’
ROW COLUMN+CELL
rk0001 column=info:age, timestamp=1523017710918, value=22
rk0001 column=info:name, timestamp=1523017557754, value=tom
rk0002 column=info:gender, timestamp=1523018418851, value=male
rk0002 column=info:name, timestamp=1523018366607, value=jerry4
2 row(s) in 0.0630 seconds
现在我们来验证一下我们在建表时给列族设定的VERSIONS =>3是否有效,我们向rk0001的iinfo:age列继续添加两次数据。info:age的值分别是21和22。
hbase(main):030:0> put ‘student’,’rk0001′,’info:age’,’22’
0 row(s) in 0.0210 seconds
hbase(main):031:0> put ‘student’,’rk0001′,’info:age’,’21’
0 row(s) in 0.0190 seconds
hbase(main):032:0> scan ‘student’
ROW COLUMN+CELL
rk0001 column=info:age, timestamp=1523018602020, value=21
rk0001 column=info:name, timestamp=1523017557754, value=tom
rk0002 column=info:gender, timestamp=1523018418851, value=male
rk0002 column=info:name, timestamp=1523018366607, value=jerry4
2 row(s) in 0.0440 seconds
可以看出只保留最近一次插入的数据。
那么我们会有个疑问,我们前面插入的info:age的值为20和21的数据被删除了吗?其实没有。我们可以通过scan ‘student’, {COLUMNS => ‘info’, VERSIONS => 3}来查看,COLUMNS => ‘info’指定的是列族,VERSIONS => 3是建这个列族时指定的可以容纳版本的数量,执行结果如下所示,我们发现info:age的所有值我们都查询出来了。
hbase(main):034:0> scan ‘student’,{COLUMNS=>’info’,VERSIONS=>3}
ROW COLUMN+CELL
rk0001 column=info:age, timestamp=1523018602020, value=21
rk0001 column=info:age, timestamp=1523018594743, value=22
rk0001 column=info:age, timestamp=1523017710918, value=22
rk0001 column=info:name, timestamp=1523017557754, value=tom
rk0002 column=info:gender, timestamp=1523018418851, value=male
rk0002 column=info:name, timestamp=1523018366607, value=jerry4
rk0002 column=info:name, timestamp=1523018359429, value=jerry3
rk0002 column=info:name, timestamp=1523018350603, value=jerry2
2 row(s) in 0.0740 seconds
既然名为info的列族设置了版本数量为3的限制,现在已经有3个版本了,那么我们继续向这个列族添加数据的话,看看是什么效果,如下所示,发现添加info:age的值为23的数据后,我们查看到的info:age信息当中只有21、22、23了,没有了最开始的20。其实info:age值为20的数据现在已经被标记为删除了,内存被flush的话就真正删除了。当前内存还没有flush,我们仍然是可以查看到那条被标记为删除的记录的。
hbase(main):035:0> put ‘student’,’rk0001′,’info:age’,’23’
0 row(s) in 0.0110 seconds
hbase(main):036:0> scan ‘student’,{COLUMNS=>’info’,VERSIONS=>3}
ROW COLUMN+CELL
rk0001 column=info:age, timestamp=1523019548097, value=23
rk0001 column=info:age, timestamp=1523018602020, value=21
rk0001 column=info:age, timestamp=1523018594743, value=22
rk0001 column=info:name, timestamp=1523017557754, value=tom
rk0002 column=info:gender, timestamp=1523018418851, value=male
rk0002 column=info:name, timestamp=1523018366607, value=jerry4
rk0002 column=info:name, timestamp=1523018359429, value=jerry3
rk0002 column=info:name, timestamp=1523018350603, value=jerry2
2 row(s) in 0.1070 seconds
注意新插入的23的位置,顶替掉最开始插入的22
我们使用scan ‘student’, {RAW => true, VERSIONS => 10}这条命令来查询包括缓存中已被标记为删除的记录。如下所示。直到缓存中的数据被flush之后才不再显示。
hbase(main):001:0> scan ‘student’,{RAW=>true,VERSIONS=>10}
ROW COLUMN+CELL
rk0001 column=info:age, timestamp=1523019548097, value=23
rk0001 column=info:age, timestamp=1523018602020, value=21
rk0001 column=info:age, timestamp=1523018594743, value=22
rk0001 column=info:age, timestamp=1523017710918, value=22
rk0001 column=info:name, timestamp=1523017557754, value=tom
rk0002 column=data:score, timestamp=1523017667855, type=DeleteCol
umn
rk0002 column=data:score, timestamp=1523017667855, value=99
rk0002 column=info:gender, timestamp=1523018418851, value=male
rk0002 column=info:name, timestamp=1523018366607, value=jerry4
rk0002 column=info:name, timestamp=1523018359429, value=jerry3
rk0002 column=info:name, timestamp=1523018350603, value=jerry2
rk0002 column=info:name, timestamp=1523018339854, value=jerry
2 row(s) in 0.7550 seconds
3,最后我们直观看看hbase结构和存表的结构图:
HBase数据表分析
我们把我们刚才操作的数据表给画出来,如下图所示,可见,这是一张不规则的表,这也是HBase的特色之处,我们可以灵活的给列族当中添加列,列的名称由我们来定。我们可以从这张图看到有些列是没有值的,那么这些空的值占空间吗?在HBase当中,这些空值是不占空间的,这比我们的关系型数据库明显要有优势(关系型数据库,你只要声明了某列,即使你不给它赋值,它也是占空间的)
上面图可能还不是特别直观,其实如果我们要存储的是比较复杂的json数据nosql形式的存储形式优势就凸显出来了。如下(数据不跟上图对应)
 {

              "customer":{

                    "id":1136,

                    "name":"Z3",

                    "billingAddress":[{"city":"beijing"}],

                    "orders":[

                        "id":17,

                        "customerId":1136,

                        "orderItems":[{"productId":27,"price":77.5,"productName":"thinking in java"}],

                        "shippingAddress":[{"city":"beijing"}],

                        "orderPayment":[{"cciinfo":"111-222-333","tenid":"asdfadcd334","billingAddress":{"city":"beijing"}}],

                      }

                    ]

              }

           }
上面存的可以看出淘宝的一个客户的信息数据,id:“1136”相当于rowkey,也就是这个客户的唯一id,billingAddress是一个地址,可这里是数组形式的,因此这里列簇的版本数就起作用了;此外这里name和地址两个字段是归于info列簇,orders单独归为另一个列簇,这个列簇的列(字段)有id,orderitems等字段。
发布者:全栈程序员-用户IM,转载请注明出处:https://javaforall.cn/106165.html原文链接:https://javaforall.cn
【正版授权,激活自己账号】: Jetbrains全家桶Ide使用,1年售后保障,每天仅需1毛
【官方授权 正版激活】: 官方授权 正版激活 支持Jetbrains家族下所有IDE 使用个人JB账号...
