大家好,又见面了,我是你们的朋友全栈君。
python的安装库就相当于java的lib包,下面我们把想用的安装包先安装好。
打开cmd命令:
依次输入python:
>>> import urllib
>>> import urllib.request
访问下百度试试:
>>> urllib.request.urlopen(‘http://www.baidu.com’)
返回:<http.client.HTTPResponse object at 0x00000000030CCA20>
没有报错就说明urllib库没问题。
下面安装request库:
重新打开一个cmd,输入命令:pip3 install requests;
C:\Users\Administrator>pip3 install requests;
Collecting requests
  Downloading https://files.pythonhosted.org/packages/7d/e3/20f3d364d6c8e5d23
72a67778eb189176f08e873c9900e10c0287b84b/requests-2.21.0-py2.py3-none-any.whl
7kB)
    52% |█████████████████               | 30kB 5.2kB/s eta
    70% |██████████████████████▋         | 40kB 6.1kB/
    88% |████████████████████████████▎   | 51kB
    100% |████████████████████████████████| 6
 8.8kB/s
Collecting chardet<3.1.0,>=3.0.2 (from requests)
出现如上图所示,说明正在下载。
下载完成后,如下验证:
C:\Users\Administrator>python
Python 3.6.1 (v3.6.1:69c0db5, Mar 21 2017, 18:41:36) [MSC v.1900 64 bit (AMD64)]
 on win32
Type "help", "copyright", "credits" or "license" for more information.
>>> import requests;
>>> requests.get('http://www.baidu.com')
<Response [200]>
>>>
说明requests库已经正确安装了。
下面安装selenium库
这是用来驱动浏览器的库。
>>> import selenium
Traceback (most recent call last):
  File "<stdin>", line 1, in <module>
ModuleNotFoundError: No module named 'selenium'
在python下输入上面命令报错说明还没有安装selenium.
下面安装:
C:\Users\Administrator>pip3 install selenium
Collecting selenium
  Downloading https://files.pythonhosted.org/packages/80/d6/4294f0b4bce4de0a
e17190289f9d0613b0a44e5dd6a7f5ca98459853/selenium-3.141.0-py2.py3-none-any.w
904kB)
    38% |████████████▎                   | 348kB 32kB/s eta 0:0
    39% |████████████▊                   | 358kB 27kB/s eta 0:0
    40% |█████████████                   | 368kB 29kB/s eta 0:0
下载完成后,验证如下:
C:\Users\Administrator>python
Python 3.6.1 (v3.6.1:69c0db5, Mar 21 2017, 18:41:36) [MSC v.1900 64 bit (AMD6
 on win32
Type "help", "copyright", "credits" or "license" for more information.
>>> import selenium;
>>>
没有报错,说明安装成功。
下面安装chromedriver,用来在python命令启动chrome。
下载地址:http://npm.taobao.org/mirrors/chromedriver/2.28/
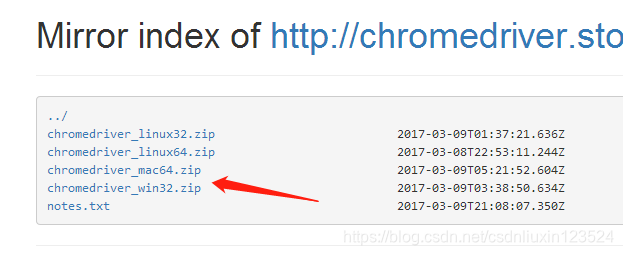

下载win32.
然后解压把chromedriver程序分别放到python安装目录的D:\python3.6.1\Scripts和D:\python3.6.1目录下。
然后重启一个cmd命令窗口。
输入以下命令:
C:\Users\Administrator>python
Python 3.6.1 (v3.6.1:69c0db5, Mar 21 2017, 18:41:36) [MSC v.1900 64 bit
on win32
Type "help", "copyright", "credits" or "license" for more information.
>>> from selenium import webdriver
>>> driver -webdriver.Chrome()
Traceback (most recent call last):
File "<stdin>", line 1, in <module>
NameError: name 'driver' is not defined
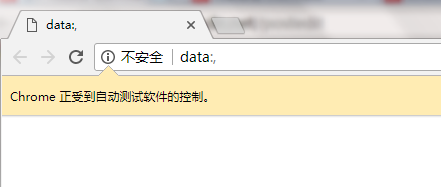
>>> driver = webdriver.Chrome()
DevTools listening on ws://127.0.0.1:12028/devtools/browser/24cccafd-54
357-ba79ae14af6a并且能弹出chrome浏览器,如下:
接着输入:
>>> driver.get(‘http://www.baidu.com’)
>>> driver.page_source 可以打开源代码。
在刚才打开的chrome浏览器中可以看到百度的网页。
说明OK。如果有报错可能会下载的chromedriver版本跟chrome流量器的版本不兼容,这就需要百度一下下了。
安装phantomjs库
这是个无界面浏览器。
下载phantomjs: 下载地址:http://phantomjs.org/download.html

下载完成后解压,进入到bin目录下,复制目录,配置环境变量。


然后启动cmd窗口,输入以下命令:
C:\Users\Administrator>phantomjs
phantomjs> console.log('hello world')
hello world
undefined
phantomjs>
安装成功。
接着执行下面命令:
>>> from selenium import webdriver
>>> driver = webdriver.PhantomJS()
>>> driver.get('http://www.baidu.com')
>>>
不会报错而且也不会弹出浏览器。
lxml库安装
C:\Users\Administrator>pip3 install lxml
Collecting lxml
如上下载lxml。
验证:
C:\Users\Administrator>python
Python 3.6.1 (v3.6.1:69c0db5, Mar 21 2017, 18:41:36) [MSC v.1900 64 bit (A
 on win32
Type "help", "copyright", "credits" or "license" for more information.
>>> import lxml
>>>
beautifulsoup库安装
它依赖于lxml。
安装:
C:\Users\Administrator>pip3 install beautifulsoup
Collecting beautifulsoup4
  Downloading https://files.pythonhosted.org/pack
4883f5d23b130bc237602a1411fa670eae12351e/beautifu
94kB)
    43% |██████████████
    54% |█████████████████▍
    65% |████████████████████
    75% |████████████████████
    86% |████████████████████
    97% |████████████████████
    100% |████████████████████
B 41kB/s
Collecting soupsieve>=1.2 (from beautifulsoup4)
验证:
>>> from bs4  import BeautifulSoup
>>> soup =BeautifulSoup('<html></html>','lxml')
>>>
puquery 安装
它也是个网页解析库,跟jquery是一样的功能
安装命令:
C:\Users\Administrator>pip3 install pyquery
Collecting pyquery
  Downloading https://files.pythonhosted.org/packages/09/c7/ce8c9c37ab8ff833
d3335c088d60bed4a35a4bed33a64f0e64fbcf29/pyquery-1.4.0-py2.py3-none-any.whl
Requirement already satisfied: lxml>=2.1 in d:\python3.6.1\lib\site-packages
om pyquery)
Collecting cssselect>0.7.9 (from pyquery)
  Downloading https://files.pythonhosted.org/packages/7b/44/25b7283e50585f0b
960691d951b05d061abf4a714078393e51929b30/cssselect-1.0.3-py2.py3-none-any.wh
Installing collected packages: cssselect, pyquery
Successfully installed cssselect-1.0.3 pyquery-1.4.0
You are using pip version 9.0.1, however version 19.0.1 is available.
You should consider upgrading via the 'python -m pip install --upgrade pip'
验证命令:
C:\Users\Administrator>python
Python 3.6.1 (v3.6.1:69c0db5, Mar 21 2017, 18:41:36) [MSC v.1900 64 bit (A
 on win32
Type "help", "copyright", "credits" or "license" for more information.
>>> from puquery import PyQuqery as pq
Traceback (most recent call last):
  File "<stdin>", line 1, in <module>
ModuleNotFoundError: No module named 'puquery'
>>> from pyquery import PyQuqery as pq
Traceback (most recent call last):
  File "<stdin>", line 1, in <module>
ImportError: cannot import name 'PyQuqery'
>>> from pyquery import PyQuery as pq
>>> doc = pq('<html></html/>')
>>> doc =pq('<html>Hello</html>')
>>> result =doc('html').test()
Traceback (most recent call last):
  File "<stdin>", line 1, in <module>
AttributeError: 'PyQuery' object has no attribute 'test'
>>> result =doc('html').text()
>>> result
'Hello'
>>>
pymysql安装
它是个存储库,操作mysql
安装:
C:\Users\Administrator>pip3 install pymysql
Collecting pymysql
  Downloading https://files.pythonhosted.org/packages/ed/39/15045ae46f2a123019aa
968dfcba0396c161c20f855f11dea6796bcaae95/PyMySQL-0.9.3-py2.py3-none-any.whl (47k
B)
    42% |█████████████▊                  | 20kB 22kB/s eta 0:00:02
    64% |████████████████████▋           | 30kB 27kB/s eta
    85% |███████████████████████████▌    | 40kB 20kB
    100% |████████████████████████████████| 51kB
 25kB/s
Installing collected packages: pymysql
Successfully installed pymysql-0.9.3
You are using pip version 9.0.1, however version 19.0.1 is available.
You should consider upgrading via the 'python -m pip install --upgrade pip' comm
and.
验证,这里我们先打开mysql-front,如下:
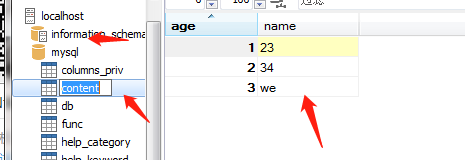
这里我有一个mysql数据库,并有个content表,里面有3条数据。
这里通过用python链接mysql并获取到这三条数据为例来验证安装的成功性:
命令如下:
C:\Users\Administrator>python
Python 3.6.1 (v3.6.1:69c0db5, Mar 21 2017, 18:41:36) [MSC v.1900 64 bit (AMD64)]
 on win32
Type "help", "copyright", "credits" or "license" for more information.
>>> import pymysql
>>> conn = pymysql.connect(host='localhost', user='root', password='root', port=
3306, db='mysql')
>>> cursor = conn.cursor()
>>> cursor.execute('select * from content')
3
>>> cursor.fetchone()
(1, '23')
>>> cursor.fetchall()
((2, '34'), (3, 'we'))
pymongo安装:
操作mongodb数据库
安装命令:
C:\Users\Administrator>pip3 install pymongo
Collecting pymongo
  Downloading https://files.pythonhosted.org/packages/d8/25/44b0fc81668a883739b1
08d9bd0c95b24f0b0204cb2dc93e0f259e173670/pymongo-3.7.2-cp36-cp36m-win_amd64.whl
(315kB)
    38% |████████████▌                   | 122kB 42kB/s eta 0:00:05
    42% |█████████████▌                  | 133kB 39kB/s eta 0:00:0
    45% |██████████████▋                 | 143kB 46kB/s eta 0:00:
    48% |███████████████▋                | 153kB 36kB/s eta 0:00
    51% |████████████████▋               | 163kB 32kB/s eta 0:0
    55% |█████████████████▊              | 174kB 24kB/s eta 0:
验证:
C:\Users\Administrator>python
Python 3.6.1 (v3.6.1:69c0db5, Mar 21 2017, 18:41:36) [MSC v.1900 64 bit (AMD64)]
 on win32
Type "help", "copyright", "credits" or "license" for more information.
>>> import pymongo
>>> client=  pymongo.MongoClient('localhost')  --链接mongo
>>> db = client['newtestdb']  --创建库
>>> db['table'].insert({'name':'Bob'})   --创建表并插入数据
ObjectId('5c51c411b1c06f1430edf124')
>>> db['table'].find_one({'name':'Boe'})
>>> db['table'].find_one({'name':'Bob'})
{'_id': ObjectId('5c51c411b1c06f1430edf124'), 'name': 'Bob'}
>>>
redis库安装:
安装命令:
C:\Users\Administrator>pip3 install redis
Collecting redis
  Downloading https://files.pythonhosted.org/packages/f1/19/a0282b77c23f9f9dbcc6
480787a60807c78a45947593a02dbf026636c90d/redis-3.1.0-py2.py3-none-any.whl (63kB)

    48% |███████████████▌                | 30kB 55kB/s eta 0:00:
    64% |████████████████████▋           | 40kB 44kB/s eta
0:00:01
验证命令:
C:\Users\Administrator>python
Python 3.6.1 (v3.6.1:69c0db5, Mar 21 2017, 18:41:36) [MSC v.1900 64 bit (AMD64)]
 on win32
Type "help", "copyright", "credits" or "license" for more information.
>>> import redis
>>> r =redis.Redis('localhost',6379)
>>> r.set('name','BOB')
True
>>> r.get('name')
b'BOB'
>>>
flask库安装
C:\Users\Administrator>pip3 install flask
Collecting flask
  Downloading https://files.pythonhosted.org/packages/7f/e
14dacb4696386634607af824ea997202cd0edb4b/Flask-1.0.2-py2.p

    44% |██████████████▍                 |
    56% |██████████████████
    67% |█████████████████████▌
    78% |█████████████████████████
    89% |█████████████████████████
    100% |████████████████████████
 30kB/s
django库安装
安装命令:
C:\Users\Administrator>pip3 install django
Collecting django
  Downloading https://files.pythonhosted.org/packages/36/5
e0278c0eb71650ed9672cdc91bd5542953bec17f/Django-2.1.5-py3-
    3% |█                               | 245kB 11kB/s et
jupyter库安装
它类似于一个记事本的功能。
>>> pip3 install jupyter
验证:
C:\Users\Administrator>jupyter notebook
[I 00:19:41.604 NotebookApp] Writing notebook server coo
dministrator\AppData\Roaming\jupyter\runtime\notebook_co
[I 00:19:42.635 NotebookApp] Serving notebooks from loca
ministrator
[I 00:19:42.635 NotebookApp] The Jupyter Notebook is run
[I 00:19:42.636 NotebookApp] http://localhost:8888/?toke
a423c0d428289e2c0adb8b4b85
[I 00:19:42.636 NotebookApp] Use Control-C to stop this
 kernels (twice to skip confirmation).
[C 00:19:42.660 NotebookApp]

    To access the notebook, open this file in a browser:
        file:///C:/Users/Administrator/AppData/Roaming/j
8480-open.html
    Or copy and paste one of these URLs:
        http://localhost:8888/?token=fa4befadec8ba227eb8
b4b85
同时会在浏览器上出现如下页面:

接着新建python3的一个文件:

然后

按b键又可弹出一个命令窗口,在线编辑:

打印百度网页源码:

发布者:全栈程序员-用户IM,转载请注明出处:https://javaforall.cn/106002.html原文链接:https://javaforall.cn
【正版授权,激活自己账号】: Jetbrains全家桶Ide使用,1年售后保障,每天仅需1毛
【官方授权 正版激活】: 官方授权 正版激活 支持Jetbrains家族下所有IDE 使用个人JB账号...
