SpringBoot2.x体系
**官网:**spring.io
学习目标:
- 如何上手一门新技术[学会通过官网文档进行学习]
- 构建springboot的知识体系
- 学会通过springboot官方文档去学习后面更新版本新技术
1.环境准备:
- 翻译工具:https://translate.google.cn/
- springbootGitHub地址:https://github.com/spring-projects/spring-boot
- springboot官方文档:https://spring.io/guides/gs/spring-boot/
- 工具自动创建:http://start.spring.io/
- 使用IDE 2018.2.1
- jdk1.8
- maven 3.5.2
学习新技术从quick start 入手
2.HTTP请求注解和简化注解
- @RestController and @RequestMapping是springMVC的注解,不是springboot特有的
- @RestController = @Controller+@ResponseBody
- @SpringBootApplication = @Configuration+@EnableAutoConfiguration+@ComponentScan
3.JSON框架
3.1 常用框架
- 阿里
Fastjson, Jackson、谷歌gson等
3.2 FastJSON
1.源码和依赖
github:https://github.com/alibaba/fastjson
<dependency>
    <groupId>com.alibaba</groupId>
    <artifactId>fastjson</artifactId>
    <version>1.2.73</version>
</dependency>
2.常用API
3.3 Jackson
1.jackson处理相关自动
- 指定别名:@JsonProperty
- 空字段不返回:@JsonInclude(Include.NON_NUll)
- 指定日期格式:@JsonFormat(pattern=“yyyy-MM-dd hh:mm:ss”,locale=“zh”,timezone=“GMT+8”)
- 指定字段不返回:@JsonIgnore
4.HTTP接口GET请求
4.1 @GetMapping
@RestController
public class UserController {


    @GetMapping(value = "/getUserByName/{username}")
    public User getUserByName( @PathVariable("username") String username) {

        User user = new User(1, username, "892295771@qq.com", "15723254410");
        System.out.println(user.toString());
        return user;
    }

}
- @GetMapping = @RequestMapping(method = RequestMethod.GET)
- @PostMapping = @RequestMapping(method = RequestMethod.POST)
- @PutMapping = @RequestMapping(method = RequestMethod.PUT)
- @DeleteMapping = @RequestMapping(method = RequestMethod.DELETE)
- @RequestMapping(path = “/{depid}/{userid}”, method = RequestMethod.GET) 可以同时指定多个提交方法
4.2 @RequestParam
@RequestParam(value = “name”, required = true)可以设置默认值,比如分页
    @GetMapping("/getUserById")
    public User getUserById(@RequestParam(value = "id",required = true,defaultValue = "1")String id){

        User user = new User(Integer.valueOf(id), "zx", "892295771@qq.com", "15723254410");
        return user;
    }
//访问路径:http://localhost:8080/getUserById?id=23
- value:参数名
- required:是否包含该参数,默认为true,表示该请求路径中必须包含该参数,如果不包含就报错。
- defaultValue:默认参数值,如果设置了该值,required=true将失效,自动为false,如果没有传该参数,就使用默认值
4.3 @RequestBody
请求体映射实体类为json格式,需要指定http头为 content-type为application/json charset=utf-8
4.4 @RequestHeader
@RequestHeader 请求头
比如鉴权@RequestHeader("access_token") String accessToken
5.资源目录规范
5.1 资源目录
src/main/java:存放代码
src/main/resources
		static: 存放静态文件,比如 css、js、image, (访问方式 http://localhost:8080/js/main.js)
		templates:存放静态页面jsp,html,tpl
		config:存放配置文件,application.properties
	    resources:
….
如果把静态文件放到templates,需要引入thymeleaf依赖,同时需要创建一个
controller进行跳转.如果静态页面向直接跳转,需要把html放在springboot默认加载的文件夹下面。比如
resource/static/public
5.2 静态资源加载顺序
META/resources > resources > static > public 里面找是否存在相应的资源,如果有则直接返回。
1.默认配置
- 官网地址:
https://docs.spring.io/spring-boot/docs/current/reference/html/boot-features-developing-web-applications.html#boot-features-spring-mvc-static-content - 自定义配置文件路径:
spring.resources.static-locations = classpath:/META-INF/resources/,classpath:/resources/,classpath:/static/,classpath:/public/
静态资源文件存储在CDN
6.文件上传
springboot文件上传 MultipartFile file,源自SpringMVC 【其本质就是流的传输】;
MultipartFile 对象的transferTo方法,用于文件保存(效率和操作比原先用FileOutStream方便和高效)
6.1 编写上传文件
静态页面存放位置:resources/static/upload.html
<!DOCTYPE html>
<html lang="en">
<head>
    <meta charset="UTF-8">
    <title>upload</title>
</head>
<body>
<h1>文件上传</h1>
<form action="/upload" enctype="multipart/form-data" method="post">
    文件:<input type="file" name="uploadFile"/>
    <br/>
    姓名:<input type="text" name="username"/>
    <br/>
    <input type="submit" value="上传">
</form>

</body>
</html>
6.2 后端接收
import com.example.springbootdemo.common.Rs;
import lombok.extern.slf4j.Slf4j;

import org.springframework.beans.factory.annotation.Value;
import org.springframework.web.bind.annotation.RequestMapping;
import org.springframework.web.bind.annotation.RestController;
import org.springframework.web.multipart.MultipartFile;

import javax.servlet.http.HttpServletRequest;
import java.io.File;
import java.util.UUID;

@RestController
@Slf4j
public class UploadController {


    @Value("${web.images-path}")
    private String path ;

    /** * 文件上传处理控制器 * * @param uploadFile * @param request * @return */
    @RequestMapping("/upload")
    public Rs upload(MultipartFile uploadFile, HttpServletRequest request) {

        //获取姓名参数
        String username = request.getParameter("username");
        System.out.println("姓名:" + username);

        //获取文件名称
        String originalFilename = uploadFile.getOriginalFilename();
        System.out.println("文件名称:"+originalFilename);
        //获取文件后缀名
        String suffixName = originalFilename.substring(originalFilename.lastIndexOf("."));
        System.out.println("文件后缀:"+suffixName);

        String fileName = UUID.randomUUID()+suffixName;
        System.out.println("转换后的文件名称:"+fileName);
       // String path = this.getClass().getClassLoader().getResource("").getPath();


        System.out.println("path:"+path);

        File file = new File(path,fileName);
        try {

            uploadFile.transferTo(file);
            return Rs.SUCCESS(path+fileName);
        }catch (Exception e){

            e.printStackTrace();
        }
        return Rs.FAILE("上传文件失败");
    }
}
application.properties
web.images-path=C:/Users/Administrator/Desktop/
spring.resources.static-locations=classpath:/META-INF/resources/,classpath:/resources/,classpath:/static/,classpath:/public/,classpath:/test/,file:${web.upload-path}
1.配置上传文件大小
文件大小配置,启动类里面配置或者专门建一个配置类或者配置文件中进行进行配置
@Bean
public MultipartConfigElement multipartConfigElement() {

    MultipartConfigFactory factory = new MultipartConfigFactory();
    //单个文件最大
    factory.setMaxFileSize("10240KB"); //KB,MB
    /// 设置总上传数据总大小
    factory.setMaxRequestSize("1024000KB");
    return factory.createMultipartConfig();
}
2.文件上传和访问需要指定磁盘路径
application.properties中增加下面配置
			1) web.images-path=C:/Users/Administrator/Desktop/
			2) spring.resources.static-locations=classpath:/META-INF/resources/,classpath:/resources/,classpath:/static/,classpath:/public/,classpath:/test/,file:${web.upload-path}
7.打包成jar包
打包成jar包,需要增加maven依赖
 <build>
        <plugins>
            <plugin>
                <groupId>org.springframework.boot</groupId>
                <artifactId>spring-boot-maven-plugin</artifactId>
            </plugin>
        </plugins>
    </build>
GUI:反编译工具,作用就是用于把class文件转换成java文件
8.热部署
8.1 加入依赖
 <dependency>
     <groupId>org.springframework.boot</groupId>
     <artifactId>spring-boot-devtools</artifactId>
     <scope>runtime</scope>
     <optional>true</optional>
</dependency>
CTRL + F9进行刷新 .同时需要对IDEA进行相关的配置,热部署才会起效果
1.setting配置
File–>settings—>compiler—>build project automatically
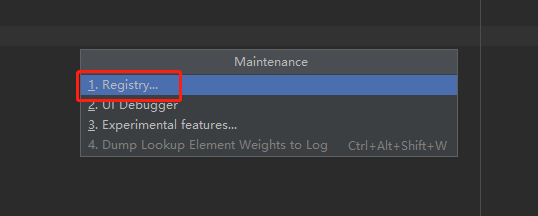
2.打开Registry
使用快捷键:ctrl + shift + alt + / ,选中Registry...
3.修改启动类配置
9.配置文件注解
9.1 @Value(“${……}”)
配置文件自动映射到属性和实体类
@Value(“${test.name}”)
private String name;
9.2 @PropertySource(“{……}”)
Controller上面配置*@PropertySource({“classpath:resource.properties”})*
10.单元测试
11.自定义异常
发布者:全栈程序员-用户IM,转载请注明出处:https://javaforall.cn/100737.html原文链接:https://javaforall.cn
【正版授权,激活自己账号】: Jetbrains全家桶Ide使用,1年售后保障,每天仅需1毛
【官方授权 正版激活】: 官方授权 正版激活 支持Jetbrains家族下所有IDE 使用个人JB账号...
