1.主机配置
[mysqld]
datadir=/var/lib/mysql
socket=/var/lib/mysql/mysql.sock
# Disabling symbolic-links is recommended to prevent assorted security risks
symbolic-links=0
# Settings user and group are ignored when systemd is used.
# If you need to run mysqld under a different user or group,
# customize your systemd unit file for mariadb according to the
# instructions in http://fedoraproject.org/wiki/Systemd

transaction-isolation = READ-COMMITTED
key_buffer_size = 32M
max_allowed_packet = 32M
thread_stack = 256k
thread_cache_size = 64
query_cache_limit = 8M
query_cache_size = 64M
query_cache_type = 1
max_connections = 550

server-id = 1
log_bin = /var/lib/mysql/mysql_master.log
binlog_format = mixed
read_buffer_size = 2M
read_rnd_buffer_size = 16M
sort_buffer_size = 8M
join_buffer_size = 8M

innodb_file_per_table = 1
innodb_flush_log_at_trx_commit = 2
innodb_log_buffer_size = 64M
innodb_buffer_pool_size = 4G
innodb_thread_concurrency = 8
innodb_flush_method = O_DIRECT
innodb_log_file_size = 512M

character_set_server = utf8

[client]

[mysqld_safe]
log-error=/var/log/mysql/mysql.log
pid-file=/var/run/mysql/mysql.pid
sql_mode=STRICT_ALL_TABLES


#
# include all files from the config directory
#
!includedir /etc/my.cnf.d
注意
server-id = 1
log_bin = /var/lib/mysql/mysql_slave.log
2.从机配置
[mysqld]
datadir=/var/lib/mysql
socket=/var/lib/mysql/mysql.sock
# Disabling symbolic-links is recommended to prevent assorted security risks
symbolic-links=0
# Settings user and group are ignored when systemd is used.
# If you need to run mysqld under a different user or group,
# customize your systemd unit file for mariadb according to the
# instructions in http://fedoraproject.org/wiki/Systemd

transaction-isolation = READ-COMMITTED
key_buffer_size = 32M
max_allowed_packet = 32M
thread_stack = 256k
thread_cache_size = 64
query_cache_limit = 8M
query_cache_size = 64M
query_cache_type = 1
max_connections = 550

server-id = 2
log_bin = /var/lib/mysql/mysql_slave.log
binlog_format = mixed
read_buffer_size = 2M
read_rnd_buffer_size = 16M
sort_buffer_size = 8M
join_buffer_size = 8M

innodb_file_per_table = 1
innodb_flush_log_at_trx_commit = 2
innodb_log_buffer_size = 64M
innodb_buffer_pool_size = 4G
innodb_thread_concurrency = 8
innodb_flush_method = O_DIRECT
innodb_log_file_size = 512M

character_set_server = utf8

[client]

[mysqld_safe]
log-error=/var/log/mysql/mysql.log
pid-file=/var/run/mysql/mysql.pid
sql_mode=STRICT_ALL_TABLES


#
# include all files from the config directory
#
!includedir /etc/my.cnf.d
注意
server-id = 2
log_bin = /var/lib/mysql/mysql_slave.log
3.主从设置(主机)
- 登陆主机 mysql
mysql -uroot -p
- 创建同步专用账号
grant replication slave on *.* to 'repl'@'%' identified by '123456';
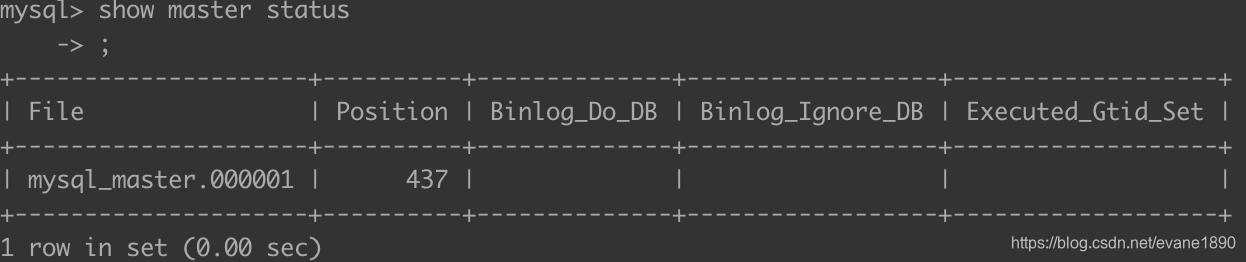
- 查看状态
查看主机master状态
show master status;

4.主从设置(从机)
- 登陆从节点mysql(root角色)
mysql -uroot -p
- 执行主从设置
change master to master_host='192.168.6.6' ,master_user='repl', master_password='123456',master_port=3306,master_log_file='mysql_master.000001',master_log_pos=578;
注意:
master_log_file、master_log_pos就是master的file、position
- 起动从机
start slave;
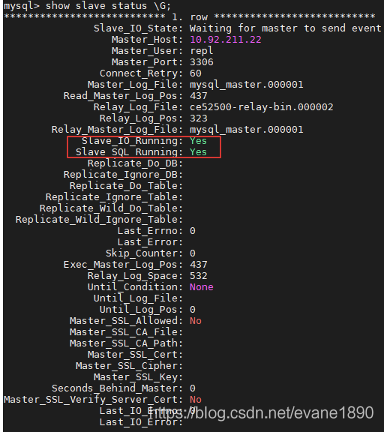
- 查看同步状态
show slave status \G;
常见问题
常见问题:Slave_SQL_Running = NO
这个需要重新从0开始同步主库与从库,操作如下:
master
#登陆mysql
mysql -uroot -p

RESET MASTER;
FLUSH TABLES WITH READ LOCK;
SHOW MASTER STATUS;
EXIT;

mysqldump -u root -p --all-databases > mysqldump.sql

#再次登陆mysql,执行解锁
mysql -uroot -p

UNLOCK TABLES;
slave
#导入数据
mysql -uroot -p < mysqldump.sql
# 进入mysql 执行
mysql -uroot -p

RESET SLAVE;
CHANGE MASTER TO master_host='192.168.88.203',\
                        master_user='repl',\
                        master_password='123456',\
                        MASTER_LOG_FILE='mysql-bin.000001', MASTER_LOG_POS=98;
START SLAVE;
SHOW SLAVE STATUS;
版权声明:本文内容由互联网用户自发贡献,该文观点仅代表作者本人。本站仅提供信息存储空间服务,不拥有所有权,不承担相关法律责任。如发现本站有涉嫌侵权/违法违规的内容, 请发送邮件至 举报,一经查实,本站将立刻删除。
发布者:全栈程序员-用户IM,转载请注明出处:https://javaforall.cn/100393.html原文链接:https://javaforall.cn
【正版授权,激活自己账号】: Jetbrains全家桶Ide使用,1年售后保障,每天仅需1毛
【官方授权 正版激活】: 官方授权 正版激活 支持Jetbrains家族下所有IDE 使用个人JB账号...
