本章主要讲Spring Boot的一些核心内容与配置,非常简单粗暴,具体参数配置还在实际项目里实践才能真正使用好这些配置。
1.基本配置
1.1 入口类和@SpringBootApplication
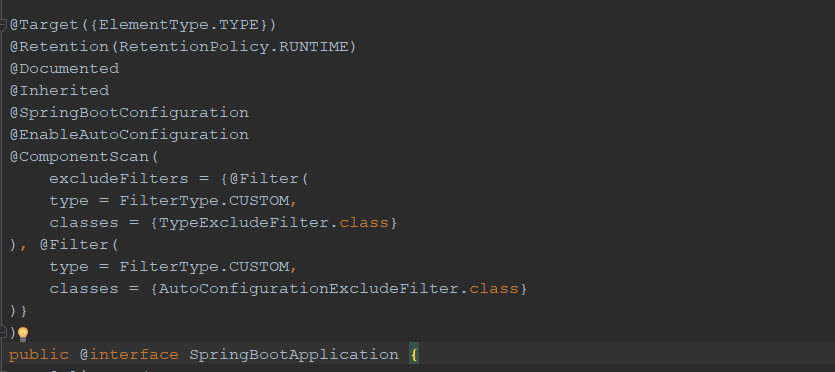
在用intellij创建Spring Boot项目的时候会默认生成一个入口类,名为*Application的类,里面有个main方法,用于启动SpringBoot应用项目。在类的上面有个@SpringBootApplication,是Spring Boot的核心注解,由多个注解组合而成。

其中,
@SpringBootConfiguration点进去发现其实也是一个@Configuration注解,代表着配置类
@EnableAutoConfiguration点进去是一大堆注解,作用是启动自动配置,根据添加的jar包来配置项目的默认配置
@ComponentScan配置扫描包以及过滤规则
1.2 关闭特定的自动配置
@SpringBootApplication(exclude = DataSourceAutoConfiguration.class)
1.3 定制banner
在src/resources下面新建一个banner.txt,然后在网站http://patorjk.com/software/taag/ 生成自己的banner放进去,再次启动程序,banner自动变成自定义的banner了。
当不想使用banner时,可以使用以下方法,springboot1.5与springboot2.0还是不一样的。当然,这不是唯一的方法,还可以使用注解。
 public static void main(String[] args) {
       //SpringApplication.run(SpringbootApplication.class, args);
       //设置不使用banner,这里的设置跟springboot版本有关系,具体设置看情况
        /*

         * Banner.Mode.OFF:关闭;

         * Banner.Mode.CONSOLE:控制台输出,默认方式;

         * Banner.Mode.LOG:日志输出方式;

         */

        SpringApplication app=new SpringApplication(SpringbootApplication.class);
        //spring boot1.5以上
        app.setBannerMode(Banner.Mode.OFF);
        //spring boot1.5以下
        //app.setShowBanner(false);
        app.run(args);
    }
1.4 Spring Boot配置文件
Spring Boot有一个全局的配置文件,application.properties,也可以改成yaml语言的application.yml。yaml是以数据为中心的语言,在配置数据的时候有面向对象的特征。
例如,配置端口号以及访问路径
application.properties 中:
server.port=9090
server.servlet.path=/girl
或者
application.yml 中:
server:
port: 9090
servlet:
context-path: /girl
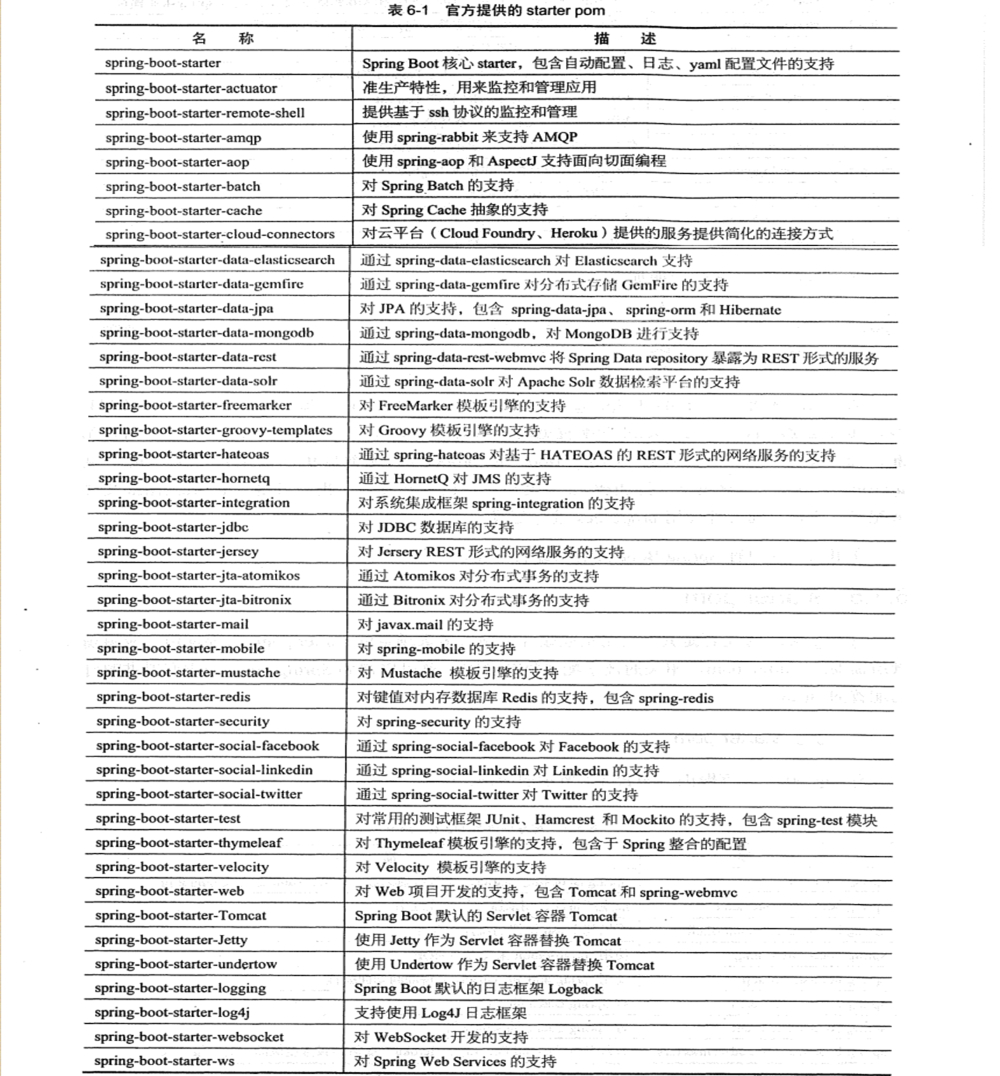
1.5 starter pom
根据项目需求添加需要的starter pom,有些被其他的pom包含了,无需重复加入,一些官方的pom截图如下:
1.6 使用xml配置
用@ImportResource来解决,例如:
@ImportResource({“classpath:one-context.xml”,”classpath:tow-context.xml”})
2 外部配置
2.1 命令行参数配置
Spring Boot如果选择基于jar包运行,可以在mvn clean package 将项目打成jar包后用以下的命令来运行:
java -jar xxx.jar
tomcat指定端口,可以加上–server.port=9080
2.2 常规属性配置
这个很简单,在配置文件里配置好之后,可以在代码里获取属性和值,本次实验是基于application.yml,简单配置如下:
book:
  author: han
  name: spring boot
java文件中获取参数:
    @Value("${book.author}")
    private String author;
    @Value("${book.name}")
    private String name;
2.3 类型安全的配置
resources下新建author.properties
author.name=good luck
author.age=19
新建一个实体类,自动获取文件里的属性值
package com.just.springboot.config;

import org.springframework.boot.context.properties.ConfigurationProperties;
import org.springframework.context.annotation.PropertySource;
import org.springframework.stereotype.Component;

@Component
@ConfigurationProperties(prefix = "author")
@PropertySource("classpath:author.properties")
public class AuthorSettings {
    private String name;
    private Long age;

    public String getName() {
        return name;
    }

    public void setName(String name) {
        this.name = name;
    }

    public Long getAge() {
        return age;
    }

    public void setAge(Long age) {
        this.age = age;
    }
}
注意,此处基于springboot2.0的@ConfigurationProperties里并没有location属性,所以要用@PropertySource指定是哪个文件,这个是和以前springboot版本不同的
测试是否成功:
package com.just.springboot;
import com.just.springboot.config.AuthorSettings;
import org.springframework.beans.factory.annotation.Autowired;
import org.springframework.beans.factory.annotation.Value;
import org.springframework.boot.Banner;
import org.springframework.boot.SpringApplication;
import org.springframework.boot.autoconfigure.AutoConfigureOrder;
import org.springframework.boot.autoconfigure.SpringBootApplication;
import org.springframework.boot.autoconfigure.jdbc.DataSourceAutoConfiguration;
import org.springframework.context.annotation.ImportResource;
import org.springframework.web.bind.annotation.RequestMapping;
import org.springframework.web.bind.annotation.RestController;
@RestController
@SpringBootApplication(exclude = DataSourceAutoConfiguration.class)
@ImportResource({"classpath:one-context.xml","classpath:tow-context.xml"})
public class SpringbootApplication {
@Value("${book.author}")
private String author;
@Value("${book.name}")
private String name;
@Autowired
private AuthorSettings authorSettings;
public static void main(String[] args) {
//SpringApplication.run(SpringbootApplication.class, args);
//设置不使用banner,这里的设置跟springboot版本有关系,具体设置看情况
/*
* Banner.Mode.OFF:关闭;
* Banner.Mode.CONSOLE:控制台输出,默认方式;
* Banner.Mode.LOG:日志输出方式;
*/
SpringApplication app=new SpringApplication(SpringbootApplication.class);
//spring boot1.5以上
app.setBannerMode(Banner.Mode.OFF);
//spring boot1.5以下
//app.setShowBanner(false);
app.run(args);
}
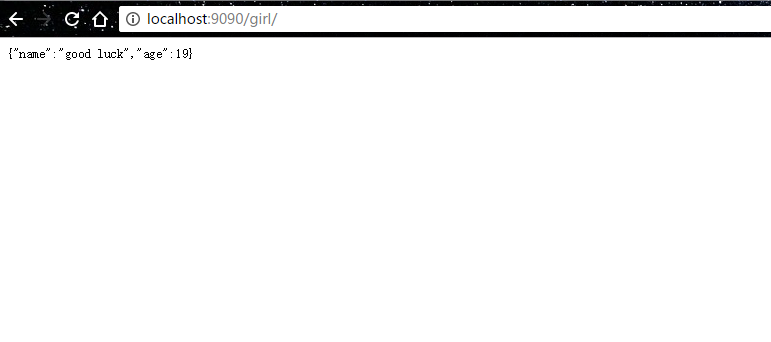
@RequestMapping("/")
public Object index(){
//return "demo spring boot"+" author:"+author+" | name:"+name;
return authorSettings;
}
}
返回结果:
3.日志配置
springboot默认使用logback作为日志框架,这个讲的很少,具体配置可以参考其他的博客,关于logback有个大神写的很全,可以参考:
https://www.cnblogs.com/warking/p/5710303.html
4.profile配置
这个在实际项目中是经常用到的,通常用来区分项目环境,比如本地、测试、生产环境,全局profile配置使用application-{profile}.properties(.yml文件同理)
比如,我们创建了一个文件application-prod.properties,配置生产环境的参数,当切换到生产环境的时候可以在application.properties文件里加一句,spring.profiles.active=prod
当然,在实际项目中一般是在命令行里指定的环境,–spring.profiles.active=prod
在intellij里启动可以这样指定profile:

5 Spring Boot运行原理
没太看明白,主要是自动配置和bean,有个编码配置的例子,主要是条件注解condition,当碰到的时候再深究吧
package com.just.springboot.config;

import org.springframework.boot.context.properties.ConfigurationProperties;

import java.nio.charset.Charset;
@ConfigurationProperties("spring.http.encoding")
public class HttpEncodingProperties {
    private static final Charset  DEFAULT_CHARSET=Charset.forName("UTF-8");
    private Charset charset=DEFAULT_CHARSET;
    private boolean force=true;

    public Charset getCharset() {
        return charset;
    }

    public void setCharset(Charset charset) {
        this.charset = charset;
    }

    public boolean isForce() {
        return force;
    }

    public void setForce(boolean force) {
        this.force = force;
    }
}
package com.just.springboot.config;

import org.springframework.beans.factory.annotation.Autowired;
import org.springframework.boot.autoconfigure.condition.ConditionalOnClass;
import org.springframework.boot.autoconfigure.condition.ConditionalOnMissingBean;
import org.springframework.boot.autoconfigure.condition.ConditionalOnProperty;
import org.springframework.boot.context.properties.EnableConfigurationProperties;
import org.springframework.boot.web.servlet.filter.OrderedCharacterEncodingFilter;
import org.springframework.context.annotation.Bean;
import org.springframework.context.annotation.Configuration;
import org.springframework.web.filter.CharacterEncodingFilter;

@Configuration
@EnableConfigurationProperties(HttpEncodingProperties.class)
@ConditionalOnClass(CharacterEncodingFilter.class)   //当CharacterEncodingFilter在类路径的情况下
@ConditionalOnProperty(prefix = "spring.http.encoding",value = "enabled",matchIfMissing = true)
public class HttpEncodingAutoConfig {
    @Autowired
    private HttpEncodingProperties httpEncodingProperties;
    @Bean
    @ConditionalOnMissingBean(CharacterEncodingFilter.class) //当容器中没有这个bean的时候创建这个bean
    public CharacterEncodingFilter characterEncodingFilter(){
        CharacterEncodingFilter filter=new OrderedCharacterEncodingFilter();
        filter.setEncoding(this.httpEncodingProperties.getCharset().name());
        filter.setForceEncoding(this.httpEncodingProperties.isForce());
        return filter;
    }
}
其他
通过本章的学习,主要学会了配置相关的东西,在项目例子的基础上改成了yml文件来配置,比较清晰,application.yml配置如下:
#配置端口和servlet访问路径
server:
  port: 8080
  servlet:
    context-path: /

#配置日志
logging:
  file: boot.log
  level:
    org:
      springframework:
        web: debug


#其他参数
book:
  author: han
  name: spring boot
#指定运行环境
spring:
  profiles:
    active: dev
#设置编码
  http:
    encoding:
      charset: UTF-8
      force: false
end.
发布者:全栈程序员-用户IM,转载请注明出处:https://javaforall.cn/100303.html原文链接:https://javaforall.cn
【正版授权,激活自己账号】: Jetbrains全家桶Ide使用,1年售后保障,每天仅需1毛
【官方授权 正版激活】: 官方授权 正版激活 支持Jetbrains家族下所有IDE 使用个人JB账号...
