MPLS VPN实验配置和抓包
文章目录
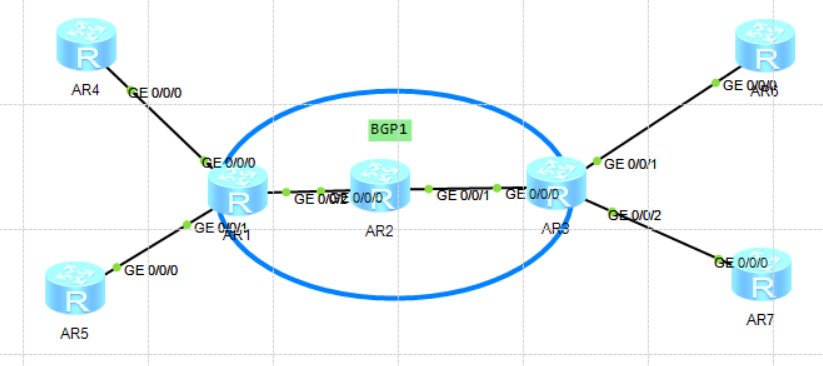
实验需求:
R1,R3为IBGP关系;R2不配BGP。(MPLS)
R6可以与R4相通;R7可以与R5相通。
实验拓扑图:
配置思路:
1.配置公网地址
2.公网启用ospf
3.配置MPLS域
4.配置 配置PE与PE间MP-BPG邻居关系
5.配置用户网络
6.配置MPLS VPN
7.将BGP和OSPF进行双向重发布
配置公网地址、公网启用ospf,配置MPLS域
R1上配置:
#
interface GigabitEthernet0/0/2
 ip address 10.1.12.1 255.255.255.0
 mpls
 mpls ldp
#
interface NULL0
#
interface LoopBack0
 ip address 10.1.1.1 255.255.255.0
#
#
ospf 1 router-id 1.1.1.1
 area 0.0.0.0
  network 10.1.1.1 0.0.0.0
  network 10.1.12.0 0.0.0.255
#
mpls lsr-id 10.1.1.1
mpls
#
mpls ldp
#
R2配置
#
interface GigabitEthernet0/0/0
 ip address 10.1.12.2 255.255.255.0
 mpls
 mpls ldp
#
interface GigabitEthernet0/0/1
 ip address 10.1.23.1 255.255.255.0
 mpls
 mpls ldp
#

interface LoopBack0
 ip address 10.2.2.2 255.255.255.0
#
ospf 1 router-id 2.2.2.2
 area 0.0.0.0
  network 10.1.12.0 0.0.0.255
  network 10.1.23.0 0.0.0.255
  network 10.2.2.2 0.0.0.0
#
#
mpls lsr-id 10.2.2.2
mpls
#
mpls ldp
#
R3配置与R1配置类似
配置PE与PE间MP-BPG邻居关系(MG-BGP用于传递RT值)
R1配置:
#
bgp 1
 router-id 1.1.1.1
 peer 10.3.3.3 as-number 1
 peer 10.3.3.3 connect-interface LoopBack0
 #
 ipv4-family unicast
  undo synchronization
  peer 10.3.3.3 enable
 #
 ipv4-family vpnv4
  policy vpn-target
  peer 10.3.3.3 enable
  peer 10.3.3.3 advertise-community
 #
R3与R1类似
配置MPLS VPN
用户端正常启用OSPF进程
PE端使用VRF技术
R1配置:
#
ip vpn-instance a
 ipv4-family
  route-distinguisher 1:1
  vpn-target 100:1 export-extcommunity
  vpn-target 100:1 import-extcommunity
#
ip vpn-instance b
 ipv4-family
  route-distinguisher 2:2
  vpn-target 200:2 export-extcommunity
  vpn-target 200:2 import-extcommunity
#
#
interface GigabitEthernet0/0/0
 ip binding vpn-instance a
 ip address 10.1.14.2 255.255.255.0
#
interface GigabitEthernet0/0/1
 ip binding vpn-instance b
 ip address 10.1.15.2 255.255.255.0
#
#
ospf 2 router-id 1.1.1.1 vpn-instance a
 import-route bgp
 area 0.0.0.0
  network 10.1.14.0 0.0.0.255
#
ospf 3 router-id 1.1.1.1 vpn-instance b
 import-route bgp
 area 0.0.0.0
  network 10.1.15.0 0.0.0.255
#
将BGP和OSPF进行双向重发布
R1配置:
#
 ipv4-family vpn-instance a
  import-route ospf 2
 #
 ipv4-family vpn-instance b
  import-route ospf 3
#
#
ospf 2 router-id 1.1.1.1 vpn-instance a
 import-route bgp

#
ospf 3 router-id 1.1.1.1 vpn-instance b
 import-route bgp
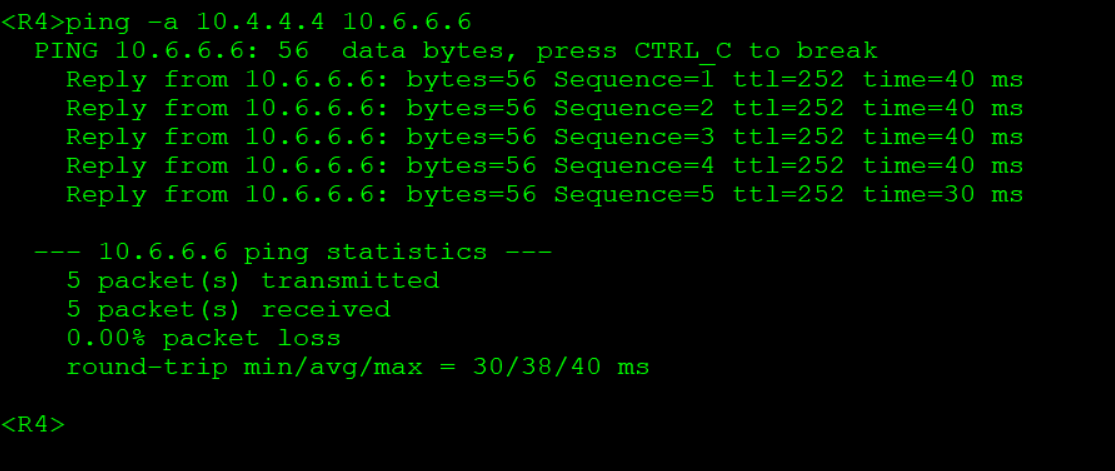
测试:

附:
R1全部配置:
<R1>dis current-configuration
[V200R003C00]
#
sysname R1
#
snmp-agent local-engineid 800007DB03000000000000
snmp-agent
#
clock timezone China-Standard-Time minus 08:00:00
#
portal local-server load flash:/portalpage.zip
#
drop illegal-mac alarm
#
wlan ac-global carrier id other ac id 0
#
set cpu-usage threshold 80 restore 75
#
ip vpn-instance a
ipv4-family
route-distinguisher 1:1
vpn-target 100:1 export-extcommunity
vpn-target 100:1 import-extcommunity
#
ip vpn-instance b
ipv4-family
route-distinguisher 2:2
vpn-target 200:2 export-extcommunity
vpn-target 200:2 import-extcommunity
#
mpls lsr-id 10.1.1.1
mpls
#
mpls ldp
#
#
aaa
authentication-scheme default
authorization-scheme default
accounting-scheme default
domain default
domain default_admin
local-user admin password cipher %$%$K8m.Nt84DZ}e#<0`8bmE3Uw}%$%$
local-user admin service-type http
#
firewall zone Local
priority 15
#
interface GigabitEthernet0/0/0
ip binding vpn-instance a
ip address 10.1.14.2 255.255.255.0
#
interface GigabitEthernet0/0/1
ip binding vpn-instance b
ip address 10.1.15.2 255.255.255.0
#
interface GigabitEthernet0/0/2
ip address 10.1.12.1 255.255.255.0
mpls
mpls ldp
#
interface NULL0
#
interface LoopBack0
ip address 10.1.1.1 255.255.255.0
#
bgp 1
router-id 1.1.1.1
peer 10.3.3.3 as-number 1
peer 10.3.3.3 connect-interface LoopBack0
#
ipv4-family unicast
undo synchronization
peer 10.3.3.3 enable
#
ipv4-family vpnv4
policy vpn-target
peer 10.3.3.3 enable
peer 10.3.3.3 advertise-community
#
ipv4-family vpn-instance a
import-route ospf 2
#
ipv4-family vpn-instance b
import-route ospf 3
#
ospf 1 router-id 1.1.1.1
area 0.0.0.0
network 10.1.1.1 0.0.0.0
network 10.1.12.0 0.0.0.255
#
ospf 2 router-id 1.1.1.1 vpn-instance a
import-route bgp
area 0.0.0.0
network 10.1.14.0 0.0.0.255
#
ospf 3 router-id 1.1.1.1 vpn-instance b
import-route bgp
area 0.0.0.0
network 10.1.15.0 0.0.0.255
#
user-interface con 0
authentication-mode password
user-interface vty 0 4
user-interface vty 16 20
#
wlan ac
#
return
版权声明:本文内容由互联网用户自发贡献,该文观点仅代表作者本人。本站仅提供信息存储空间服务,不拥有所有权,不承担相关法律责任。如发现本站有涉嫌侵权/违法违规的内容, 请发送邮件至 举报,一经查实,本站将立刻删除。
发布者:全栈程序员-用户IM,转载请注明出处:https://javaforall.cn/100127.html原文链接:https://javaforall.cn
【正版授权,激活自己账号】: Jetbrains全家桶Ide使用,1年售后保障,每天仅需1毛
【官方授权 正版激活】: 官方授权 正版激活 支持Jetbrains家族下所有IDE 使用个人JB账号...